
The Ultimate Guide to Homemade Potato and Cheese Pierogi: A Comfort Food Classic
There’s nothing quite like the warmth and satisfaction of a truly homemade meal, and this Homemade Pierogi recipe delivers comfort in every tender, savory bite. Imagine delicate dough parcels brimming with a creamy potato and sharp cheddar cheese filling, pan-fried to golden perfection in rich butter, and served alongside a dollop of cool, tangy sour cream. This traditional Polish dish, beloved across Eastern Europe, transcends cultural boundaries to become an irresistible favorite in any home. If you appreciate the convenience of store-bought pierogi, prepare to fall in love with the unparalleled flavor and texture of these pillow-soft, scratch-made dumplings. They’re not just a meal; they’re an experience, promising to be an instant family classic and a go-to comfort food.

What Are Pierogi? A Culinary Journey
At its heart, a pierogi is a type of dumpling, crafted from a soft, pliable dough and typically stuffed with a variety of savory or sweet fillings. Often compared to ravioli or potstickers, these half-moon shaped delights are a culinary cornerstone throughout Eastern Europe, especially in Poland, where they hold a cherished place in national cuisine and family traditions. The most classic and widely recognized version, like the one we’re making today, features a simple yet profoundly satisfying potato and cheese filling.
The journey of a pierogi usually involves two cooking stages: first, they are gently boiled until they float, signaling their tenderness. Then, for an extra layer of flavor and texture, they are often pan-fried in butter until their edges turn beautifully golden and slightly crisp. This dual cooking method creates a delightful contrast between the soft interior and the outer crust.
While potato and cheese pierogi are incredibly popular, the versatility of these dumplings knows no bounds. Fillings can range from savory options like ground meat, sauerkraut, mushrooms, and onions to sweet concoctions featuring fresh berries, sweetened cheese, or fruit preserves. This adaptability makes pierogi a perfect dish for any time of day, whether as a hearty main course, a delightful side dish, or even a unique dessert.
A Fun Fact on Terminology: The word “pierogi” is actually already plural in Polish. Adding an “s” to form “pierogies” is an anglicized pluralization, widely accepted in English-speaking countries. So, whether you say “pierogi” or “pierogies,” you’re referring to the same delicious dumplings!
Why Choose Homemade Pierogi?
While store-bought pierogi offer a convenient shortcut, making them from scratch is an incredibly rewarding experience that yields a vastly superior product. Here’s why you should embrace the homemade journey:
- Unmatched Flavor and Freshness: Homemade pierogi boast a freshness that simply can’t be replicated by frozen, mass-produced versions. You control the quality of ingredients, from the flour in the dough to the cheese and potatoes in the filling, resulting in a vibrant, authentic taste.
- Perfect Texture: The dough is key. A homemade dough is tender, elastic, and achieves that perfect pillowy consistency when boiled, followed by a delightful crispness when pan-fried. Store-bought versions often have a tougher, chewier texture.
- Customization: Making pierogi from scratch allows for endless customization. You can adjust the seasoning in the filling to your exact preference, experiment with different cheese blends, or even venture into entirely new sweet or savory fillings.
- A Rewarding Experience: The process of making pierogi, from kneading the dough to crimping the edges, is a labor of love that can be a wonderful culinary adventure, especially when shared with family and friends. The end result is not just a meal, but a proud accomplishment.
- Cost-Effective: While requiring a bit more time, homemade pierogi are often more economical to make in larger batches than buying multiple packs from the store, especially when ingredients are sourced wisely.
Like many cherished homemade dishes, creating pierogi involves several steps. However, each step contributes to the exquisite final product, making the effort truly worthwhile.

Crafting the Perfect Pierogi Dough
The foundation of an exceptional pierogi is its dough. Our recipe utilizes a simple yet robust dough made from common pantry staples: flour, egg, oil, salt, and water. The key to a tender, pliable dough lies in proper mixing and resting.
Step-by-Step Dough Preparation:
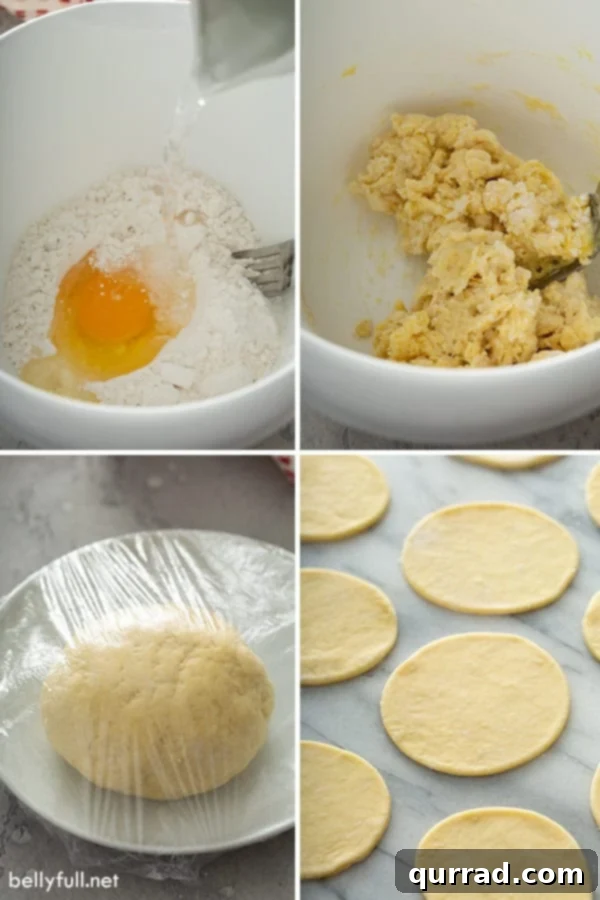
- Combine Dry Ingredients: In a medium-sized mixing bowl, whisk together the all-purpose flour and salt. Create a small well in the center of the flour mixture.
- Add Wet Ingredients: Into the well, crack the large egg and pour in the vegetable oil. Gradually add warm water, starting with about two tablespoons, and begin mixing the dough with a fork. Continue mixing, incorporating flour from the sides, until a shaggy dough forms. Add a touch more warm water, a teaspoon at a time, only if the dough appears too dry and isn’t coming together. The goal is a cohesive, slightly firm dough.
- Knead to Smoothness: Transfer the dough from the bowl to a lightly floured work surface. Knead the dough gently with your hands for about 1-2 minutes until it becomes smooth and elastic. Avoid over-kneading, which can make the dough tough.
- Rest the Dough: Shape the dough into a ball, cover it tightly with plastic wrap, and let it rest in the refrigerator for a minimum of 30 minutes. This resting period is crucial as it allows the gluten to relax, making the dough easier to roll out and contributing to its tender texture.
- Roll and Cut: Once rested, remove the dough from the fridge. On a lightly floured surface, roll the dough out evenly to approximately 1/8-inch thickness. Use a 3-inch round cookie cutter or the rim of a glass to cut out as many circles as possible. Gather the dough scraps, gently re-knead them, and re-roll to cut additional circles, minimizing waste.
Creating the Creamy Potato and Cheese Filling
For this classic pierogi recipe, we’re focusing on a beloved cheesy potato filling. The key is to have flavorful, well-seasoned mashed potatoes as your base. Whether you’re using freshly made potatoes or repurposing leftovers, ensure they are warm for easier mixing.
Filling Preparation:
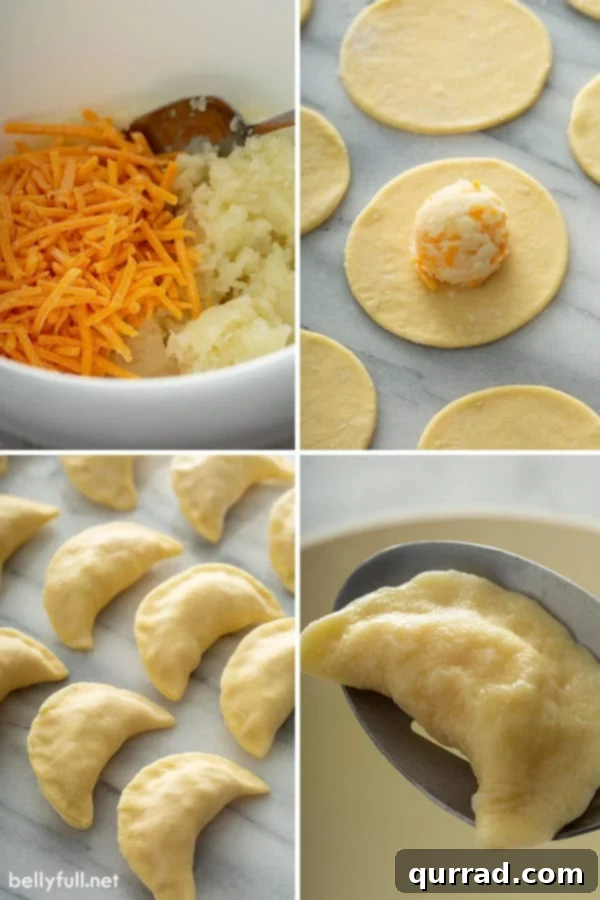
- Prepare Mashed Potatoes: If starting with plain mashed potatoes, mix them with a tablespoon of butter, salt, and freshly ground black pepper to taste. If you’re using leftover mashed potatoes that are already seasoned, you can skip this step. The potatoes should be smooth and free of lumps.
- Incorporate Cheese: Add the shredded cheddar cheese to the warm mashed potatoes. Gently mix until just combined. Overmixing can make the filling gummy. The warmth of the potatoes will help the cheese melt slightly and integrate beautifully.
- Portion the Filling: Place a generous tablespoon of the potato and cheese filling in the center of each dough circle. Using a tablespoon-sized cookie scoop can help ensure consistent portions, leading to uniformly sized pierogi.
- Form the Pierogi: Carefully fold one half of the dough circle over the filling to meet the other half, creating a half-moon shape. Pinch the edges firmly together to seal the pierogi. If the dough seems dry and isn’t sealing well, dip the tip of your finger in water and moisten the edges before pinching them together. You can also use the tines of a fork to create a decorative, secure crimped edge.
Once formed, your pierogi are ready for their next step! You can cook them immediately, refrigerate them overnight for cooking the next day, or freeze them for later enjoyment.
How to Cook Your Homemade Pierogi
Pierogi are traditionally boiled, and often, for an extra layer of flavor and texture, pan-fried afterward. Here’s how to master both methods:
To Boil Pierogi:
- Prepare Boiling Water: Bring a large pot of generously salted water to a rolling boil. Salting the water seasons the dough and prevents sticking.
- Add Pierogi: Gently drop the pierogi into the boiling water, making sure not to overcrowd the pot. Cook them in batches if necessary. Stir gently with a spoon immediately after adding them to prevent them from sticking to each other or the bottom of the pot.
- Cook to Perfection: The pierogi will sink to the bottom initially. Once they float to the surface, cook them for an additional 3-4 minutes. If your dough is slightly thicker, they might require an extra minute or two. They should be tender and cooked through, but not mushy.
- Serve Immediately or Pan-Fry: At this point, you can serve the boiled pierogi as is, perhaps tossed with a little melted butter, sour cream, and a sprinkle of fresh green onions. Or, proceed to the pan-frying step for an enhanced experience.
To Pan-Fry Pierogi (Recommended for Maximum Flavor):
- Heat Skillet with Butter: In a large skillet, melt 2-3 tablespoons of butter over medium heat. You can also add some finely diced yellow onion to the butter and sauté until softened and slightly caramelized for an extra layer of flavor.
- Sauté Pierogi: Add the boiled pierogi to the hot skillet in a single layer, again, being careful not to overcrowd the pan.
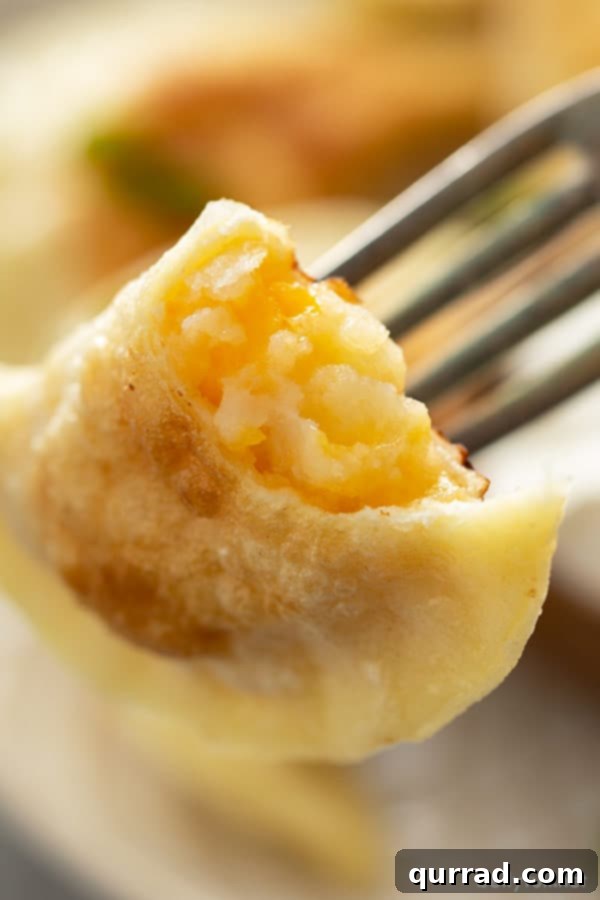
- Achieve Golden Brown: Cook the pierogi for 3-5 minutes on each side, or until they are beautifully golden brown and heated through. The edges should be slightly crispy, providing a wonderful textural contrast to the soft interior.
- Serve: Transfer the pan-fried pierogi to a serving platter.

Expert Tips for Perfect Homemade Pierogi
- Plan Ahead: To simplify your cooking day, prepare the potato and cheese filling 1-2 days in advance. Store it in an airtight container in the refrigerator. This allows the flavors to meld and saves precious time.
- Consistent Filling: Utilize a tablespoon-sized cookie scoop to portion the filling evenly into each dough circle. This ensures that all your pierogi are uniform in size and cook consistently.
- Secure Sealing: Pay close attention when pinching the edges of the dough together. A tight seal is essential to prevent the filling from escaping during the boiling process. If needed, a little water on your fingertip can help the dough stick.
- Flour Your Surface: Always work on a lightly floured surface when rolling out and shaping the dough to prevent sticking.
- Don’t Overcrowd: When boiling or pan-frying, cook pierogi in batches to avoid overcrowding the pot or skillet. Overcrowding can lower the water temperature, leading to gummy pierogi, or prevent even browning.
- Experiment with Fillings: While potato and cheese is a classic, don’t hesitate to get creative! Explore savory variations with ground meat, sautéed mushrooms, or sauerkraut. For a sweet treat, try fresh berries with a touch of sugar or sweetened farmer’s cheese.
- Make a Double Batch: Pierogi freeze beautifully, both raw and cooked. Making a larger batch at once allows you to enjoy some immediately and freeze the rest for quick, convenient meals later.
- Reinvent Leftovers: Boiled pierogi can be pan-fried the next day for a delicious twist. Simply warm them in butter until golden and crispy.
How to Freeze Pierogi for Later
One of the greatest advantages of making homemade pierogi is the ability to freeze them, ensuring you always have a stash of these delightful dumplings on hand. Freezing raw, formed pierogi is incredibly effective and preserves their quality beautifully.
Freezing Raw Pierogi:
- Flash Freeze: Lightly dust a baking sheet with flour. Arrange the freshly formed, uncooked pierogi in a single layer on the baking sheet, ensuring they do not touch each other. This prevents them from sticking together.
- Initial Freeze: Cover the baking sheet loosely with plastic wrap and place it in the freezer for about 1-2 hours, or until the pierogi are completely solid. This “flash freezing” step is key.
- Store: Once the pierogi are frozen solid, transfer them to a large, freezer-safe plastic bag or an airtight container. Label with the date.
- Shelf Life: Frozen pierogi will keep well in the freezer for approximately 1 month. When you’re ready to cook them, simply boil them directly from frozen, adding a few extra minutes to the cooking time (about 5-7 minutes after they float).
Just like my classic meatball recipe, I often double this pierogi recipe to ensure I have a ready supply in the freezer. It’s incredibly convenient to pull out just what I need for a satisfying dinner or even a unique breakfast!
What to Serve with Your Pierogi
Pierogi are wonderful on their own, especially when pan-fried with butter and onions and served with sour cream. However, they also pair beautifully with a variety of side dishes that complement their rich flavor and comforting nature:
- Roasted Cabbage with Crispy Bacon: The earthy sweetness of roasted cabbage and the salty crunch of bacon offer a perfect contrast to the creamy pierogi.
- Sautéed Cabbage and Apples: A classic combination, the slight tartness of apples and the tender, caramelized cabbage provide a sweet and savory balance.
- Roasted Brussels Sprouts (with apples, craisins, and pecans): For a healthier side with a festive feel, these roasted Brussels sprouts add a delightful crunch and a mix of sweet and nutty flavors.
- Cabbage and Kielbasa Skillet: This hearty skillet meal features savory Polish sausage and tender cabbage, creating a robust and satisfying accompaniment that enhances the Eastern European theme.
- Caramelized Onions: Slow-cooked until sweet and golden, caramelized onions are a quintessential topping for pierogi, adding depth and richness.
- Crispy Bacon Bits: A sprinkle of crispy bacon bits over your pierogi adds a delightful smoky flavor and crunchy texture.
- Fresh Dill or Chives: A garnish of fresh herbs brightens the dish and adds a fresh aromatic note.
Other Delicious Potato Recipes We Love!
If you’re a fan of the humble potato, here are some other recipes you might enjoy:
- The Best Mashed Potatoes
- Classic Potato Latkes
- Loaded Mashed Potato Cakes
- Perfect Baked Potato
Homemade Pierogi Recipe
This homemade Pierogi recipe is filled with cheese and potatoes, pan-fried in butter, then served alongside sour cream for dipping. They are so irresistible!
Recipe Details
- Prep Time: 25 mins
- Cook Time: 15 mins
- Resting Time: 30 mins
- Total Time: 1 hr 10 mins
- Servings: 15 Pierogi
Ingredients
For the Pierogi Dough
- 1 cup all-purpose flour, plus more for kneading and rolling
- 1/4 teaspoon salt
- 1 large egg
- 1/2 tablespoon vegetable oil
- 3 tablespoons warm water (adjust as needed)
For the Pierogi Filling
- 1 cup warm mashed potatoes
- 1 tablespoon butter
- Salt and pepper, to taste
- 1 cup shredded cheddar cheese
For Serving
- 3 tablespoons butter, for frying pan
- 1/2 cup yellow onion, finely diced (optional, to sauté)
- Diced scallions, for serving
- Sour cream, for serving
Instructions
For the Dough:
- Mix flour and salt in a medium bowl. Make a well in the center and add the egg and oil. Add about 2 tablespoons of warm water and start mixing dough with a fork until it comes together. (Adding a touch more water, only if needed, to form a cohesive dough).
- When the dough comes together, transfer it to a work surface and knead a little with your hands until smooth, about 1-2 minutes.
- Cover the dough with plastic wrap and let rest for 30 minutes.
For the Filling:
- Mix mashed potatoes with 1 tablespoon butter and salt and pepper, to taste (skip this step if you are using leftover mashed potatoes that have already been seasoned). Add cheddar cheese and mix until just combined.
To Form the Pierogi:
- On a lightly floured surface roll the dough out about 1/8-inch thick.
- Using a cooking cutter or cup, cut as many circles as you can, 3-inches in diameter. (Re-roll the rest of the dough and cut more circles.)
- Using a cookie scoop, place a tablespoon of filling in the middle of each dough circle.
- Fold the dough over the filling and pinch the edges together firmly. (If dough doesn’t stick together well enough, dip the tip of your finger in water and run around the edges.) Repeat with remaining dough and filling.
- At this point you can cook them, refrigerate overnight, or freeze for about a month.
To Boil Pierogi:
- Bring a large pot of salted water to boil. Add pierogi and stir gently with a spoon so they don’t stick together or to the bottom of the pot.
- Wait until they float to the top and then cook about 3-4 minutes more (if your dough is on the thicker side, they might need more time).
To Pan-Fry Pierogi:
- In a large skillet, warm 3 tablespoons butter over medium heat. If desired, add diced yellow onion and sauté until softened and lightly caramelized. Add the boiled pierogi and sauté on both sides, until they are lightly browned and heated through.
- Serve boiled or pan-fried pierogi with butter, sour cream, and diced scallions.
Notes
- For additional recipe tips and variations, please refer to the full article above.
- Raw formed pierogi freeze beautifully! To freeze: Dust a baking sheet with flour and arrange pierogi in a single layer so they are not touching. Cover loosely with plastic wrap and place in the freezer for about 1-2 hours. Once frozen, transfer to a large plastic freezer-safe bag. (Flash-freezing keeps them from sticking together once fully frozen.) They will keep in the freezer for about 1 month.
Nutrition (approximate per serving)
Calories: 109kcal | Carbohydrates: 9g | Protein: 4g | Fat: 6g | Saturated Fat: 4g | Cholesterol: 28mg | Sodium: 118mg | Potassium: 88mg | Fiber: 1g | Sugar: 1g | Vitamin A: 187IU | Vitamin C: 3mg | Calcium: 61mg | Iron: 1mg
Nutritional information is an automatic calculation and can vary based on the exact products you use and any changes you make to the recipe. If these numbers are very important to you, I would recommend calculating them yourself.
Conclusion: The Joy of Homemade Pierogi
Making pierogi from scratch is a culinary journey that connects you to generations of tradition and culminates in a truly unforgettable dish. The tender, hand-crafted dough, the rich and creamy potato and cheese filling, and the golden, buttery crust all combine to create a symphony of textures and flavors that far surpasses any store-bought alternative. Whether you’re gathering with loved ones to pinch pierogi together or simply savoring a quiet meal, these homemade dumplings are a testament to the simple joys of comfort food. So, roll up your sleeves, gather your ingredients, and embark on the delightful process of creating your own batch of irresistible homemade pierogi. You’ll be glad you did!