
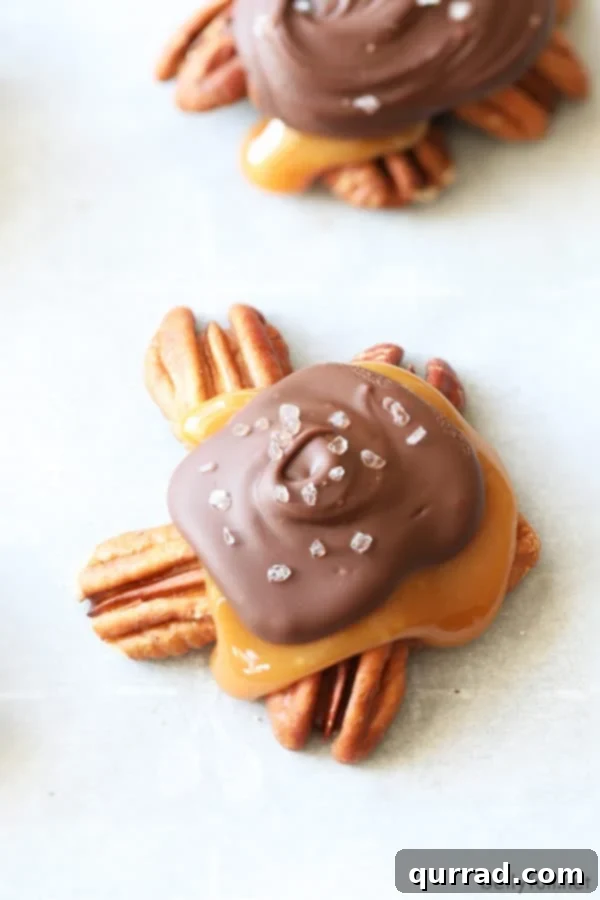
Delight your senses with Homemade Turtles Candy, an incredibly fast, effortlessly easy, and utterly irresistible 3-ingredient treat perfect for virtually any occasion! Whether you’re planning for holidays, celebrating birthdays, hosting baby showers, cheering on game day, or simply craving something sweet and decadent, these classic pecan, caramel, and chocolate clusters are guaranteed to satisfy. Forget store-bought; crafting these iconic candies at home allows for ultimate freshness, customization, and a deeply satisfying experience that will impress friends and family alike.
What Exactly Is Turtle Candy?
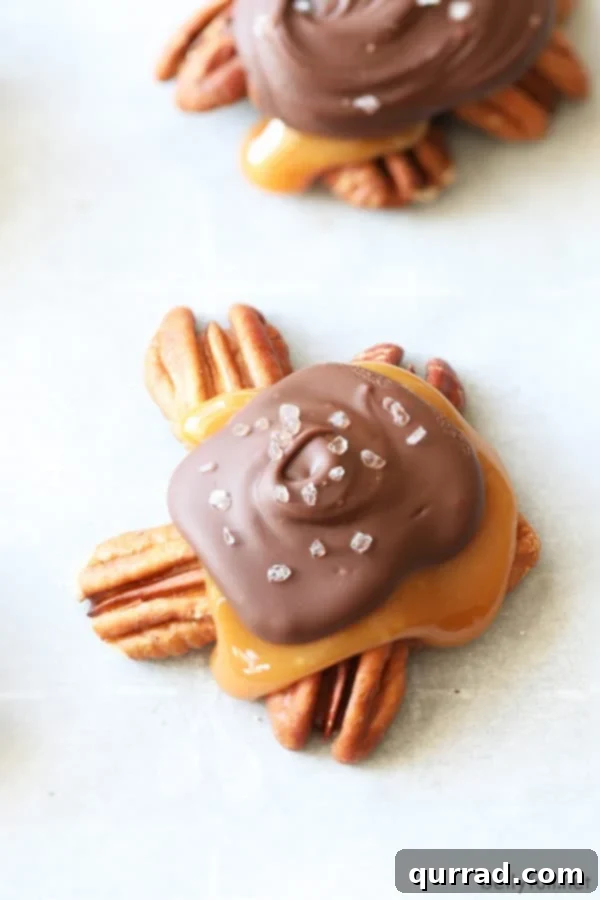
Turtle Candy is a beloved confectionery staple, easily recognized by its distinctive shape and harmonious blend of flavors and textures. Traditionally, it consists of a cluster of pecan halves, generously topped with a rich, chewy layer of caramel, all enrobed in a smooth, decadent coating of chocolate. This delightful treat gets its whimsical name from its appearance – the pecan cluster resembles a turtle’s body, while the caramel and chocolate form its “shell.”
While you can find variations in nearly every reputable chocolate shop, the beauty of Homemade Turtle Candy lies in its simplicity and accessibility. With just three core ingredients – pecans, caramels, and chocolate – you can recreate this gourmet confection in your own kitchen, often surpassing the quality of store-bought versions. The combination of the nutty crunch from the pecans, the buttery chewiness of the caramel, and the luxurious melt of the chocolate creates a symphony of textures and tastes that is truly addicting. It’s a testament to how simple ingredients can come together to form something truly extraordinary.
Why Make Homemade Turtle Candy?
Beyond the sheer joy of creating something delicious from scratch, there are numerous compelling reasons to opt for homemade turtle candies:
- **Unmatched Freshness:** Store-bought candies, while convenient, often lack the vibrant freshness of a homemade batch. When you make them yourself, you control the quality of ingredients, ensuring the pecans are crisp, the caramel is soft and pliable, and the chocolate is perfectly tempered and shiny.
- **Cost-Effective Indulgence:** Gourmet chocolates can be quite expensive. Making your own turtle candies is a surprisingly economical way to enjoy this luxurious treat, especially when preparing larger quantities for gatherings or gifts.
- **Customization is Key:** Homemade means you’re the chef! You can tailor the ingredients to your exact preferences – from the type of chocolate (milk, dark, white) to adding a sprinkle of sea salt or even experimenting with different nuts. This level of personalization is simply not possible with pre-packaged options.
- **A Fun and Rewarding Activity:** Candy making, especially with a recipe as straightforward as this one, can be a delightful activity for all ages. It’s a fantastic way to spend an afternoon with family, creating edible masterpieces and lasting memories. The satisfaction of biting into a candy you crafted yourself is truly unmatched.
- **Impressive Gifts:** Hand-packed boxes of homemade turtle candies make exquisite and thoughtful gifts for any occasion. They demonstrate care and effort, making them far more special than anything bought from a store.
Essential Ingredients for Perfect Turtles
The magic of this recipe lies in its simplicity, utilizing just three core ingredients:
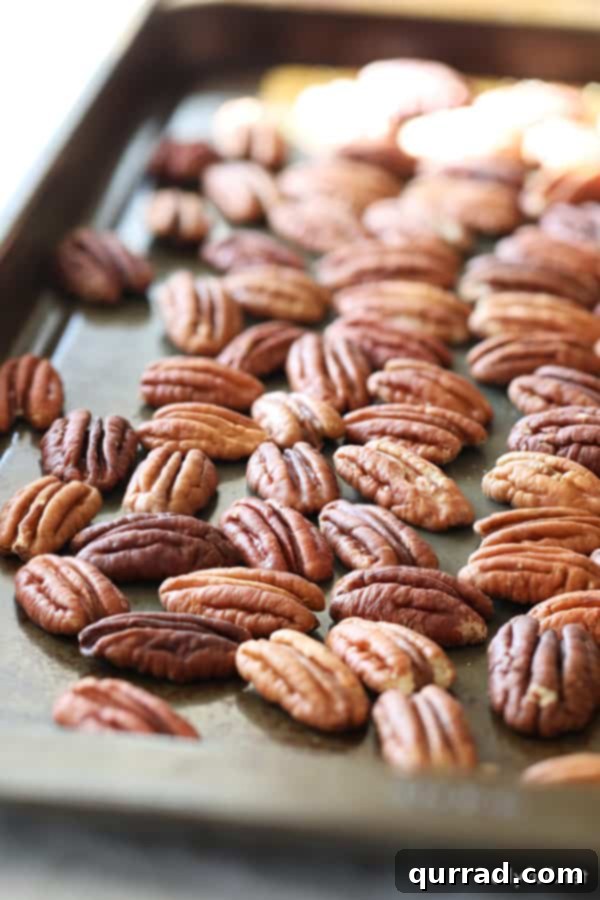
Pecan Halves: These are the “foundation” of your turtles. Opt for high-quality, fresh pecan halves. While not strictly required, toasting them before assembly is a game-changer. Toasting intensifies their nutty flavor and adds an extra layer of crispness, making your turtles truly exceptional. Avoid pre-salted pecans unless you are specifically aiming for a sweet and salty profile, and even then, control the salt addition yourself.
Caramels: You’ll need soft, chewy caramels that melt smoothly. Individually wrapped soft caramels (like Kraft Caramels) are ideal here. The softer the caramel, the easier it will be to melt and spoon onto your pecan clusters, resulting in a perfectly gooey center. Ensure they are unwrapped completely before melting to avoid any paper residue.
Chocolate: The final decadent layer. Semi-sweet chocolate morsels are a classic choice, offering a balanced sweetness that complements the rich caramel and pecans. However, you can easily customize this! Milk chocolate provides a sweeter, creamier finish, while dark chocolate adds a sophisticated depth and slight bitterness that can cut through the sweetness of the caramel. Chocolate chips, baking bars, or even couverture chocolate can be used, just ensure it’s good quality for the best melting and setting properties.
How To Make Irresistible Homemade Turtle Candy
Crafting these delightful candies is surprisingly simple, requiring no special equipment or advanced candy-making skills. Just follow these steps for perfect results every time:
-
Toast the Pecans for Enhanced Flavor
This initial step, though optional, is highly recommended as it truly elevates the flavor of your turtles. Preheat your oven to 350°F (175°C). Spread your pecan halves in a single layer on a baking sheet. Bake for approximately 8-10 minutes, or until they become fragrant and slightly darkened. Keep a close eye on them, as nuts can burn quickly! Alternatively, you can toast them in a hot non-stick skillet over medium heat, stirring constantly for about 5 minutes, until aromatic. Allow them to cool slightly before the next step.
-
Arrange Your Pecan Clusters
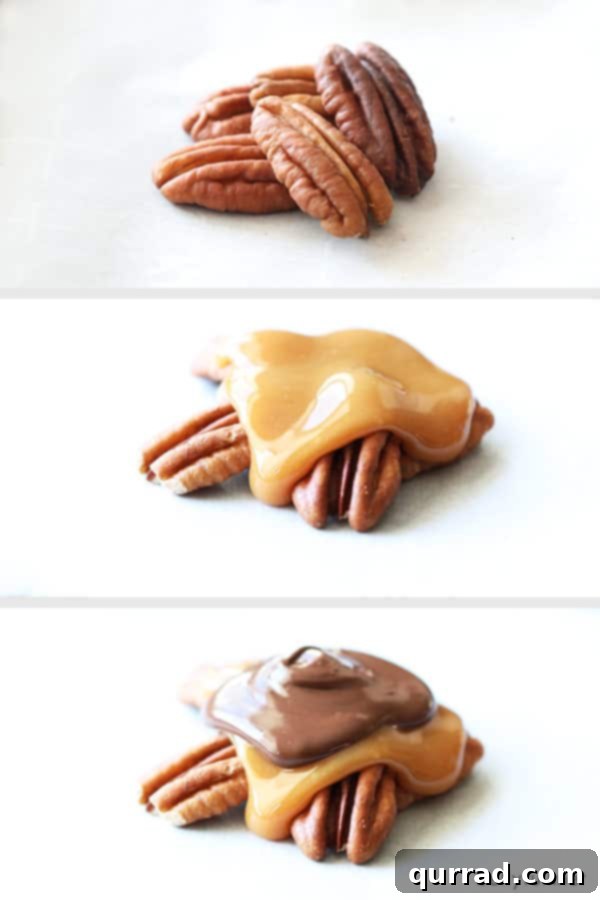
Line two baking sheets with parchment paper. This is crucial for easy removal and prevents sticking. On each lined sheet, arrange the toasted pecan halves into approximately 18 small clusters. Aim for about 5 pecan halves per cluster, depending on their size, creating a rough turtle-like shape. Overlap the pecans slightly to minimize gaps, which will help prevent the melted caramel from seeping through. Ensure your baking sheets can fit comfortably into your refrigerator or freezer later.
-
Melt the Caramel to Perfection
Combine the unwrapped caramels and 1 tablespoon of water in a microwave-safe bowl. Make sure the bowl is completely clean and dry to avoid any issues with melting. Microwave the caramels in 30-second intervals, stirring vigorously after each interval. Initially, the caramels will be stiff and challenging to stir, but with persistence, they will soften and eventually become a smooth, glossy, and cohesive mixture. The caramel will be quite runny at first but will thicken considerably as it cools. Work quickly once melted.
-
Spoon the Caramel onto the Pecans
As soon as your caramel is perfectly melted and smooth, work swiftly to spoon about two teaspoons of the hot caramel over each pecan cluster. Ensure that each pecan half in the cluster is covered with the warm, gooey caramel. Don’t strive for absolute perfection; these homemade candies are charmingly rustic! The key is to act quickly before the caramel begins to cool and set, which will make it harder to work with.
-
Add the Decadent Chocolate Layer
Once the caramel has been applied, allow the turtles to sit for a bit, giving the caramel a chance to harden slightly. This prevents the chocolate and caramel from mixing too much. While the caramel is setting, melt your chocolate morsels. Place the chocolate in a separate small microwave-safe bowl (again, ensuring it’s free of moisture). Microwave at half power, stirring every 30 seconds, until the chocolate is smooth and fully melted. Avoid overheating the chocolate, as this can cause it to seize. Once melted, spoon about two teaspoons of the smooth chocolate on top of each caramel-covered pecan cluster, creating the final “shell” of your turtle.
-
Optional: A Hint of Sea Salt
If you desire a delightful sweet and salty contrast, now is the perfect time to sprinkle a tiny pinch of flaky sea salt over the wet chocolate layer on each turtle. This simple addition can truly enhance the overall flavor profile.
-
Allow the Turtle Candy to Firm Up
For the candies to set properly, they need time to cool and firm. You can allow them to firm up at room temperature, which will take several hours, resulting in a slightly softer caramel. For quicker results, place the baking sheets in the refrigerator for at least 30 minutes, or in the freezer for about 15 minutes. Regardless of the method, for the absolute best taste and texture – and to prevent anyone from potentially cracking a tooth on a very cold, hard caramel – serve the turtles at room temperature.
Tips for Turtle Candy Success
Achieving perfect homemade turtle candies is easy with a few expert tips:
- **Quality Ingredients Matter:** Since there are only three ingredients, the quality of each shines through. Use fresh pecans, good-quality soft caramels, and chocolate you genuinely enjoy eating on its own.
- **Prevent Sticking:** Always line your baking sheets with parchment paper or a silicone baking mat. This is non-negotiable for easy removal of the candies once set.
- **Work Quickly with Caramel:** Melted caramel begins to set relatively fast. Have your pecan clusters ready and your spoon handy so you can apply the caramel efficiently before it becomes too stiff to work with. If it starts to harden, a quick 10-15 second reheat in the microwave can soften it again.
- **Avoid Water in Chocolate:** When melting chocolate, ensure your bowl and utensils are completely dry. Even a tiny drop of water can cause chocolate to seize, turning it into a grainy, unusable mass.
- **Don’t Overheat Chocolate:** Melt chocolate slowly, especially in the microwave. Use half power and stir frequently. Chocolate retains its shape even when melted, so stirring is key to checking its consistency without burning.
- **Serve at Room Temperature:** As mentioned in the instructions, while chilling helps them set faster, allowing turtles to come to room temperature before serving ensures the caramel is perfectly chewy and soft, making for a much more enjoyable bite.
Creative Turtle Candy Recipe Variations
While the classic pecan, caramel, and chocolate combination is undeniably perfect, there are countless ways to customize your Homemade Turtle Candy to suit different tastes and occasions. Don’t be afraid to experiment!
- **Crunchy Pretzel Base:** For an added salty crunch, arrange small pretzel twists or pieces as the base of your clusters instead of or alongside the pecans. The salty pretzels create a delightful contrast with the sweet caramel and chocolate.
- **Alternate Nuts:** While pecans are traditional, feel free to substitute or combine them with other nuts. Walnuts, almonds, or even cashews can create an interesting twist on the classic flavor profile. Ensure any alternative nuts are also toasted for best flavor.
- **Different Chocolate Types:** Instead of semi-sweet, try using creamy white chocolate for a sweeter, visually striking turtle, or rich dark chocolate for a more intense, bittersweet experience. A mix of dark and milk chocolate can also be excellent.
- **Espresso Infusion:** Add a teaspoon of instant espresso powder or finely ground coffee to your melted chocolate for a sophisticated mocha flair. This subtle addition beautifully enhances the chocolate’s depth.
- **Spice It Up:** A pinch of cinnamon, nutmeg, or even a tiny dash of cayenne pepper (for a Mexican chocolate kick) can be stirred into the melted chocolate for an intriguing flavor dimension.
- **Extra Toppings:** Before the chocolate sets, sprinkle on additional toppings like chopped toffee bits, mini chocolate chips, colorful sprinkles for a festive touch, or a dusting of cocoa powder.
- **Nut Butter Caramel:** For a unique flavor, you could try stirring a tablespoon of your favorite nut butter (like peanut or almond butter) into the melted caramel before spooning it over the pecans.

How To Store Homemade Turtle Candy
Proper storage is key to maintaining the freshness and deliciousness of your homemade turtle candies. With the right technique, you can enjoy these treats for an extended period.
**At Room Temperature or in the Refrigerator:** You can store your finished turtles in an airtight container at room temperature for up to 2 weeks. However, if your home is particularly warm, or during hot weather, it’s best to store them in the refrigerator to prevent the chocolate from melting and becoming sticky. When refrigerating, ensure they are in an airtight container to keep them from absorbing other odors and to prevent the chocolate from blooming (developing a whitish film due to temperature fluctuations).
**Freezing Turtle Candy:** For longer storage, homemade turtles freeze beautifully. To freeze them, arrange the candies in a single layer on a parchment-lined baking sheet and flash freeze for about 30 minutes until solid. Once firm, transfer them to an airtight freezer-safe container, layering them with parchment paper or wax paper between each layer to prevent sticking. They can be frozen for up to 2 months. When you’re ready to enjoy them, simply defrost at room temperature for a few hours before serving. This gradual thawing helps maintain their texture and prevents the chocolate from cracking.

Homemade Turtles: The Perfect Edible Gift
Who doesn’t love a thoughtful, handmade gift? Homemade Turtle Candies are an excellent choice for holiday gifts, hostess presents, or just a sweet surprise for a loved one. Their gourmet appearance belies their easy preparation, making them a fantastic option for even novice candy makers looking to impress.
To present them as gifts, arrange the cooled and set turtles in decorative candy boxes, small tins, or cello bags tied with festive ribbons. You can even layer them with parchment paper to prevent sticking and add a personalized touch with a handwritten tag detailing the ingredients or a warm holiday greeting. These luscious treats are always a welcome sight and are sure to be devoured with pleasure.
As you can see, candy making can be wonderfully simple and incredibly rewarding! No special thermometer or fancy utensils are needed for this delightful Homemade Turtle Candy recipe. Just three ingredients, a little patience, and you’ll have a batch of irresistible treats that taste far more complicated than they are to make. Enjoy the process and the delicious outcome!
Other Delicious Candy Recipes to Try!
- Old Fashioned Potato Candy
- (See’s Copycat) Polar Bear Paws
- Cream Cheese Mints
- Candied Pecans
We hope you adore this delicious and simple recipe. Your feedback is valuable, so please consider leaving a review below! For more culinary inspiration, don’t forget to follow us on Facebook, Instagram, Pinterest, and YouTube!
Homemade Turtles Candies
10 mins
5 mins
30 mins
45 mins
18

Pin
Ingredients
- 8 ounces pecan halves
- 12 ounces caramels, (unwrapped)
- 1 tablespoon water
- 12 ounces semi-sweet chocolate morsels
- sea salt, , optional
Instructions
-
Preheat oven to 350 degrees F. Place your pecan halves on a baking sheet; transfer to the oven and bake for about 8-10 minutes until toasted and fragrant. (Alternatively, you can add them to a hot non-stick skillet, stirring constantly until they are fragrant, about 5 minutes.)
-
Line two baking sheets with parchment paper (that can also fit in the refrigerator or freezer.) Make 18 small mounds, about 5 pecan halves in each one depending on their size. (Overlap the pecans some to reduce gaps, otherwise the caramel will seep through.)
-
Add the caramels and water to a microwave safe bowl (making sure it’s free of any debris or moisture) and microwave in 30 second increments, stirring each time, until fully melted and stirred together fully. (The first few times you try to stir, it feels impossible, but eventually they do soften and you’ll be able to stir them until smooth. The caramel will be runny when it first comes together, but firms up quite a bit as it cools.)
-
As soon as your caramel is ready, quickly spoon a 2 teaspoons of the hot caramel on top of the clusters, making sure each pecan is covered with some caramel. Don’t worry about them being perfect, just work quickly before the caramel starts to set up.
-
Let the caramels sit for a bit to harden and then add the chocolate later. Just melt the chocolate in a small microwave-safe bowl (making sure it’s free of any debris or moisture) in the microwave at half power, stirring every 30 seconds. Then spoon 2 teaspoons on top of each turtle.
-
Sprinkle a little bit of sea salt on top, if using.
-
Allow the Turtle Candy to firm up at room temp (this will take many hours) or place in the refrigerator for at least 30 minutes (or freezer for 15.)
-
For the best taste and texture, serve the turtles at room temperature.
Notes
- You can store these turtles in airtight container in the refrigerator or at room temperature for up to 2 weeks. (Keep them away from warm temperatures or the chocolate will start to melt.)
- To freeze Turtle Candy: layer them in an airtight container with parchment paper or wax paper (this will prevent them from sticking together.) Freeze for up to 2 months, then defrost at room temperature before serving.
- It’s best to serve these at room temperature, otherwise someone could crack a tooth trying to bite into them!
Nutrition
Calories:
269
kcal
|
Carbohydrates:
26
g
|
Protein:
3
g
|
Fat:
18
g
|
Saturated Fat:
5
g
|
Cholesterol:
2
mg
|
Sodium:
48
mg
|
Potassium:
199
mg
|
Fiber:
3
g
|
Sugar:
20
g
|
Vitamin A:
24
IU
|
Vitamin C:
1
mg
|
Calcium:
47
mg
|
Iron:
2
mg
Nutritional information given is an automatic calculation and can vary based on the exact products you use and any changes you make to the recipe. If these numbers are very important to you, I would recommend calculating them yourself.
Did you make this? Leave a rating below!