
Unlock the secret to professionally decorated cookies with this incredibly easy Sugar Cookie Icing recipe! Whether you’re a seasoned baker or just starting your cookie decorating journey, this simple glaze is your ticket to stunning, stackable, and deliciously adorned treats. Crafted from readily available pantry staples, you can whip up this brilliant icing in mere minutes, and it dries to a hard, glossy finish, making your beautifully decorated cookies perfect for gifting or display. Get ready to transform your homemade sugar cookies into edible masterpieces for Christmas, Easter, birthdays, or any special occasion that calls for a touch of sweetness and charm.
Pair this versatile sugar cookie glaze with our signature easy sugar cookie recipe, and you’ll have an unbeatable combination that guarantees delectable results. Imagine the smiles when your family enjoys these perfectly iced treats, or the joy they bring as thoughtful, homemade holiday gifts. This article will guide you through every step of making, coloring, and applying this fantastic sugar cookie icing, complete with helpful tips to achieve flawless results.

Effortless Elegance: Your Go-To Easy Sugar Cookie Icing
Have you ever admired those intricately decorated sugar cookies that look like they’ve come straight from a high-end bakery? The kind that are almost too beautiful to eat? Well, prepare to create impressive cookies just like them, because it’s far simpler than you might imagine! The secret lies in a reliable sugar cookie recipe and, crucially, a fantastic easy sugar cookie icing – precisely the one we’re sharing with you today.
This homemade sugar cookie icing is designed for maximum ease and spectacular results. It requires only a handful of basic ingredients, typically found in any kitchen, and comes together effortlessly. What makes it truly exceptional is its ability to dry into a firm, protective shell, which means your artistic creations can be stacked, packaged, and transported without fear of smudging or damage. This sturdy finish is a game-changer for anyone who loves to bake and share custom cookies for parties, holidays, or thoughtful gifts.
Royal Icing vs. Glaze Icing: Choosing Your Cookie Canvas
When it comes to decorating sugar cookies, two primary types of icing dominate the scene: royal icing and glaze icing. While both can create beautiful results, they differ significantly in their composition, application, and final finish. Understanding these differences will help you choose the best sugar cookie icing for your decorating goals.
Royal Icing: The Professional’s Choice
Royal icing is renowned for its crisp, elegant appearance and its ability to hold intricate piped designs with exceptional precision. Traditionally, it’s made from pasteurized raw egg whites, egg white powder, or meringue powder, along with powdered sugar and a bit of liquid. Once dry, royal icing forms a perfectly smooth, matte, candy-like coating that is virtually blemish-free. Its impressive structural integrity makes it the go-to for complex details, delicate lace patterns, and sturdy dimensional elements.
However, royal icing comes with a few challenges. The specialized ingredients often need to be purchased online or from specialty baking stores. Achieving the ideal consistency—thick enough for piping fine lines but thin enough for smooth flooding—requires significant practice and a keen eye. Furthermore, royal icing begins to dry almost immediately upon exposure to air, making it less forgiving for beginners and requiring swift execution. This finicky nature means it can be frustrating for the casual home baker who desires stunning results without the steep learning curve.
Glaze Icing: The Home Baker’s Dream
In contrast, glaze icing, sometimes referred to as ‘glaze for sugar cookies’ or ‘easy sugar cookie glaze,’ offers a far simpler and more forgiving decorating experience. Made with common pantry items, it’s a fuss-free royal icing alternative that delivers beautiful, shiny results. You can whip up a batch of this simple cookie icing in just a minute, and adjusting its consistency is straightforward, allowing you to easily achieve the perfect texture for outlining and flooding.
While glaze icing may be slightly more prone to “flooding” over edges if too thin, it’s ideal for achieving a solid, vibrant coating on your cookies without the need for advanced techniques. The beauty of this sugar cookie glaze is its hard-drying nature, which, although not quite as hard or candy-like as royal icing, is certainly firm enough to stack and bag your cookies without smudging. This makes it an excellent choice for novice decorators, busy parents, or anyone looking to create impressive-looking cookies with minimal stress and maximum enjoyment. It offers a gorgeous, glossy finish that makes every cookie feel special.

Crafting the Perfect Hardening Sugar Cookie Icing: Your Recipe Guide
Ready to create this magical, hard-drying sugar cookie icing? Below is the full recipe and detailed instructions. However, we highly recommend reading through the helpful tips and information that follow to master the art of this easy sugar cookie glaze.
Essential Icing Ingredients:
Gathering the right ingredients is the first step to a flawless sugar cookie icing. Here’s what you’ll need and why each component is vital:
- Powdered Sugar (Confectioners’ Sugar): This is the foundation of our homemade sugar cookie icing. Granulated sugar will not work as it won’t dissolve properly, leading to a gritty texture. For the smoothest, lump-free icing, sifting your powdered sugar is highly recommended. This extra step ensures a silky, professional finish on your cookies.
- Whole Milk: Milk serves as the primary liquid to thin the icing to the perfect consistency. We suggest using whole milk or 2% milk because their fat content contributes to a richer mouthfeel and helps the icing maintain its structure. Avoid skim milk or milk substitutes, as they can alter the texture and consistency of the glaze.
- Light Corn Syrup: This is our secret ingredient for a brilliant, long-lasting shine and that coveted hard finish! Light corn syrup plays a crucial role in preventing the sugar from crystallizing, which results in a smooth, glossy surface and ensures your hardening sugar cookie icing sets beautifully.
- Vanilla Extract: For flavor, vanilla extract is indispensable. If you aim for a pure, bright white icing (especially important if you plan to create vibrant colors), opt for clear vanilla extract. Regular vanilla extract, being brown, will impart a slight beige undertone to your white icing. You can also experiment with other flavor extracts like almond, lemon, or peppermint for different cookie themes.
- Pinch of Salt: While entirely optional, a tiny pinch of salt works wonders to balance the sweetness and enhance all the other flavors in the icing. It’s a subtle addition that truly elevates the overall taste profile.
How to Make Sugar Cookie Icing: Simple Steps to Success
Making this easy sugar cookie icing is incredibly straightforward:
- Combine all the ingredients—sifted powdered sugar, milk, light corn syrup, vanilla extract, and the optional pinch of salt—in a medium-sized bowl.
- Stir them together thoroughly using a whisk or a spoon until the mixture is completely smooth and free of lumps.
- Achieving the Right Consistency: This is key for successful cookie decorating. Your icing should be thick enough to hold a shape but fluid enough to flow smoothly. If the icing appears too thick, add a very small amount of milk, about half a teaspoon to a tablespoon at a time, stirring well after each addition, until it reaches a pipeable consistency. If it’s too thin, gradually add more sifted powdered sugar until you reach the desired texture. A good test: drizzle a small amount of icing from your whisk back into the bowl. A ribbon of icing should hold its shape on the surface for a few seconds (typically 5-10 seconds) before melting back into the rest of the icing. This “five-second rule” indicates it’s ready for decorating!
Unleashing Your Creativity: How to Color Icing
Once you’ve perfected your white glaze icing, it’s time to add a splash of color! This easy sugar cookie glaze is an ideal canvas for vibrant hues. Remember, if you desire a truly bright white icing as a base, ensure you’ve used clear vanilla extract, as regular vanilla can introduce a slight cream or beige tint.
To color your icing, simply divide the white icing into separate bowls, one for each color you plan to use. Then, whisk in a few drops of colored food dye until you achieve your desired shade. Keep in mind that the color will typically deepen slightly as the icing dries on the cookies, so it’s often best to aim for a shade slightly lighter than your ultimate goal.
Food Gel vs. Liquid Dye: We highly recommend using food gel coloring over traditional liquid dyes. Food gel offers a more concentrated coloring agent, which means you’ll need less of it to achieve vibrant, rich colors. This is beneficial because it minimizes the amount of extra liquid introduced into your icing, helping to maintain its perfect consistency. Liquid dyes, while they work, can sometimes dilute the icing, making it thinner and harder to control. Food gels also provide a wider spectrum of vivid colors, making your decorated sugar cookies truly pop!
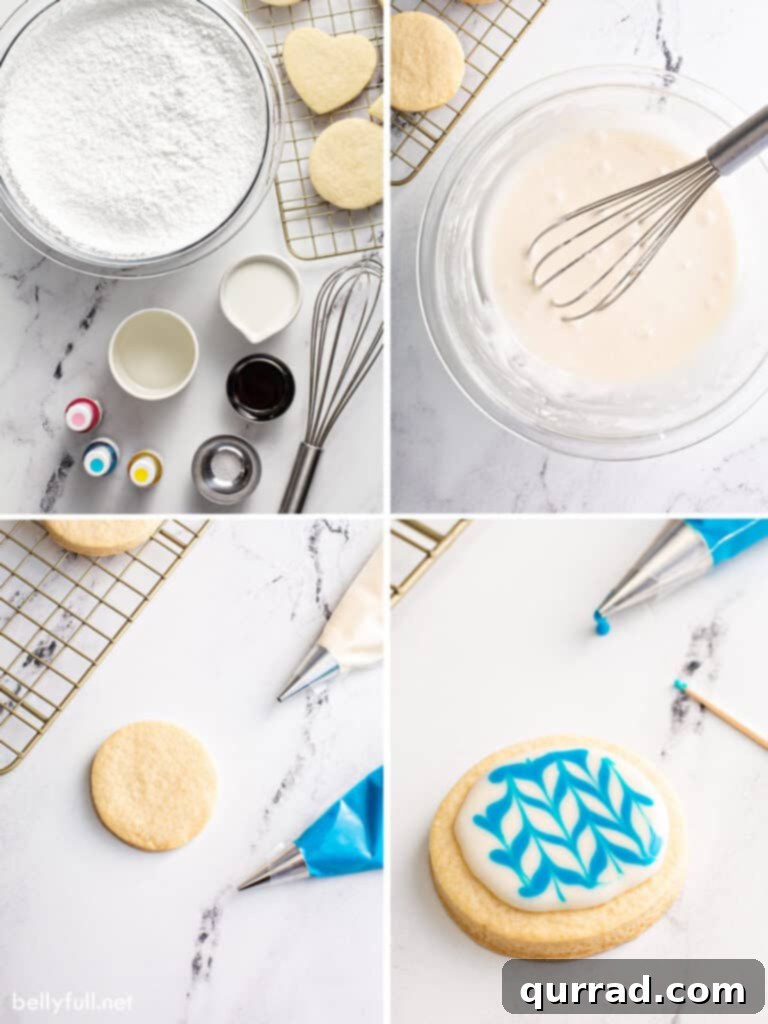
Mastering the Art: How to Ice Sugar Cookies
Decorating sugar cookies with this easy sugar cookie icing is a fun and rewarding process. While simply dunking the tops of your cookies into the glaze provides a quick and neat coating, there are several methods to achieve more controlled and intricate designs:
- The Piping Bag Method: For the most precise application, transfer your prepared icing into a clear plastic disposable piping bag fitted with a small round piping tip (a Wilton #2 or #3 is excellent for outlining, and a #5 works well for flooding larger areas). This allows for steady lines and controlled filling.
- The Ziploc Bag Trick: A fantastic alternative for home bakers without specialized tools is a sturdy Ziploc bag. Simply spoon your icing into one corner of the bag, push out any air, and snip a tiny piece off the very tip of the corner. Be careful not to make the hole too large initially, as you can always enlarge it if needed. Ensure your icing isn’t overly thick, as squeezing it through a small hole could stress the seam of the bag.
- Squeeze Bottles: For those who frequently decorate, dedicated squeeze bottles are a worthwhile investment. They offer excellent control, are reusable, and make the outlining and flooding process incredibly easy and mess-free.
Step-by-Step Decorating Techniques:
Once your icing is ready to pipe or squeeze, follow these steps to decorate your cookies like a pro:
- Outline: Begin by carefully piping a border around the edge of each cooled sugar cookie. This creates a dam that will contain your flood icing. Allow this outline to set for a few minutes (5-10 minutes) to prevent colors from bleeding.
- Flood: After the outline has lightly set, fill the inside area of the cookie with more icing. This technique is called “flooding.” You can use the same piping method or a small spoon.
- Spread and Smooth: Use a clean toothpick, a small decorating scribe, or the tip of your piping tool to gently nudge the icing around, ensuring the entire surface within the outline is evenly covered. Work quickly but carefully to avoid lumps.
- Pop Bubbles: If you notice any small air bubbles forming on the surface of your flooded icing, gently pop them with your toothpick before the icing begins to set. This ensures a perfectly smooth finish.
Inspiring Sugar Cookie Decorating Icing Ideas:
The possibilities are endless with this versatile sugar cookie glaze! Here are a few popular and easy decorating ideas to get you started:
- Solid Color Delight: Simply flood the entire cookie with a single, vibrant color for a classic and elegant look.
- Sprinkle Magic: While the flood icing is still wet, sprinkle on your favorite sanding sugar, nonpareils, or small candies. This creates an immediate festive touch and ensures the decorations adhere firmly.
- Polka Dots or Stripes: After a solid layer of base icing has been flooded, use a contrasting color to add dots or stripes while the base is still wet (for a smooth finish) or once it’s completely dry (for a raised texture).
- Heart Swirls (Wet-on-Wet): Flood your cookie with a base color. Immediately, while the base is still wet, pipe small dots of a contrasting color in a line. Then, drag a toothpick through the centers of the dots to create a beautiful swirled heart pattern.
- Marbled Effect: Flood your cookie with one color. While still wet, drip or pipe lines of another color onto the wet surface. Gently drag a toothpick through the colors to create unique marbled designs.
Experiment and have fun with these techniques! Even simple designs can look stunning with this easy sugar cookie icing.

Patience is a Virtue: How Long Does it Take for Glaze to Harden?
Once your cookies are beautifully decorated with this hardening sugar cookie icing, the waiting game begins! While you can certainly enjoy the glazed cookies right away, for optimal stackability and to prevent smudges, it’s crucial to allow the icing to fully set and harden. This glaze sets up relatively quickly, but achieving a completely firm, transport-ready shell typically takes anywhere from 3 hours to overnight at room temperature.
Several factors can influence the drying time: the thickness and consistency of your icing, the number of layers applied to the cookie, and even the humidity in your environment. Thicker layers of icing and high humidity will naturally prolong the drying process. For best results, place your decorated cookies on a wire rack in a single layer, allowing air to circulate around them. This open-air exposure encourages faster and more even drying. Once they are thoroughly dry and firm to the touch, your gorgeous cookies are ready to be stacked or packaged for gifting, ensuring they arrive in perfect condition.
Proper Storage: Keeping Your Icing and Cookies Fresh
Proper storage is essential to maintain the quality and freshness of both your unused icing and your beautifully decorated sugar cookies. Follow these guidelines to ensure everything stays delicious and pristine:
Storing Unused Icing:
Any leftover easy sugar cookie icing can be stored in an airtight container or, even better, a squeeze bottle with a cap. Place it in the refrigerator, where it will remain fresh for up to 3 days. When you’re ready to use it again, allow the icing to come to room temperature first. You might need to give it a good stir or a quick shake if it has separated slightly, and you may need to add a tiny drop of milk to restore its perfect consistency.
How to Store Iced Sugar Cookies:
Once your iced sugar cookies are completely dry and the glaze has fully hardened, they can be stored in an airtight container at room temperature for up to 2 weeks. For maximum freshness and to preserve their delicate decoration, place sheets of parchment paper or wax paper between layers if you need to stack them. This prevents any potential sticking or transfer of color, even if the icing feels fully dry. Avoid refrigerating decorated sugar cookies, as the condensation can cause the icing to become sticky or dull its beautiful shine.
Visual Guide: Homemade Sugar Cookie Icing Video Tutorial
For those who prefer a visual demonstration, watch our step-by-step video tutorial on how to make and apply this easy sugar cookie icing. Seeing the consistency and decorating techniques in action can be incredibly helpful for first-time decorators.
Pro Tip: If you’re looking for a creamier texture rather than a hard glaze, we also have a fantastic sugar cookie frosting recipe! It boasts a rich, creamy consistency but still forms a “crust” allowing you to stack cookies without major smudging. It’s made in minutes and tastes absolutely amazing!
Easy Sugar Cookie Glaze
Highly rated! This easy Sugar Cookie Icing recipe takes only minutes to make and it dries hard so you can stack or bag your beautifully decorated cookies!
Prep Time: 5 minutes
Total Time: 5 minutes
Yields: Approximately 40 (3-inch) round sugar cookies

Ingredients
- 3 cups powdered sugar, sifted
- 3-4 tablespoons whole milk (start with 3, add more as needed)
- 1 1/2 tablespoons light corn syrup
- 1/2 teaspoon vanilla extract (use clear vanilla extract for bright white icing)
- Pinch of salt (optional, for flavor enhancement)
- Gel food coloring (optional, for vibrant colors)
- Plain cooled sugar cookies, for decorating
Instructions
- In a medium-sized bowl, combine the sifted powdered sugar, 3 tablespoons of whole milk, light corn syrup, and vanilla extract. Stir everything together until the mixture is completely smooth and free of lumps.
- Assess the icing’s consistency. If it’s too thick to easily pipe, add the remaining tablespoon of milk, a tiny bit at a time, until the icing is thick yet flows smoothly. If the icing is too thin, gradually add a little more sifted powdered sugar until the desired consistency is achieved. The “ribbon test” is helpful: drizzle some icing from your whisk; it should hold its shape for about 5-10 seconds before melting back into the bowl.
- If you plan to use multiple colors, divide the white icing into separate bowls at this stage. Add drops of gel food coloring to each bowl and whisk until the desired color is reached. Remember that the color may deepen slightly as it dries.
- Transfer the prepared icing to a piping bag fitted with a small round piping tip (such as Wilton #3 or #5), a Ziploc bag with a snipped corner, or a squeeze bottle.
- Carefully pipe an outline around the border of your cooled sugar cookies, then “flood” the inside area of the cookie with more icing, using a toothpick to spread it evenly and pop any air bubbles.
- If adding sprinkles, sanding sugar, or small candies, apply them immediately while the icing is still wet to ensure they adhere properly.
- Allow the decorated cookies to harden completely at room temperature. This can take anywhere from 3 hours to overnight, depending on the thickness of the icing and ambient humidity. The icing should be firm to the touch before stacking or packaging.
- Note: For in-depth tips on coloring techniques and creative decorating ideas, refer to the full article above!
- Note: This recipe yields enough icing to decorate approximately 40, 3-inch sugar cookies. The nutritional information provided below is calculated for the icing only and does not include the calories or macros from the sugar cookies themselves.
Nutrition Information
Nutritional information is an estimate based on the recipe ingredients and can vary based on the exact products used. If precise nutritional values are crucial for your dietary needs, we recommend calculating them yourself using your specific ingredients.
Per Serving (approx. 1/40th of recipe, for icing only):
- Calories: 38 kcal
- Carbohydrates: 10g
- Protein: 1g
- Fat: 1g
- Saturated Fat: 1g
- Cholesterol: 1mg
- Sodium: 1mg
- Potassium: 2mg
- Sugar: 9g
- Vitamin A: 2 IU
- Calcium: 1mg
- Iron: 1mg
I hope you thoroughly enjoy this delicious and easy sugar cookie icing recipe! Your feedback means a lot, so please consider leaving a review below. Don’t forget to connect with us on Facebook, Instagram, Pinterest, and YouTube for more delightful recipes and baking inspiration!