
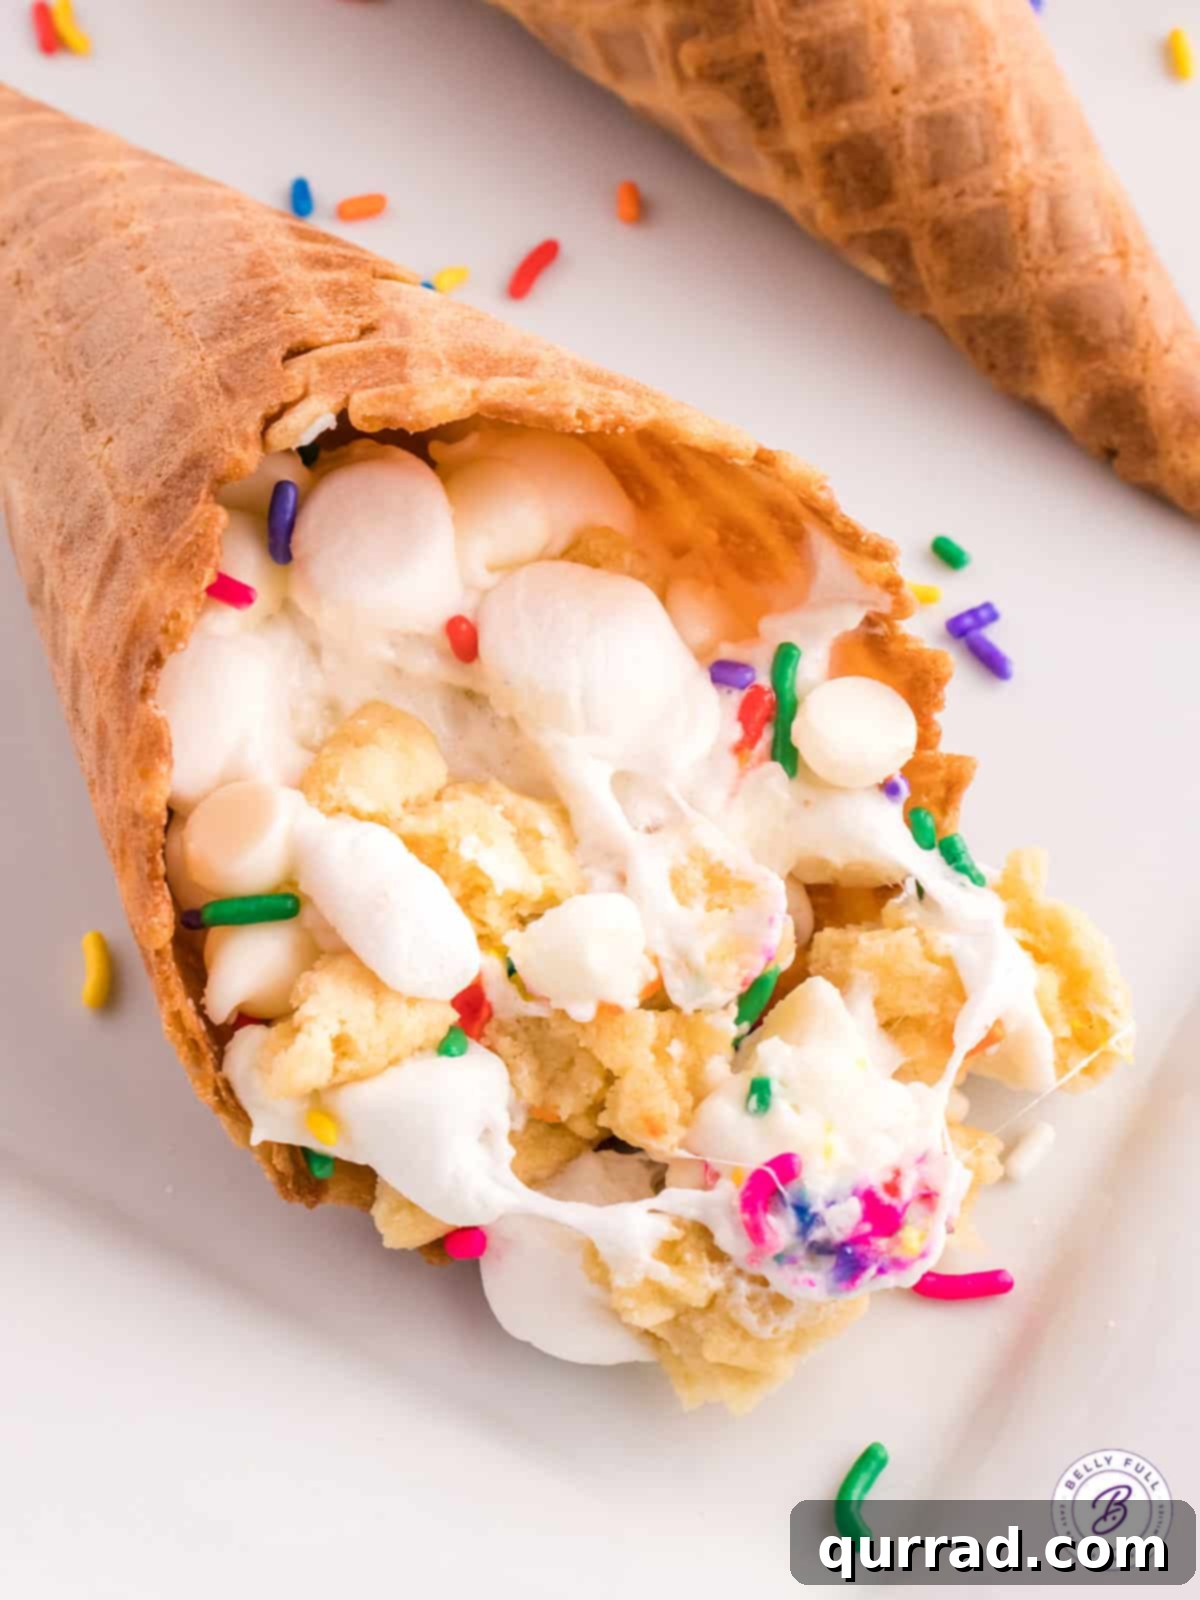
Transform your outdoor gatherings or cozy evenings into a delightful culinary adventure with these incredible Sugar Cookie Campfire Cones. Imagine crisp waffle cones generously filled with fluffy marshmallows, creamy white chocolate chips, and tender sugar cookie pieces, all warmed to gooey perfection. Whether you’re gathered around a crackling campfire, firing up the grill, or simply baking in your oven, this easy and versatile dessert promises to be a highlight for kids and adults alike. Get ready to make these irresistibly sweet treats all summer long, creating cherished memories with every delicious bite!

Effortless Campfire Cones: Your New Favorite Dessert
For many outdoor enthusiasts, the joy of camping is often intertwined with the challenge of meal preparation. I, for one, am always on the hunt for simple yet spectacular campfire recipes that minimize fuss and maximize fun. While savory dishes like our go-to kielbasa and vegetable foil packets handle dinner, these versatile campfire cones have effortlessly claimed the title of our absolute favorite camping dessert. They’re quick to assemble, incredibly customizable, and deliver a warm, gooey satisfaction that’s hard to beat after a day of outdoor activities.
Our featured recipe, the Sugar Cookie Campfire Cones, are a dream come true for anyone with a sweet tooth. They are generously loaded with miniature marshmallows, smooth white chocolate chips, and delightful soft sugar cookie chunks, finished with a scattering of colorful sprinkles for an extra touch of whimsy. But the beauty of campfire cones lies in their endless adaptability. Over the years, we’ve experimented with countless variations, from classic s’mores-inspired creations to rich chocolate peanut butter combinations, and beyond. You’ll find a treasure trove of creative ideas further down this page!
And here’s the best part: you don’t even need a campfire to enjoy these delectable treats! If camping isn’t on your agenda, or if the weather isn’t cooperating, these cones bake up beautifully in a conventional oven or can be cooked to perfection on a backyard grill. This makes them a fantastic dessert option for barbecues, backyard parties, or even a cozy night in.
Why You’ll Adore This Irresistible Campfire Treat
These campfire cones aren’t just a dessert; they’re an experience. Here are several compelling reasons why they’ve become a beloved staple in our summer recipe rotation, and why we’re confident they’ll become a favorite for you too:
- Unforgettable Family Fun: This is a dessert that genuinely transcends age. Loved equally by toddlers and grandparents, assembling these cones becomes a fantastic interactive activity for everyone. Kids can eagerly pick their favorite fillings and layer them into the cones, fostering creativity and a sense of ownership over their delicious creation. It’s an easy, hands-on project that brings smiles and minimizes stress for busy parents.
- Endless Flavor Customization: While our signature sugar cookie version offers a delightful blend of familiar flavors, the possibilities for campfire cones are truly limitless. Think beyond the basic and let your imagination run wild! This recipe acts as a perfect canvas, allowing you to tailor each cone to individual preferences or dietary needs (within reason). We’ve provided a range of exciting variations below, from fruity delights to decadent chocolate combinations, ensuring there’s a perfect cone for every palate.
- Remarkably Quick & Simple: In a world where delicious often means complicated, these campfire cones stand out for their sheer simplicity. The preparation involves just a few minutes of gathering ingredients and layering them into the cones. The cooking time is equally brief, typically around 10 to 15 minutes, allowing you to whip up a batch of warm, gooey treats without missing out on valuable quality time with friends and family.
- No Campfire? No Problem!: Don’t let the name mislead you! While they are perfectly suited for open flames, the “campfire” in their title refers more to the cozy, communal experience they evoke rather than a strict cooking requirement. We’ve meticulously included detailed instructions for baking them in your oven or grilling them on your barbecue. This flexibility ensures that you can savor these delightful desserts anytime, anywhere, regardless of your outdoor cooking setup.

Unpacking the Delicious Concept: What Exactly Are Campfire Cones?
At its heart, a campfire cone is a wonderfully inventive and universally appealing dessert, synonymous with outdoor adventures and joyful gatherings. It takes the familiar, crispy base of a waffle cone and transforms it into a portable, edible container for a medley of sweet, meltable ingredients. The magic happens when these foil-wrapped cones are exposed to heat – be it the ambient warmth of an open campfire, the even heat of a grill, or the consistent environment of an oven. As the heat penetrates the foil, the marshmallows soften and expand, the chocolate chips melt into a luscious river, and any added cookies or candies become tender and gooey, all while the waffle cone achieves a delightful warm crunch. It’s a customizable, hands-on snack that delivers immense satisfaction and a delightful mess, making it a favorite for all who try it.
Essential Ingredients for Your Campfire Cone Adventure
Crafting these delightful campfire cones requires minimal ingredients, proving that sometimes the simplest components yield the most extraordinary results. All you truly need is a sturdy waffle cone and your imagination to fill it with deliciousness. For our standout sugar cookie version, here’s what you’ll be gathering:
- Waffle Cones: This is a non-negotiable component! The distinction between waffle cones and regular ice cream cones is crucial for the success of this recipe. Waffle cones are inherently thicker, more robust, and possess a superior structural integrity that is essential for holding a generous amount of filling and withstanding the direct heat of a fire or grill without crumbling. Regular, thinner ice cream cones will invariably become soggy and fall apart, leading to a disappointing (and messy) experience. Always opt for the sturdier waffle cone for optimal results and enjoyment.
- The Star Fillings: For these particular Sugar Cookie Campfire Cones, we’re creating a symphony of textures and flavors with three key ingredients:
- Mini Marshmallows: These tiny puffs of sweetness are perfect because their smaller size allows for quicker melting and better distribution throughout the cone. They provide that quintessential gooey texture that defines a campfire treat.
- White Chocolate Chips: Offering a creamy, sweet contrast, white chocolate chips melt beautifully and blend with the other fillings, adding a rich, decadent layer.
- Sugar Cookie Pieces: This is where the “sugar cookie” magic truly shines. You can effortlessly pick up a pack of soft, chewy sugar cookies from your local grocery store, or for an extra personal touch, bake a batch of our wildly popular 3-ingredient sugar cookies in advance. Breaking them into small pieces ensures they soften and integrate perfectly into the melted mixture, adding a delightful cakey texture.
- Rainbow Sprinkles (Optional but Recommended): For a pop of color and a festive touch, don’t forget the sprinkles! They add a playful visual appeal that makes these cones even more inviting, especially for younger participants.
(For precise measurements and detailed instructions, be sure to scroll down to the printable recipe card below!)
Beyond the Basics: Exciting Campfire Cone Variations to Explore
The beauty of campfire cones lies in their incredible versatility. Once you’ve mastered the basic technique, the possibilities for flavor combinations are truly endless. Here are some of our absolute favorite variations, guaranteed to spark your creativity and satisfy every craving:
- The Ultimate S’mores Cone: A timeless classic, reimagined! Fill your waffle cone generously with mini marshmallows, milk chocolate chips (or broken pieces of your favorite chocolate bar), and crumbled graham cracker pieces. This delivers all the iconic flavors of a traditional s’mores in a neat, easy-to-handle cone.
- Refreshingly Zesty Orange Creamsicle Cone: For a bright, citrusy twist, combine mini marshmallows with white chocolate chips and small pieces of dried orange peel or orange candy slices. A tiny splash of orange extract mixed into the white chocolate before adding could amplify the flavor.
- Indulgent Mint Chocolate Cone: Elevate your dessert game with a cool, minty flavor. Layer mini marshmallows with refreshing mint chocolate chips and finely chopped Andes mints. For an extra decadent finish, drizzle with a rich chocolate sauce immediately after cooking, allowing it to melt over the warm fillings.
- Decadent Twix Bar Cone: Bring the beloved candy bar to your campfire! Stuff your cone with mini marshmallows, generous chunks of chopped Twix bars (for that signature cookie, caramel, and chocolate trio), and extra chocolate chips. A final swirl of homemade caramel sauce after the cone is cooked will take this to an entirely new level of deliciousness.
- Classic Chocolate Peanut Butter Cone: A match made in heaven! This variation combines mini marshmallows with mini Reese’s Peanut Butter Cups, colorful Reese’s Pieces, and classic chocolate chips. For an even richer experience, add a drizzle of melted peanut butter and/or our luscious homemade chocolate sauce once the cone is cooked and slightly cooled.
- Sweet & Crunchy Cinnamon Toast Crunch Cone: For a breakfast-for-dessert vibe, layer mini marshmallows with a sprinkle of cinnamon sugar, generous handfuls of Cinnamon Toast Crunch cereal, and a drizzle of dulce de leche or caramel sauce after cooking. The cereal retains some of its crunch, offering a delightful textural contrast.
- Berry Blast Cone: A lighter, fruitier option. Fill with white chocolate chips, mini marshmallows, and freeze-dried strawberries or raspberries. Avoid fresh fruit during cooking to prevent sogginess (see tips below).
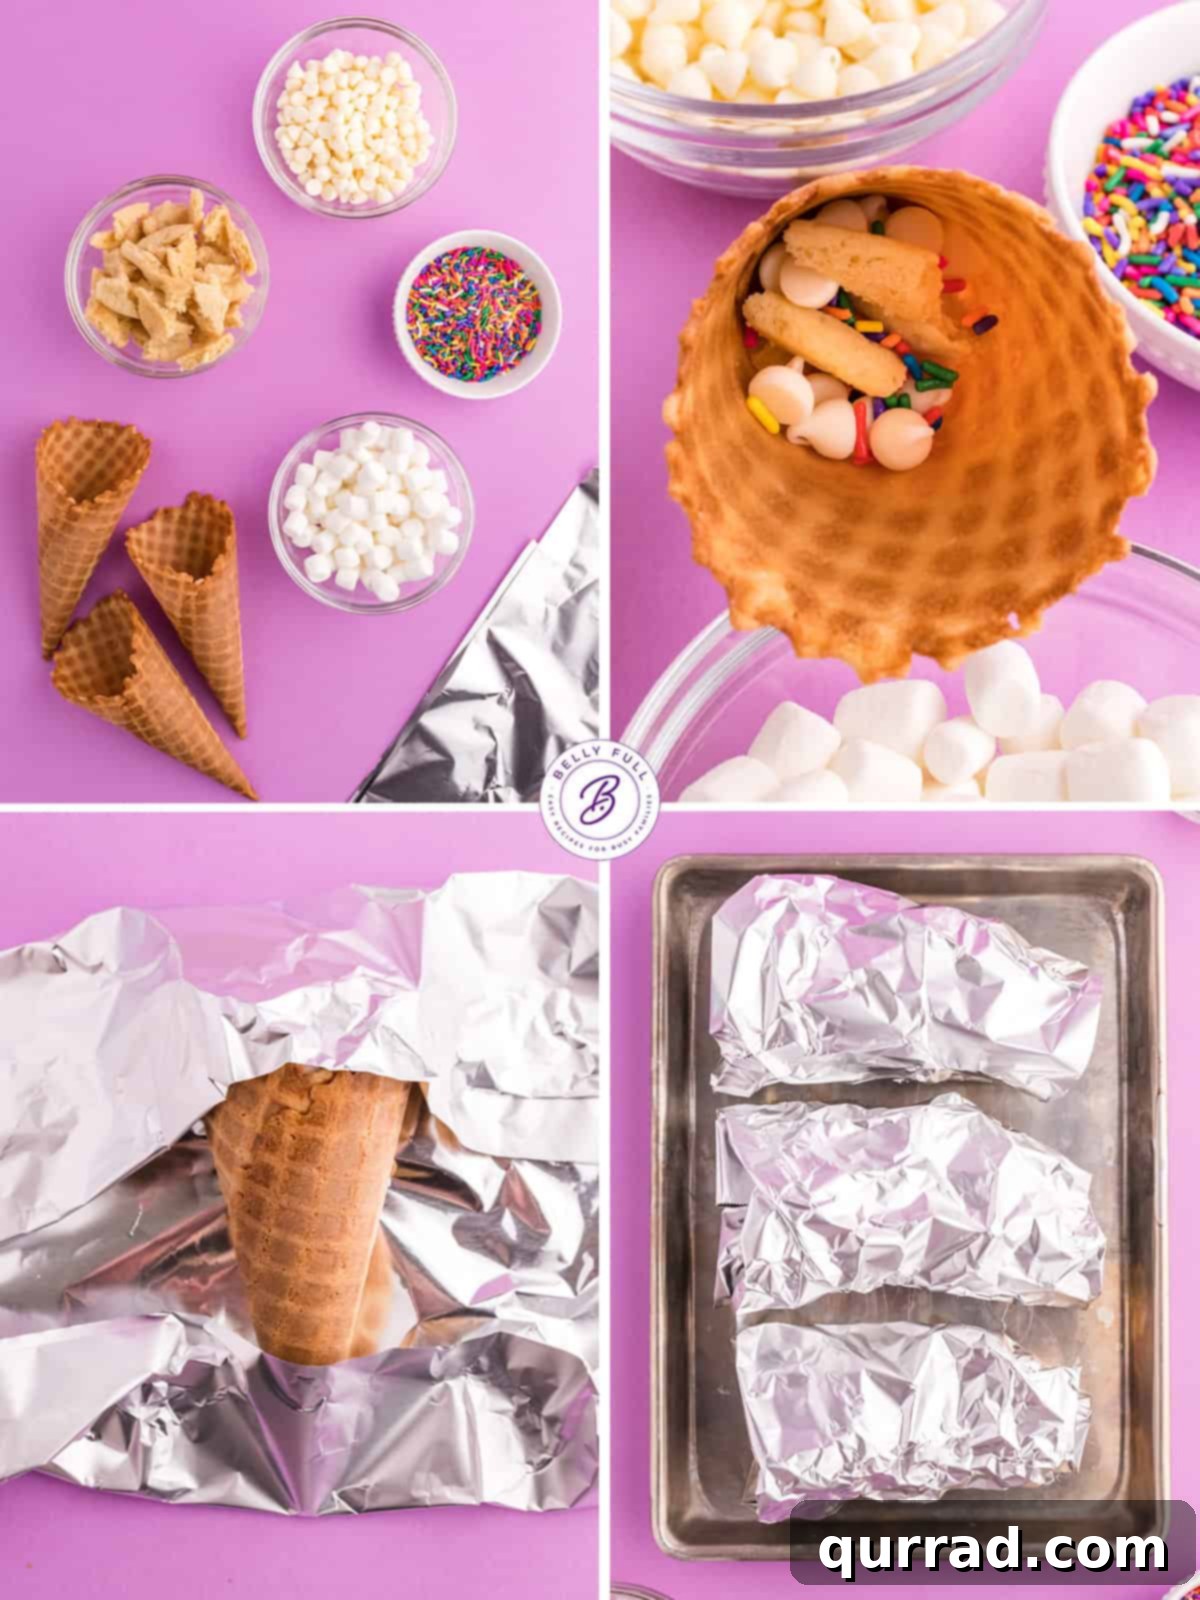
Step-by-Step Guide: Crafting Your Perfect Campfire Cones
No matter your preferred heating method, making these campfire cones is a straightforward and rewarding process. Follow these simple steps to achieve warm, gooey perfection every time:
- Prepare Your Cone Foundation: Begin by taking one waffle cone. Place a small handful of mini marshmallows (roughly 5-7) at the very bottom of the cone. Gently press them down to create a protective “plug.” This crucial step prevents any melted chocolate or gooey goodness from leaking out through the small hole at the cone’s base during cooking.
- Layer Up the Sweetness: Now, it’s time to fill your cone! Begin layering your chosen ingredients in an appealing sequence. For our Sugar Cookie Campfire Cones, this means alternating between white chocolate chips, sugar cookie pieces, and rainbow sprinkles, topping each layer with a few more mini marshmallows. Continue layering until the cone is as full as possible, gently pressing down each layer as you go. Remember that the ingredients will significantly shrink as they melt, so don’t be afraid to pack them in!
- Securely Wrap Each Cone: Once your cone is filled, it’s essential to wrap it securely in aluminum foil. Use a piece of heavy-duty foil large enough to fully encase the cone. A smart technique is to first cover the open top of the cone, twisting the foil slightly to seal it and prevent any ingredients from spilling out as it heats. Then, fold up the bottom and tightly wrap the sides, ensuring no gaps. A well-wrapped cone ensures even cooking and prevents sticky messes.
- Cook to Gooey Perfection (Choose Your Method):
- Over a Campfire: Carefully place the foil-wrapped cones directly onto the hot coals of your campfire, avoiding direct flames which can burn the cone. Cook for approximately 5-7 minutes, using long tongs to turn them occasionally for even heating. The goal is to melt the fillings without burning the cone.
- On the Grill: Preheat your grill to a medium heat (around 350-375°F). Place the wrapped cones directly on the grill grates. Cook for 5-7 minutes, turning them every couple of minutes to ensure all sides are heated evenly and the fillings are melted.
- In the Oven: Preheat your oven to 350°F (175°C). Arrange the wrapped cones on a baking sheet. Bake for 10-15 minutes, or until the fillings are completely melted and wonderfully gooey. The oven provides a consistent heat, making this a reliable indoor option.
(Don’t forget to check out the printable recipe card below for all the specifics, and watch our helpful video tutorial!)
Expert Tips for Campfire Cone Success
To ensure your campfire cone experience is nothing short of perfect, keep these invaluable tips in mind during preparation and cooking:
- Fruit: After Cooking is Key: While fresh fruit can add a delightful freshness, it’s generally not recommended to cook it inside the cones. The moisture from fresh fruit can release juices during heating, which will make your waffle cone soggy and potentially cause leaks. If you desire fruit, such as sliced bananas or fresh berries, add them as a vibrant, fresh topping *after* the cones have been cooked and unwrapped.
- Safety First: Handle with Long Tools: When cooking over an open fire or on a hot grill, the foil-wrapped cones will become extremely hot. Always use long-handled tongs, a sturdy spatula, or a grill fork to handle and turn them. This prevents burns and ensures a safe cooking experience.
- Patience is a Virtue: Allow Cooling Time: The melted fillings inside the cones will be scalding hot directly off the fire, grill, or out of the oven. Resist the urge to bite in immediately! Allow the cones to cool for at least a few minutes after unwrapping. This not only prevents burns but also allows the gooey fillings to set slightly, making them easier and more enjoyable to eat.
- Gentle Hands for Delicate Cones: Waffle cones, while sturdy, can still be brittle. Exercise care when packing them with ingredients and especially when wrapping them in aluminum foil. Avoid forceful handling that could lead to cracks or breaks, which would compromise their ability to hold the delicious fillings.
- Chop Fillings into Small, Uniform Pieces: For optimal melting and an even distribution of flavors, ensure all your chosen fillings – especially any candy bars, cookies, or larger chocolates – are chopped into small, bite-sized pieces. Smaller pieces melt more consistently and quickly, preventing some ingredients from being raw while others are perfectly gooey.
- Double Check Your Foil Seal: A tight foil seal is critical. Before cooking, gently squeeze the wrapped cone to ensure there are no loose edges or holes where melted ingredients could escape. A well-sealed cone means less mess and a more successful treat.
- Consider Eco-Friendly Options: If you’re a frequent camper, consider investing in reusable silicone cone holders or heavier duty, multi-use foil packets that can be washed and reused, minimizing waste.
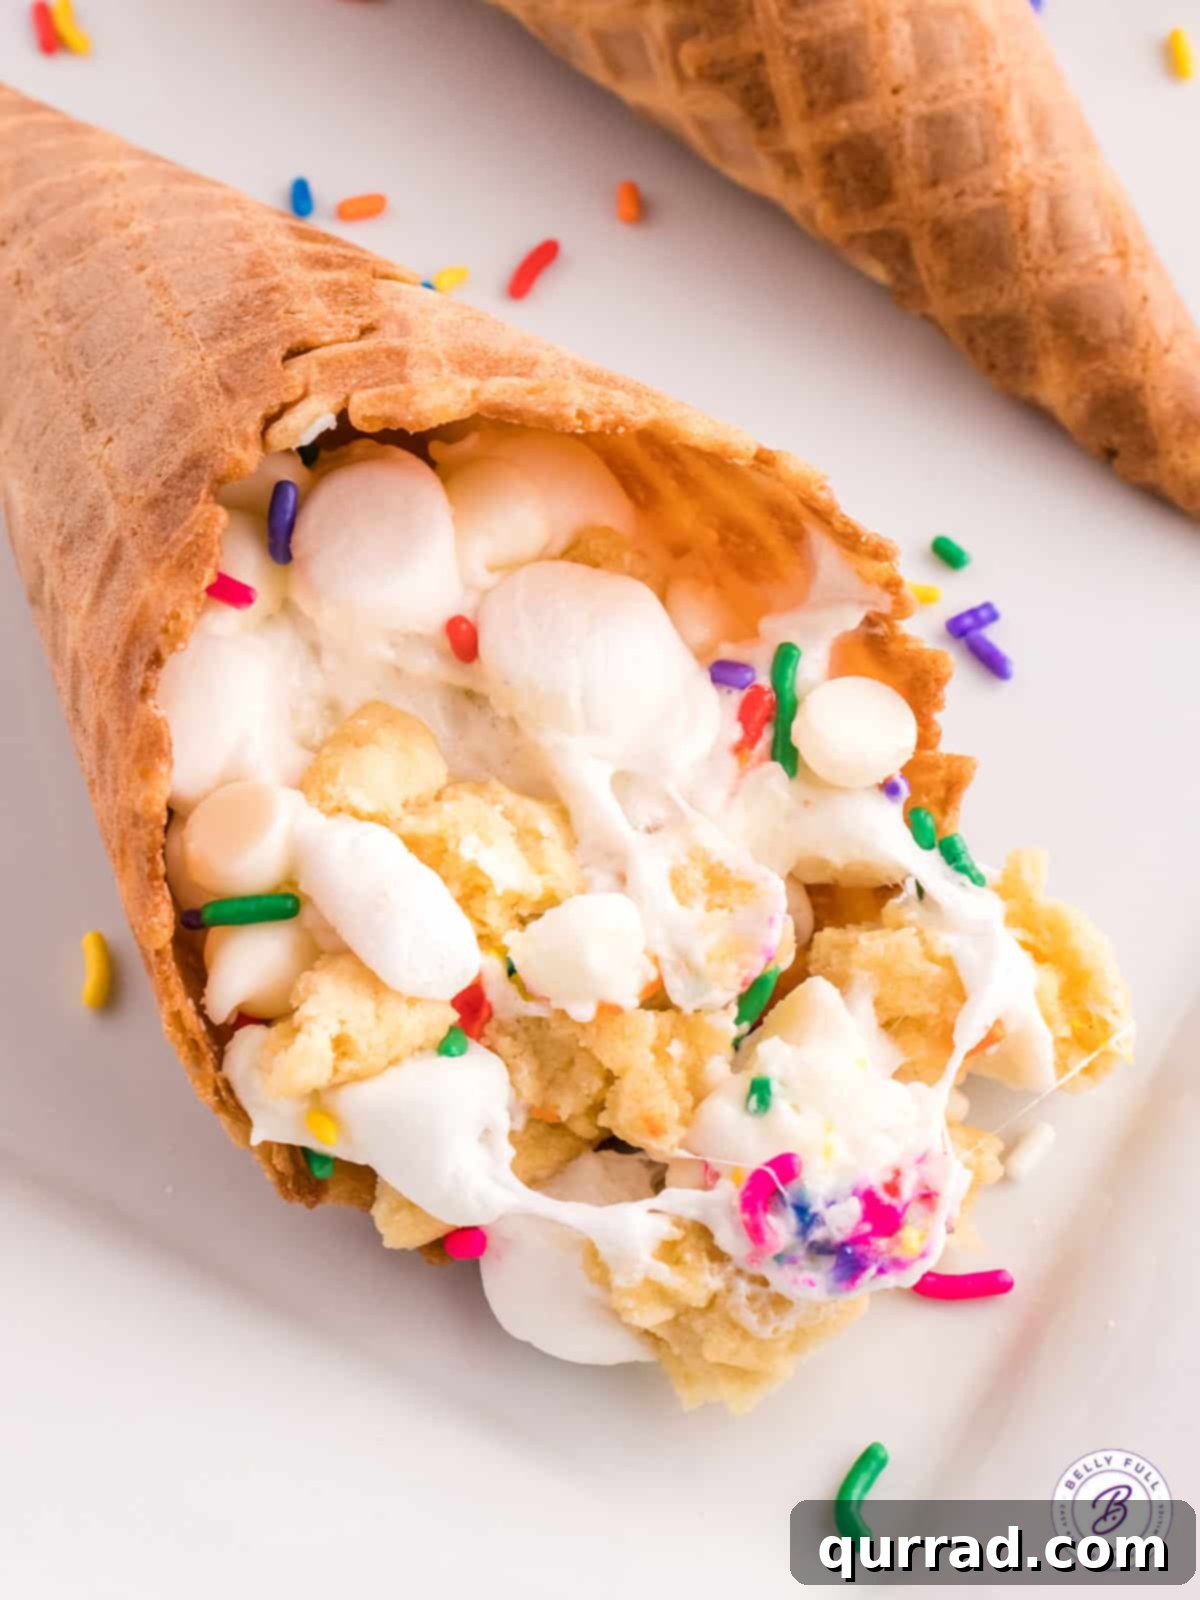
Watch the Magic Unfold: Sugar Cookie Campfire Cones Video Tutorial
Sometimes, seeing is believing! For a visual guide to assembling and cooking these delightful treats, check out our comprehensive video tutorial below. It walks you through each step, ensuring you have all the confidence to create your own perfect Sugar Cookie Campfire Cones.
Can These Delicious Cones Be Prepared in Advance? Absolutely!
One of the many reasons these campfire cones are a dream come true for camping trips and outdoor events is their fantastic make-ahead potential. You can certainly prepare them in advance, which significantly streamlines your cooking process when you’re ready to enjoy them.
To do so, simply fill your waffle cones with all your desired ingredients and wrap each one tightly and individually in aluminum foil, just as you would before cooking. Once wrapped, store them in a cooler with ice, or in your refrigerator if you’re not heading out immediately. This pre-assembly allows you to simply grab and cook when the moment strikes, saving precious time and effort when you’re trying to relax and enjoy your gathering. They are perfect for packing for a weekend camping trip, ensuring a quick and easy dessert is always at hand.
Frequently Asked Questions About Campfire Cones
Q: Can I use regular ice cream cones instead of waffle cones?
A: It’s highly recommended to use waffle cones. Regular ice cream cones are much thinner and more fragile; they tend to become soggy and break apart under the heat and weight of the fillings, leading to a messy and disappointing outcome. Waffle cones are sturdier and designed to withstand the cooking process better.
Q: How do I prevent the fillings from leaking out the bottom?
A: The trick is to create a “plug” at the bottom. Start by placing a small handful of mini marshmallows at the very bottom of the cone and gently press them down. As they melt, they’ll seal any small holes, preventing other ingredients from escaping.
Q: Can I add fresh fruit to my campfire cones?
A: While delicious, it’s best to add fresh fruit after cooking. The moisture from fresh fruit can cause the cone to become soggy and the juices might leak out during heating. For a fruity touch, add fresh berries, banana slices, or apple pieces on top of your warm, cooked cone.
Q: What kind of foil should I use?
A: Heavy-duty aluminum foil is ideal. It’s more durable and less likely to tear, ensuring your cones are well-protected from direct heat and prevent leaks. If you only have standard foil, you might consider using a double layer for extra protection.
Q: How do I know when the campfire cones are done?
A: The cones are ready when the marshmallows are fully melted and gooey, and the chocolate chips are soft and luscious. You can gently unwrap one cone to check the consistency of the fillings. The cone itself should be warm and slightly toasted.
Q: Can I make these in an air fryer?
A: Yes, you can! Wrap the cones in foil as usual. Air fry at 325°F (160°C) for about 8-10 minutes, checking periodically, until the fillings are melted. Air fryers circulate heat very efficiently, so keep a close eye on them to prevent burning.
Explore More Fantastic Camping & Outdoor Recipes:
If you’re anything like us, the joy of cooking outdoors is a huge part of the camping experience. Expand your culinary repertoire with these other delicious and easy-to-make recipes, perfect for your next adventure or backyard cookout:
- Hearty Jambalaya Foil Packets
- Flavorful Shrimp Boil Foil Packets
- Classic Kielbasa and Vegetable Foil Packets
- Sweet Upside Down Pineapple Foil Packs
- Creative S’mores Banana Boats
- Fun Walking Tacos
- Delectable Walking Banana Pudding
- Unique Walking Strawberry Pretzel Salad
We truly hope you’ve enjoyed discovering this incredibly versatile and delicious recipe for Sugar Cookie Campfire Cones. It’s a simple pleasure that brings big smiles and sweet memories. Don’t hesitate to give it a try on your next outdoor adventure or cozy evening at home – and when you do, please remember to leave a review below and share your experience!
And for more mouth-watering recipes and culinary inspiration, be sure to follow Belly Full on TikTok, Facebook, Instagram, Pinterest, and YouTube!
Sugar Cookie Campfire Cones
Cook Time: 10 mins
Total Time: 15 mins

Pin Recipe
Print Recipe
Featuring waffle cones stuffed with marshmallows, white chocolate chips, and sugar cookie pieces, these Sugar Cookie Campfire Cones are a fun, easy campfire treat! Directions for baking & grilling also included. You’ll want to make these all summer long!
Ingredients
- 1 waffle cone
- 1/3 cup mini marshmallows, divided
- 1/4 cup white chocolate chips
- 1/4 cup sugar cookie pieces
- Rainbow sprinkles (to taste)
Instructions
- Fill the bottom of each cone with a few mini marshmallows. This acts as a “plug” to prevent any fillings from leaking out the bottom hole of the cone.
- Layer the white chocolate chips, chopped sugar cookies, rainbow sprinkles, and the remaining mini marshmallows until the cone is filled as much as possible. Gently pack the layers down as you go, as the ingredients will shrink quite a bit as they cook and melt.
- Wrap each cone individually and tightly in aluminum foil. The easiest way to do this is by first covering the top of the cone where the ingredients are to ensure they don’t spill out. Then, fold up the bottom and wrap up the sides securely.
- To cook over the fire or on the grill: Place the wrapped cones over the hot coals of your campfire or directly on the grill grates. Cook for 5-7 minutes, turning occasionally, until the fillings are melted and the cone is slightly toasted.
- To bake in the oven: Preheat your oven to 350°F (175°C). Place the wrapped cones on a baking sheet and bake for 10-15 minutes, or until everything is melted and gooey.
Notes & Variations
- S’mores Cone: Fill your cone with mini marshmallows, chocolate chips, and broken graham cracker pieces for a classic s’mores flavor.
- Mint Chocolate Cone: Fill your cone with mini marshmallows, mint chocolate chips, chopped Andes mints, and a drizzle of chocolate sauce (add after cooking).
- Twix Cone: Fill your cone with mini marshmallows, chopped Twix bars, chocolate chips, and caramel sauce (add after cooking).
- Chocolate Peanut Butter Cone: Fill your cone with mini marshmallows, Reese’s Mini Peanut Butter Cups, Reese’s Pieces, and chocolate chips. Add melted peanut butter and/or chocolate sauce after cooking, if desired.
- Cinnamon Toast Crunch Cone: Fill your cone with mini marshmallows, cinnamon sugar, Cinnamon Toast Crunch cereal, and a drizzle of dulce de leche or caramel sauce (add after cooking).
Nutrition Facts (per cone)
Calories: 580kcal | Carbohydrates: 81g | Protein: 6g | Fat: 26g | Saturated Fat: 12g | Polyunsaturated Fat: 2g | Monounsaturated Fat: 11g | Cholesterol: 16mg | Sodium: 252mg | Potassium: 231mg | Fiber: 1g | Sugar: 58g | Vitamin A: 35IU | Vitamin C: 0.2mg | Calcium: 99mg | Iron: 2mg
Nutritional information is an automatic calculation and may vary based on exact products used and any modifications to the recipe. Please calculate independently if precise figures are crucial.
Save This Recipe!
Get this recipe sent directly to your inbox, along with new recipes from us every week!