
Spooktacular No-Bake Zombie Dirt Pudding Cups: The Ultimate Halloween Treat
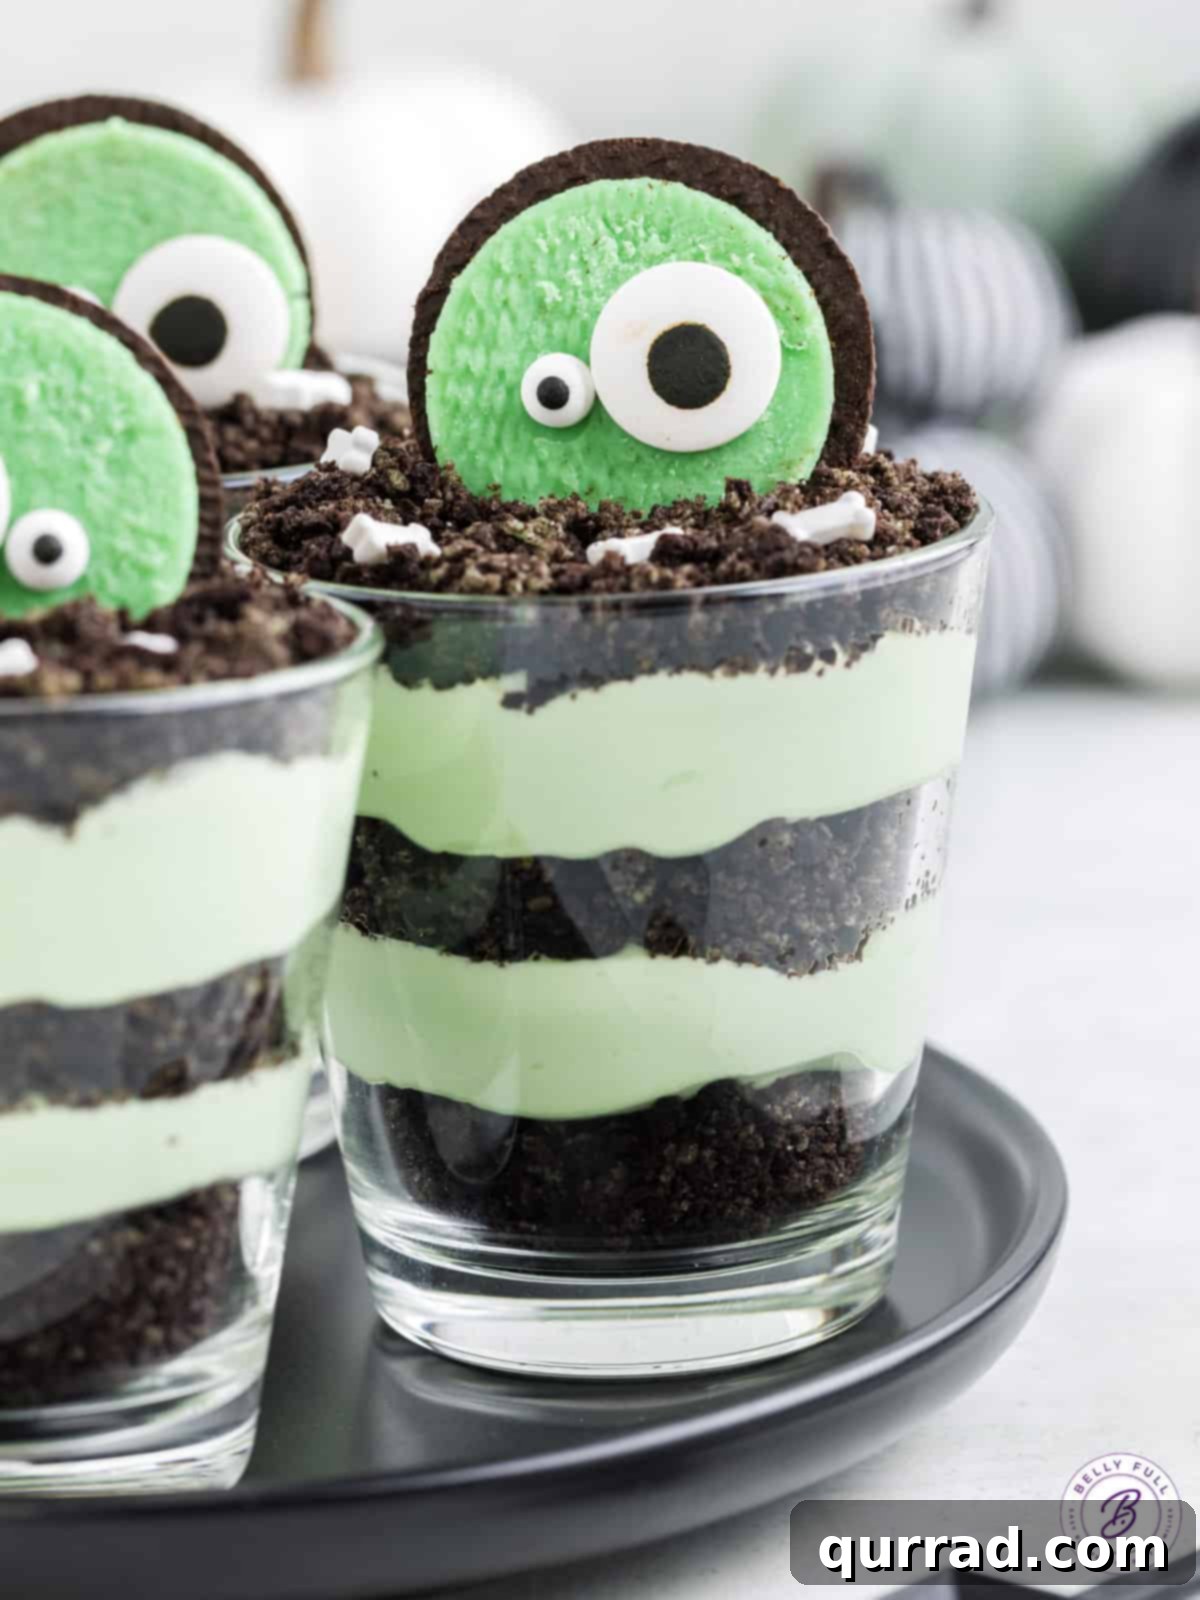
Get ready for a ghoulishly good time with these incredible Zombie Dirt Pudding Cups! Crafted with layers of crushed Oreos, creamy instant pudding, and fluffy Cool Whip, these no-bake wonders are an absolute hit for any Halloween celebration. They boast a smooth, rich texture with a delightful hint of mint, making them universally adored by both kids and adults. Forget complicated baking; these spooky treats come together in minutes, leaving you more time to enjoy the festivities.
Effortlessly Easy Zombie Dirt Pudding Cups for a Frightfully Fun Halloween
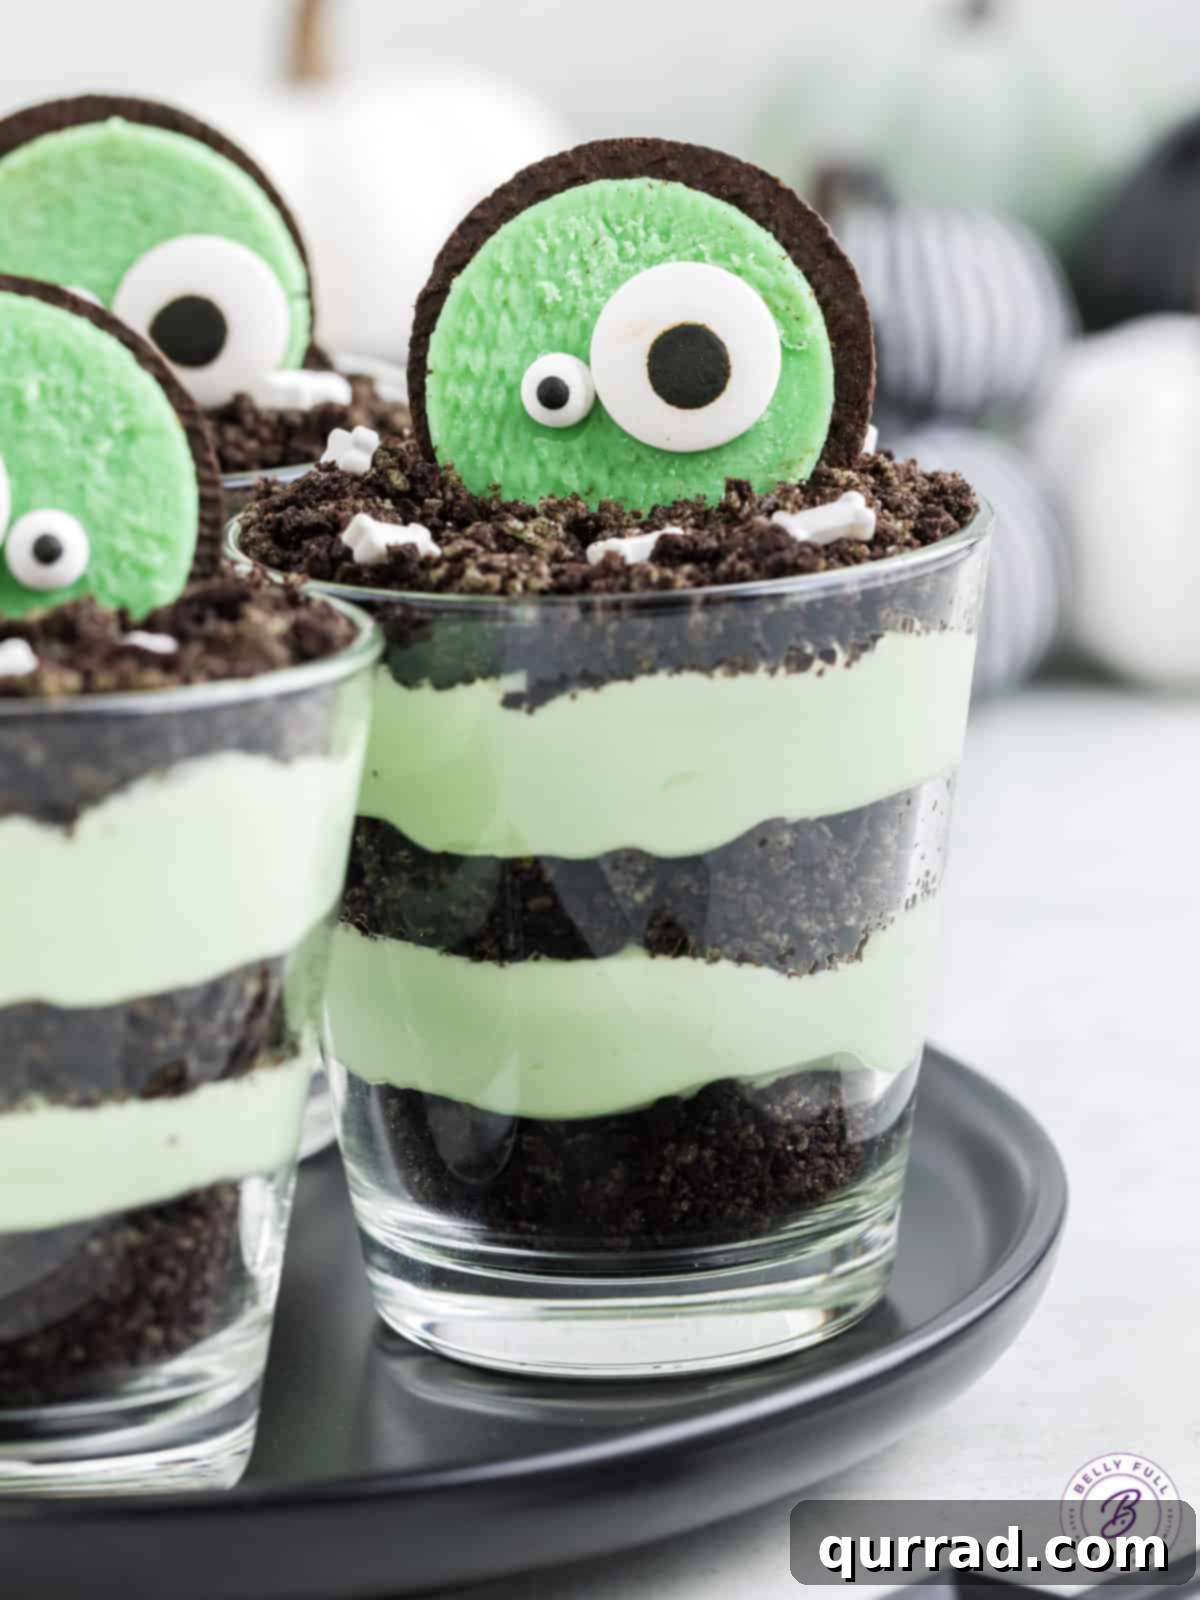
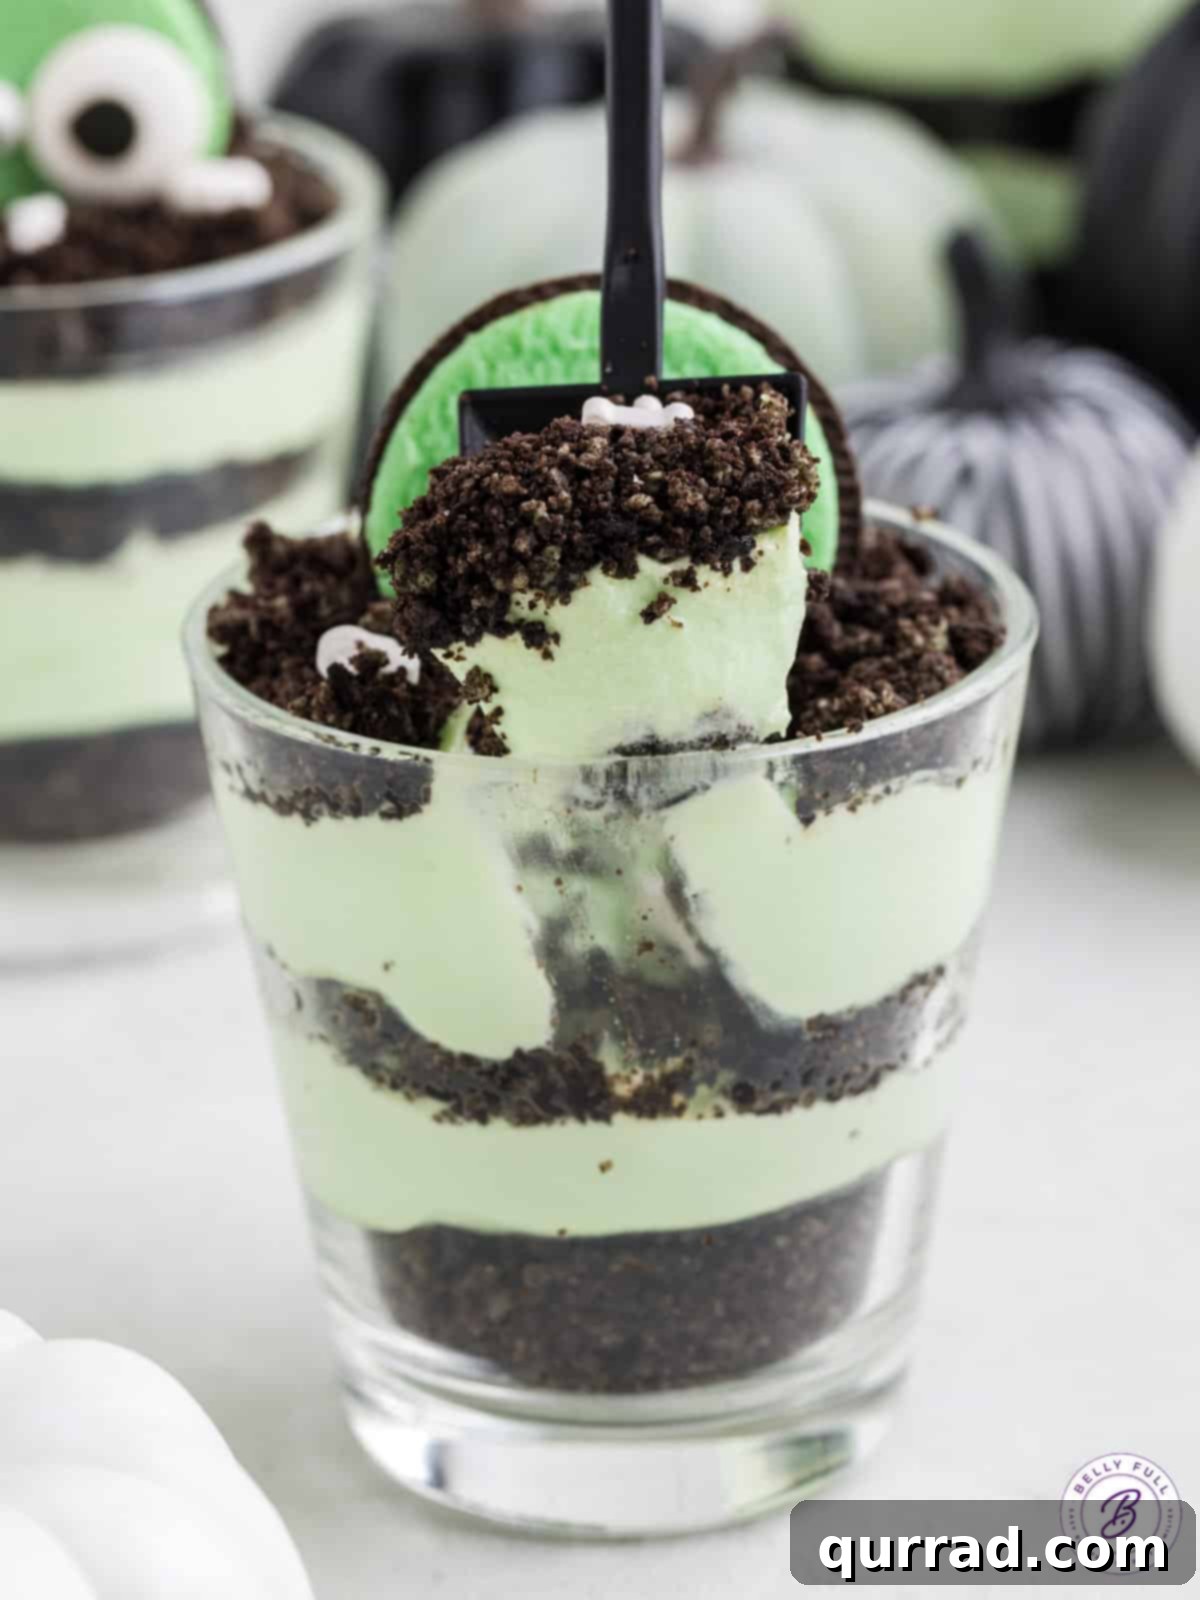
When it comes to Halloween party food, convenience is key, and these zombie dirt pudding cups deliver on all fronts. They are the perfect no-bake dessert for Halloween, monster-themed gatherings, or any zombie apocalypse-inspired celebration. Each cup features inviting layers of perfectly crushed Oreo cookies, interspersed with a vibrant green pudding mixture folded with light and airy Cool Whip. The green food coloring in the pudding, combined with the use of mint-flavored Oreos, creates an authentically eerie hue that’s essential for a zombie theme.
What makes this recipe truly outstanding is the minimal effort required. There’s absolutely no baking involved, no stovetop cooking, and no microwave needed. Your hands-on preparation time is impressively short, typically around 10 minutes. The only waiting period is an hour of chilling, which means you can effortlessly whip them up in advance, making them an ideal make-ahead party dessert. This flexibility allows you to focus on other aspects of your party planning, knowing a delightful and spooky treat is chilling patiently in the fridge.
The yield of this recipe can vary, typically producing 8 to 12 pudding cups, depending on the specific size and shape of the cups you choose for serving. Small clear plastic cups, mason jars, or even mini dessert bowls work wonderfully. If you’re hosting a larger gathering or simply want to ensure there are plenty of undead desserts to go around, feel free to double or even triple the ingredients. Adjusting the recipe is straightforward, allowing you to cater to any crowd size with ease.
Why You’ll Absolutely Adore These Halloween Dirt Pudding Cups
These zombie dirt pudding cups are more than just a dessert; they’re a festive experience that consistently garners rave reviews at any Halloween event. Here’s a closer look at what makes them an undeniable crowd-pleaser:
- No-Bake Simplicity: In the hustle and bustle of Halloween preparations, a no-bake recipe is a true lifesaver. This dessert eliminates the need for ovens, stovetops, or even microwaves. All you’ll require is a mixing bowl, a whisk, and a few simple ingredients. It’s the ultimate hassle-free solution for a delicious, homemade treat.
- Enchanting Minty Oreo Flavor: While the primary reason for choosing mint Oreos is their festive green color, the subtle mint flavor perfectly complements the rich white chocolate pudding and the creamy lightness of the Cool Whip. The result is a refreshing and indulgent taste experience that stands out from typical chocolate desserts, offering a delightful twist that surprises and pleases the palate.
- The Perfect Halloween Party Star: If you’re hosting a Halloween bash, these dirt pudding cups are your secret weapon. They’re a guaranteed hit with guests of all ages, from the littlest monsters to the most seasoned Halloween enthusiasts. Their spooky appearance and delicious flavor make them a memorable addition to any dessert table, all while demanding minimal effort from the host.
- Visually Striking & Thematic: The vibrant green layers combined with the crushed “dirt” cookies and the iconic candy eyeballs transform a simple pudding into a captivating, themed masterpiece. They instantly elevate your Halloween spread, adding an element of playful horror that perfectly suits the holiday spirit.
- Completely Customizable & Fun: Beyond the core recipe, these cups offer endless possibilities for customization. You can easily adapt the decorations, experiment with different cookie or pudding flavors, and even involve the kids in the assembly process, turning dessert making into a fun pre-party activity.
Essential Ingredients for Your Undead Delicacy
Creating these delightful zombie dirt pudding cups requires just a handful of readily available ingredients. Each component plays a vital role in achieving the perfect flavor, texture, and spooky aesthetic. Here’s a detailed look at what you’ll need:
- Mint Oreos: The star of the show! An 18.7-ounce package (approximately 39 cookies) of mint Oreos is ideal. Their distinct green cream filling contributes significantly to the Halloween theme and imparts a refreshing minty flavor that pairs surprisingly well with white chocolate. While mint Oreos are highly recommended for thematic consistency, regular Oreos can be used in a pinch if mint isn’t available or preferred. However, be aware that you might miss out on the signature green coloring in the crushed cookie layers.
- Instant White Chocolate Pudding Mix: You’ll need a 3.3-ounce box of instant white chocolate pudding mix. It is absolutely crucial to use the INSTANT variety, not the cook-and-serve type, as this recipe involves no heat. White chocolate pudding provides a subtly sweet and creamy base that allows the mint flavor to shine without overpowering it. Vanilla instant pudding can also be a suitable alternative.
- Whole Milk: Two cups of chilled whole milk are essential for achieving the thickest, creamiest pudding consistency. The fat content in whole milk helps the pudding set properly and contributes to its rich mouthfeel. It’s important to keep the milk well-chilled until you’re ready to mix it, as cold liquid aids in the setting process of instant pudding. Avoid using skim milk or milk substitutes, as they may prevent the pudding from setting correctly and result in a runnier texture.
- Green Food Coloring: A few drops (typically 6-8) of green food coloring are key to transforming your pudding into a vibrant, ghoulish green. You can adjust the amount to achieve your desired shade of “zombie” green, from a subtle pastel to a deep, eerie emerald. Remember that the color will lighten slightly when mixed with Cool Whip, so consider adding a touch more initially if you prefer a darker final hue.
- Cool Whip: An 8-ounce tub of Cool Whip (or a similar whipped topping) is necessary. Ensure it is completely thawed before use. Cool Whip provides an airy, light texture that makes the pudding incredibly smooth and palatable. For those who prefer a homemade touch, stabilized whipped cream can be used as a delicious alternative, offering a richer flavor and excellent stability.
- Spooky Decorations: This is where the magic happens! You’ll need 8-12 large candy eyeballs and 8-12 small candy eyeballs to create the iconic zombie faces. The varying sizes add character and a touch of grotesque charm to each cookie. Additionally, bone or skeleton sprinkles are a fantastic optional extra, adding another layer of macabre detail to the “dirt” topping.
Step-by-Step Guide to Crafting Your Zombie Dirt Pudding Cups
These captivating Halloween dirt pudding cups are remarkably straightforward to assemble, requiring only about 10 minutes of active preparation time. However, remember to factor in at least one hour of chilling time before serving to allow the pudding to set perfectly. Follow these simple steps to bring your undead desserts to life:
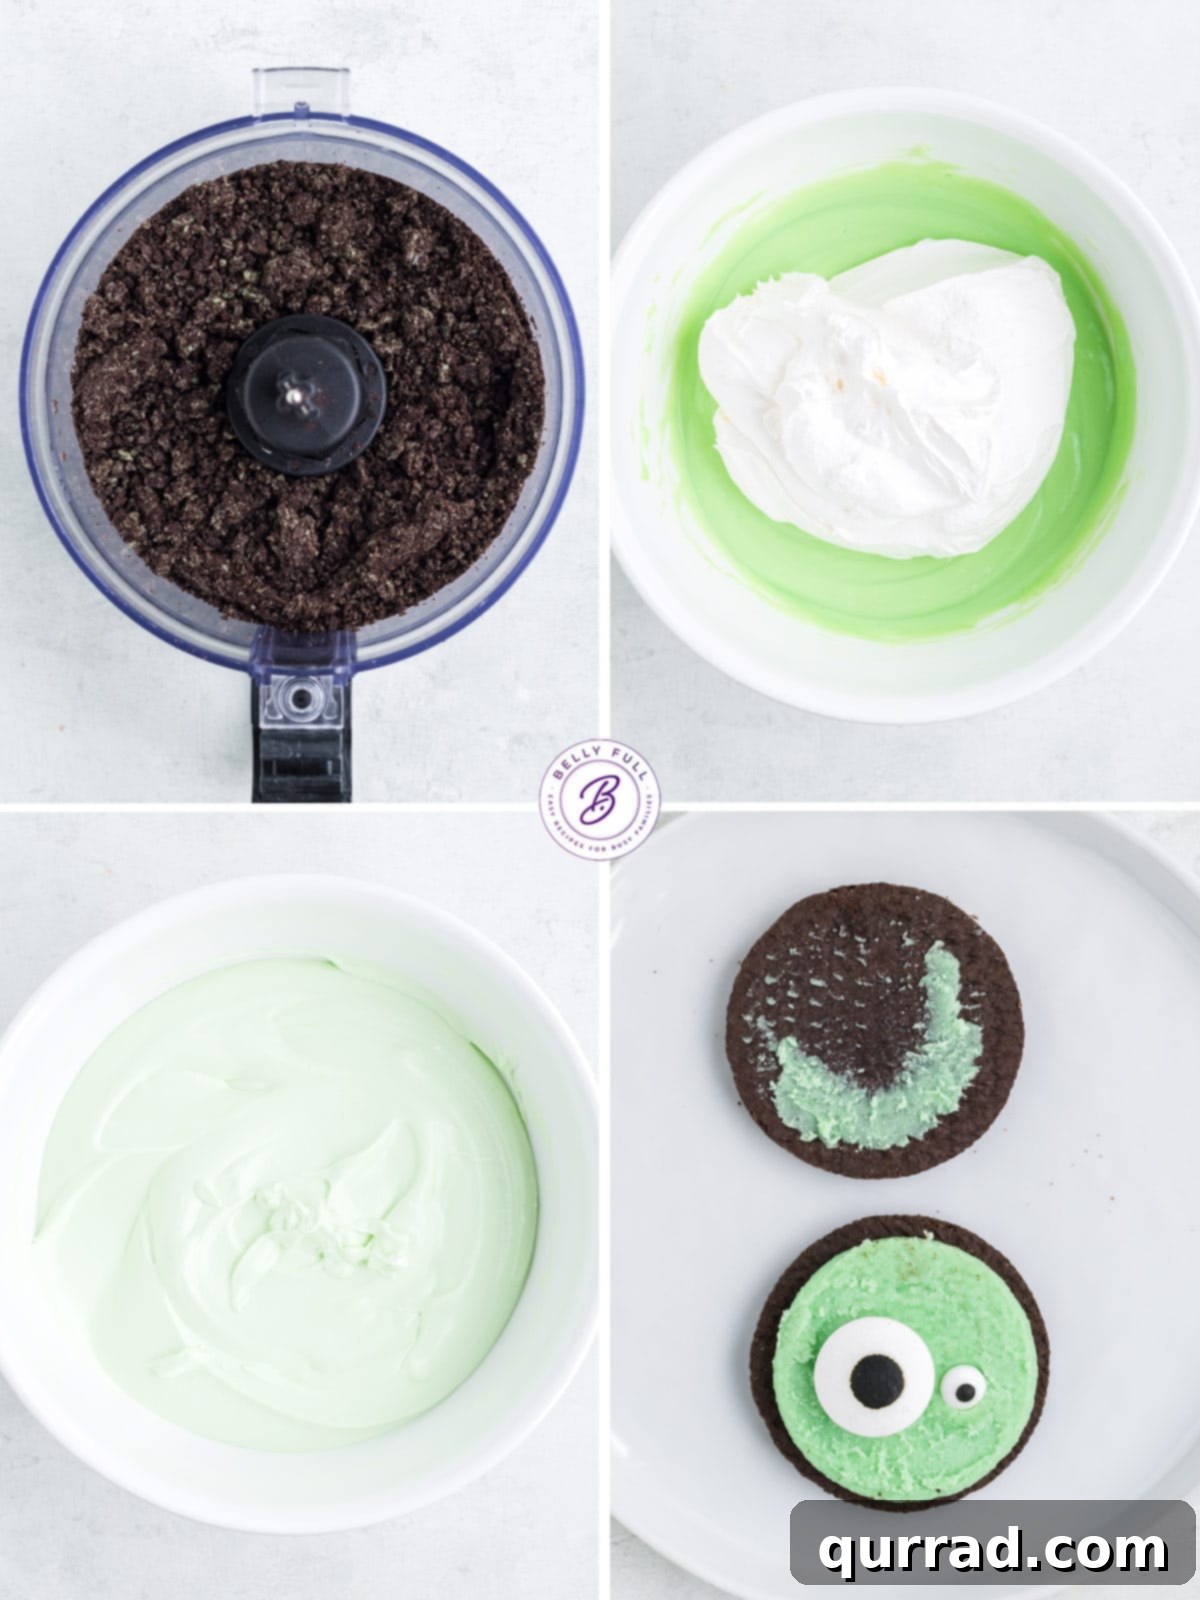
- Prepare the Oreos: Begin by carefully separating 12 of your mint Oreo cookies. Gently twist each cookie to detach one side, ensuring the creamy filling remains intact on the other half. Set aside the 12 cookie halves with the exposed filling – these will become the “zombie eyes.” Take the remaining Oreos (both the plain halves and any unseparated cookies) and crush them thoroughly. A food processor works best for achieving a fine, dirt-like texture, but you can also place them in a resealable bag and crush them with a rolling pin. Once crushed, set these cookie crumbs aside.
- Make the Ghastly Green Pudding: In a large mixing bowl, combine the chilled whole milk, the instant white chocolate pudding mix, and the green food coloring. Whisk these ingredients vigorously for 1 to 2 minutes. Continue whisking until the mixture begins to visibly thicken. The goal is a smooth, lump-free pudding that holds its shape.
- Fold in the Cool Whip: Once your green pudding has thickened, gently fold in the thawed Cool Whip. Use a spatula or a large spoon to incorporate the whipped topping, being careful not to overmix. Overmixing can deflate the Cool Whip and reduce the airy, creamy texture of your finished pudding. The mixture should be light green and uniformly blended.
- Assemble the Dirt Pudding Cups: Now it’s time to build your spooky layers! Start by spooning 1-2 tablespoons of the crushed Oreo crumbs into the bottom of each serving cup. This forms the “dirt” foundation. Next, add a generous layer of the green pudding mixture on top of the cookies. Continue alternating layers of crushed Oreos and green pudding until your cups are nearly full, always ensuring you finish with a final layer of crushed Oreos on top to mimic fresh grave dirt.
- Chill to Perfection: Once assembled, cover the pudding cups (you can use plastic wrap) and place them in the refrigerator. Allow them to chill for at least one hour. This crucial step allows the pudding to fully set and ensures the flavors meld beautifully, resulting in a firm yet creamy dessert.
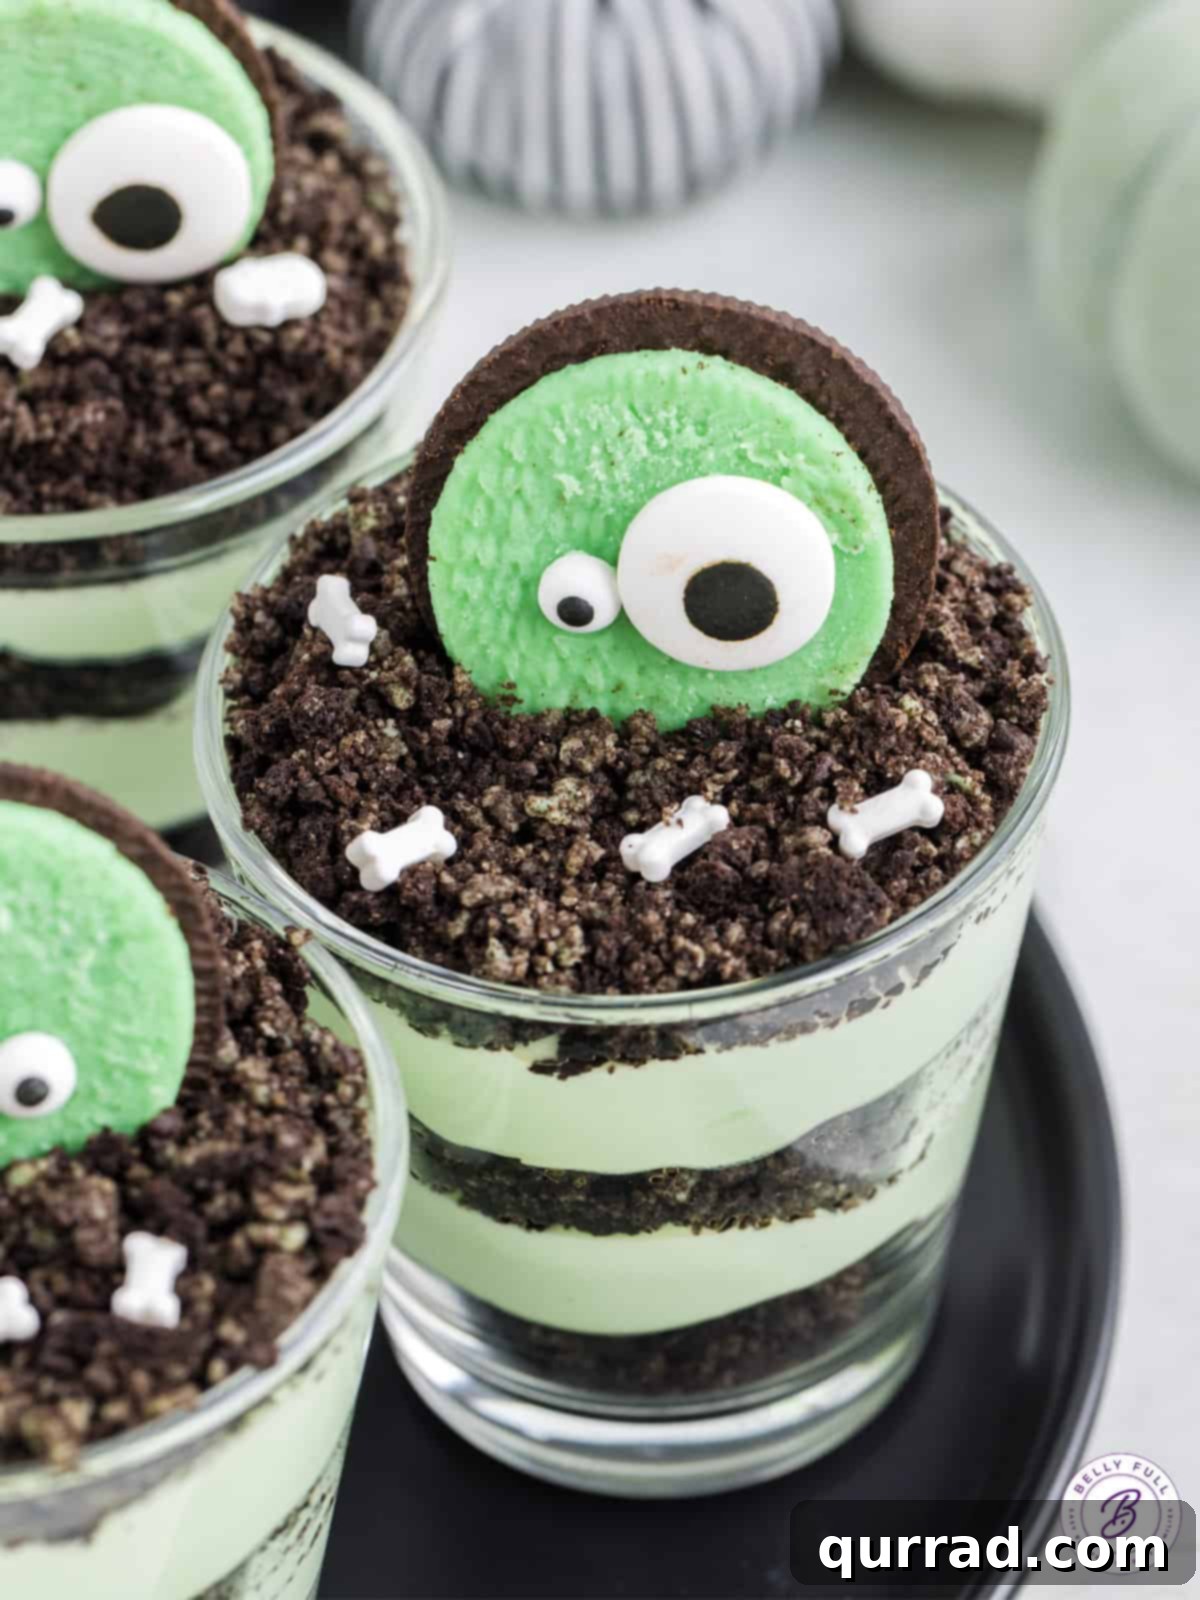
- Decorate Your Zombies: Just before you are ready to serve, retrieve the cookie halves with the exposed filling you set aside earlier. Gently press one large candy eyeball and one small candy eyeball into the white filling of each cookie half. This creates the comical yet eerie zombie face. Carefully press these decorated cookies into the top layer of crushed Oreos in your pudding cups, positioning them upright so they appear to be peeking out from the “dirt.” For an extra touch of morbid charm, sprinkle additional bone or skeleton sprinkles on top of the crushed Oreos. Serve immediately and enjoy the frightful fun!
Pro Tips for Perfectly Spooky Pudding Cups
To ensure your Halloween dirt pudding cups are nothing short of spectacular, keep these expert tips in mind during preparation. These small details can make a big difference in the final taste, texture, and presentation of your ghoulish treats:
- The Importance of Chilled Whole Milk: For the ultimate creamy and firm pudding, always use chilled whole milk. The cold temperature helps the instant pudding mix set more effectively, resulting in a thicker, more stable consistency. While 2% milk can be used if whole milk is unavailable, be aware that the pudding may be slightly less creamy and robust in texture. Avoid skim milk or non-dairy substitutes unless specifically formulated for pudding, as they often lack the fat content needed for proper setting.
- Switch Up the Pudding Flavor: Don’t be afraid to experiment with different instant pudding flavors! While white chocolate pudding provides an excellent base that allows the mint and green color to stand out, vanilla pudding is another fantastic and versatile option. For a richer, darker “dirt” effect, you could even try instant chocolate pudding, though it might make the green food coloring less vibrant.
- Thaw Cool Whip in Advance: This is a crucial step for achieving a smooth, well-incorporated pudding. Cool Whip or any other frozen whipped topping must be completely thawed before being folded into the pudding mixture. For best results, transfer the tub of Cool Whip from the freezer to the refrigerator at least 4 hours before you plan to use it, or even overnight. Attempting to fold partially frozen Cool Whip will result in a lumpy texture and a less appealing dessert.
- Achieve the Perfect Green Hue: The color of your pudding will inevitably lighten quite a bit once the white Cool Whip is folded in. To compensate for this, start by making your pudding mixture a shade or two darker than your desired final green color. It’s always easier to add more food coloring to intensify the shade than to try and lighten it once it’s fully mixed. However, once the Cool Whip is added, try to stir as little as possible to maintain its airy texture.
- Time Your Decorations Wisely: For the most impactful presentation, wait until just before serving to add the candy eyeballs and bone/skeleton sprinkles. While these decorations are sturdy, they can sometimes absorb moisture from the pudding over time, which might cause the eyeballs to slide or the sprinkles to soften. Adding them at the last minute ensures they look fresh, vibrant, and perfectly placed for maximum spooky effect.
- Serving Cup Versatility: The type of serving cup you choose can influence both the aesthetic and the yield. Clear plastic cups are fantastic for showcasing the distinct layers of “dirt” and green pudding. Mason jars offer a charming, rustic touch, while small glass bowls can create a more elegant presentation. Experiment with different sizes; smaller cups might yield more servings, while larger ones offer a more substantial treat.
Creative Variations & Customization for Your Spooky Creations
While the classic Zombie Dirt Pudding Cup recipe is undeniably fantastic, there’s always room to unleash your creativity and customize these treats to your liking. Here are some fun variations and customization ideas to make your Halloween desserts truly unique:
- Cookie Crumb Alternatives: Instead of mint Oreos, explore other cookie options. Regular chocolate sandwich cookies are a classic choice and still create that iconic “dirt” look. For a different flavor profile, consider crushed graham crackers, vanilla wafers, or even chocolate chip cookies. Gluten-free Oreos are also an excellent substitute for those with dietary restrictions.
- Pudding Flavor Swaps: The instant pudding aisle offers a treasure trove of possibilities! While white chocolate and vanilla are superb, imagine the eerie possibilities with pistachio pudding (naturally green!), or even chocolate pudding for a darker, more menacing base. Butterscotch or cheesecake flavored puddings could also add a unique twist.
- Topping Extravaganza: Beyond candy eyeballs and skeleton sprinkles, the sky’s the limit for spooky toppings. Consider adding gummy worms peeking out from the “dirt” for a classic touch. Crushed chocolate bars, mini chocolate chips, or even a drizzle of chocolate syrup can enhance the richness. For a more gruesome look, a few drops of red gel food coloring can create “blood” effects.
- “Grave” Decorations: Elevate the graveyard theme with miniature plastic tombstones or candy corn arranged as gravestones. Small gummy brains or severed gummy fingers can add a truly horrifying (and delicious) touch to the top.
- Themed Colors: While green is perfect for zombies, you could adapt the food coloring for other Halloween themes. Orange pudding for pumpkins, purple for witches, or even black for a truly dark and mysterious dessert.
- Dairy-Free Options: For guests with dairy sensitivities, consider using dairy-free Oreos (ensure they are certified GF/DF if necessary), along with a dairy-free instant pudding mix and a plant-based whipped topping. Always check ingredient labels carefully.
Serving Your Spooky Creations with Style
These zombie dirt pudding cups are more than just a dessert; they’re an experience waiting to be devoured! They make a fantastic addition to any Halloween party spread or can simply be a special, unexpected treat to surprise the kids with after school. Their individual serving size makes them hygienic and easy for guests to grab and enjoy. For the best taste and texture, keep your pudding cups refrigerated until the moment you’re ready to serve. As mentioned in our tips, it’s ideal to add the delicate candy eyeballs and sprinkles just before bringing them out, ensuring they look their absolute best. Provide small spoons and watch as smiles (and maybe a few shrieks of delight) appear on everyone’s faces!
If you’re planning a full Halloween feast, these pudding cups pair wonderfully with other themed dishes. Imagine serving them alongside savory treats like mummy hot dogs, or other sweet delights such as colorful candy corn waffles for breakfast, or a vibrant monster fruit dip with apple mouths. Creating a cohesive spooky menu will make your Halloween celebration truly unforgettable!
Proper Storage & Make-Ahead Tips
One of the many advantages of these no-bake pudding cups is their flexibility when it comes to preparation. You can easily make them ahead of time, which is a huge bonus when planning for parties or busy evenings. Once assembled, any leftover zombie dirt pudding cups should be stored in the refrigerator. Cover them tightly with plastic wrap to prevent them from absorbing refrigerator odors and to maintain freshness. They will keep well for 2-3 days.
It’s important to note that the cookie layers will naturally lose some of their initial crunch the longer they sit in the pudding, becoming slightly softer. If you prefer a crisp top layer, you can always add a fresh sprinkle of cookie crumbs to the top of any leftover cups just before serving. This simple trick will refresh their texture and appearance. For party planning, assembling the cups (without decorations) the day before is perfectly fine, then add the candy eyeballs and sprinkles right before guests arrive.
Frequently Asked Questions About Zombie Dirt Pudding Cups
Here are answers to some common questions you might have when making these spooky treats:
- Can I use a different type of milk? Whole milk is highly recommended for the best texture and setting ability. While 2% milk can work, skim milk or non-dairy alternatives (like almond or soy milk) may prevent the pudding from setting properly, resulting in a runnier consistency. If you must use a non-dairy option, look for one specifically labeled for pudding or baking.
- Can I make my own whipped cream instead of Cool Whip? Absolutely! If you prefer homemade whipped cream, ensure it is stabilized for best results. Stabilized whipped cream holds its shape better and won’t weep over time, making it ideal for layered desserts. You can achieve this by adding a small amount of unflavored gelatin or cream cheese to your whipped cream.
- How far in advance can I prepare these? You can assemble the pudding cups (without the cookie decorations) up to 1-2 days in advance. Store them covered in the refrigerator. Add the candy eyeballs and sprinkles just before serving for the freshest look.
- Are these gluten-free? The original recipe uses regular Oreos and instant pudding mix, which typically contain gluten. However, you can easily make these gluten-free by using certified gluten-free chocolate sandwich cookies and ensuring your instant pudding mix is also gluten-free. Always check product labels carefully.
- Can I skip the mint Oreos if I don’t like mint? Yes, you can! Regular chocolate sandwich cookies work perfectly well. You’ll still achieve the “dirt” effect, but the green color will primarily come from the food coloring in the pudding.
More Hauntingly Delicious Halloween Desserts to Try
If you loved making these Zombie Dirt Pudding Cups, you’re in for a treat! Explore more of our fun and festive Halloween dessert recipes to complete your spooky spread:
- Witch Hat Cookies: Adorable and easy-to-make cookies that resemble classic witch hats, perfect for adding a touch of magic to your dessert table.
- Monster Oreo Pops: Fun, colorful, and customizable Oreo pops transformed into playful monsters – a favorite with kids!
- Mummy Oreo Balls: Creamy, chocolatey Oreo balls decorated to look like cute little mummies, requiring no baking.
- Hocus Pocus Cupcakes: Themed cupcakes inspired by the beloved Halloween movie, complete with festive colors and decorations.
We hope you thoroughly enjoy this deliciously easy recipe for Zombie Dirt Pudding Cups. Your feedback means the world to us, so please don’t hesitate to leave a review below and let us know how your spooky creations turned out!
Zombie Dirt Pudding Cups
Made with Oreos, instant pudding, and Cool Whip, these Zombie Dirt Pudding Cups are a fun no-bake treat for any Halloween celebration. Smooth and creamy with a light mint flavor, they’re loved by kids and adults alike.
Prep Time: 10 mins
Chill Time: 1 hr
Total Time: 1 hr 10 mins
Servings: 8 pudding cups
Ingredients
- 18.7 ounce package Mint Oreos (approx. 39 cookies)
- 3.3 ounce box Instant white chocolate pudding mix
- 2 cups whole milk, chilled (see note)
- 6-8 drops green food color
- 8 ounce tub Cool Whip, thawed (see note)
- 8-12 large candy eyeballs
- 8-12 small candy eyeballs
- Bone or skeleton sprinkles (optional)
Instructions
- Gently twist one side off 12 of the Oreo cookies so the filling remains intact. Set the cookie halves with exposed filling aside.
- Crush the remaining Oreos into a fine dirt-like texture in a food processor or by hand and set aside.
- Whisk the milk, pudding mix, and food color in a large bowl for 1-2 minutes or until the pudding thickens.
- Fold the Cool Whip into the green pudding mixture until well combined.
- Sprinkle 1-2 tablespoons of crushed Oreo crumbs into the bottom of each serving glass.
- Add a layer of the pudding mixture on top of the cookies.
- Continue creating alternating layers of crushed cookies and pudding, ending with a layer of crushed Oreos.
- Chill the pudding cups in the refrigerator for at least an hour to allow the pudding to set.
- When ready to serve, gently press one large and one small candy eyeball into the exposed filling of the separated cookies to create the zombies.
- Press the decorated cookies into the pudding so they are standing upright.
- Decorate the tops with bone or skeleton sprinkles if desired. Serve immediately.
Notes
- Replace the Cool Whip: The whipped topping can be replaced with homemade stabilized whipped cream, if preferred, for a richer taste.
- Use whole milk: Avoid skim milk or milk substitutes, as the pudding may not set properly. Chilled whole milk ensures the best creamy texture.
- Adjust green color: The pudding color will lighten when mixed with Cool Whip, so make the initial pudding mixture slightly darker than your desired final shade.
Nutrition
Calories: 452kcal | Carbohydrates: 68g | Protein: 6g | Fat: 18g | Saturated Fat: 8g | Polyunsaturated Fat: 3g | Monounsaturated Fat: 7g | Trans Fat: 0.04g | Cholesterol: 8mg | Sodium: 375mg | Potassium: 278mg | Fiber: 2g | Sugar: 46g | Vitamin A: 121IU | Calcium: 110mg | Iron: 8mg
Nutritional information provided is an automatic calculation and can vary based on the exact products you use and any changes you make to the recipe. If these numbers are very important to you, we recommend calculating them yourself.