
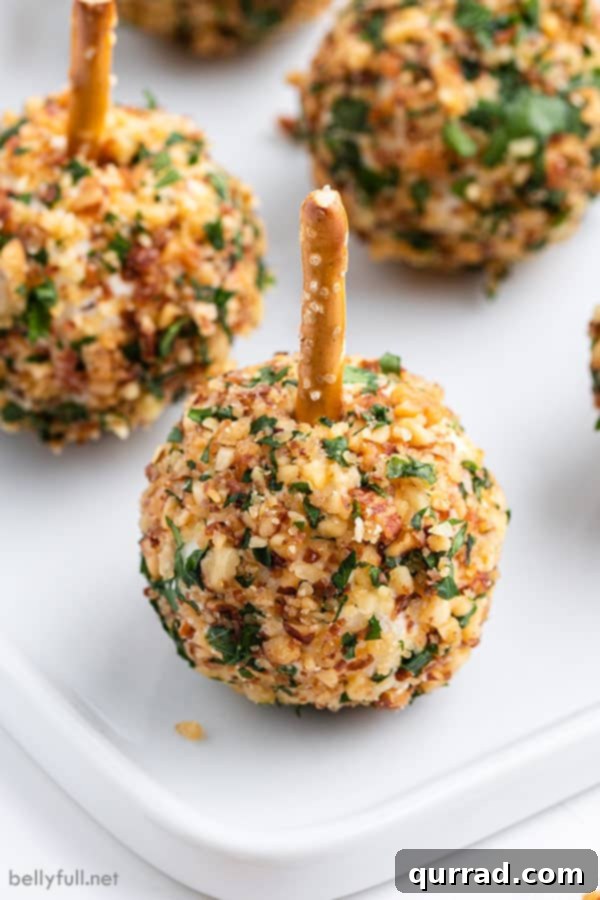
Get ready to elevate your appetizer game with these irresistible Mini Pizza Cheese Balls! Imagine the classic flavors of your favorite pepperoni pizza, perfectly encapsulated in a bite-sized, creamy cheese ball, all expertly coated in crunchy, smoked almonds. These aren’t just any cheese balls; they are designed for ultimate party convenience and maximum flavor impact, ensuring every guest can enjoy a delectable, single-serving snack without any fuss. Say goodbye to messy double-dipping and hello to effortless entertaining!
Whether you’re hosting a casual get-together, a lively game day party, or simply seeking a sophisticated yet easy-to-make snack, these mini cheese balls hit all the right notes. Their charming size makes them incredibly appealing, while the rich combination of cheeses, savory pepperoni, and aromatic seasonings delivers a burst of pizza goodness in every mouthful. Pair them alongside these delightful mini tortellini kabobs for a diverse spread, or incorporate them into an elegant antipasto charcuterie board to truly impress your guests.

Effortless Elegance: Easy Mini Cheese Balls for Any Occasion
The cheese ball is a timeless appetizer, a true crowd-pleaser that graces countless party tables. Its enduring popularity stems from its inherent simplicity and incredible versatility. While traditional cheese balls often come in a large, communal format, we’ve reimagined this beloved classic into individual, bite-sized portions. This ingenious adaptation not only makes them easier to eat but also ensures a more hygienic serving experience, eliminating any concerns about shared utensils.
Our particular recipe takes a delightful turn towards the familiar comfort of pizza. Each mini cheese ball is a creamy blend of smooth cream cheese and rich Monterey Jack, infused with savory diced pepperoni and a medley of classic Italian spices. The secret to their irresistible crunch lies in their coating: perfectly crushed smoked almonds that add an incredible depth of flavor and satisfying texture. This combination creates an appetizer that’s both nostalgic and exciting, guaranteed to be devoured almost as quickly as you can make them!
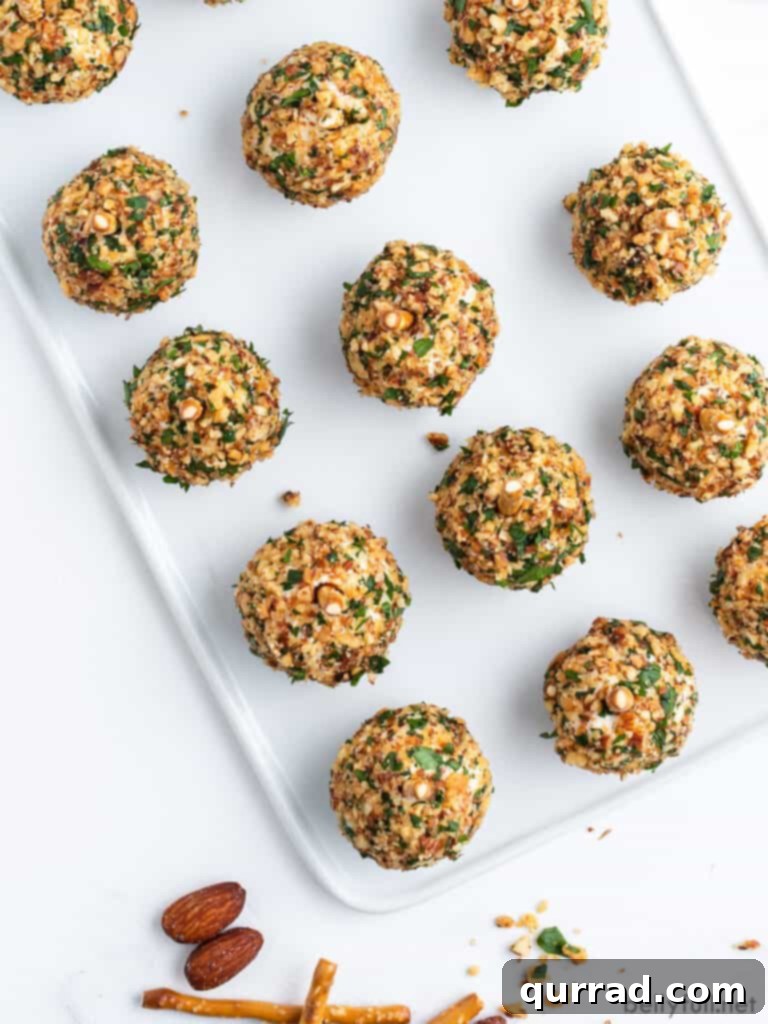
Crafting Perfection: Essential Ingredients for Your Mini Pizza Cheese Balls
Creating these sensational mini pizza cheese balls requires a handful of accessible ingredients, each playing a crucial role in delivering that authentic, savory flavor. The beauty of this recipe lies in its straightforward components, allowing you to whip up a gourmet-tasting appetizer with minimal effort. Here’s a detailed look at what you’ll need to gather:
- Cream Cheese: The foundation of our cheese balls, cream cheese provides the essential creamy texture and tangy base. Whether you opt for full-fat or reduced-fat varieties, ensure it’s softened to room temperature before mixing. This crucial step guarantees a smooth, lump-free mixture that’s easy to blend and form into perfect spheres.
- Monterey Jack Cheese: This mild, semi-hard cheese melts beautifully and offers a creamy, buttery flavor that complements the cream cheese and pepperoni wonderfully. For an extra layer of flavor and superior texture, we highly recommend freshly grating your Monterey Jack cheese. Pre-packaged shredded cheeses often contain anti-caking agents that can slightly alter the texture and melt. Alternatively, if you prefer a sharper, more robust cheese profile, a good quality sharp cheddar can be an excellent substitute, bringing a bolder character to your mini cheese balls.
- Pepperoni: The star of our “pizza flair,” finely diced pepperoni introduces a delightful smoky, spicy, and savory kick that instantly evokes the taste of your favorite pizza. Choose high-quality pepperoni for the best flavor. Ensure it’s diced very small so it incorporates smoothly into the cheese mixture and doesn’t make the balls difficult to form.
- Seasonings: A carefully selected blend of seasonings elevates the overall taste.
- Worcestershire Sauce: Just a half teaspoon of this versatile sauce adds a deep umami note and a subtle tang, enhancing the savory components of the cheese and pepperoni. It’s a secret weapon for boosting overall flavor complexity.
- Dried Italian Seasoning: This classic herb blend typically includes oregano, basil, thyme, rosemary, and marjoram, providing the quintessential “pizza” aroma and taste. It brings warmth and aromatic depth to the cheese mixture.
- Fresh Chopped Parsley: Beyond its vibrant green color, fresh parsley contributes a clean, herbaceous freshness that brightens the rich flavors of the cheese and pepperoni. It’s incorporated into both the cheese mixture and the outer coating, ensuring a consistent burst of freshness.
- Smoked Almonds: These are key for the crunchy, flavorful exterior. Smoked almonds add an incredible depth of nutty, savory flavor and a wonderful textural contrast to the creamy interior. They need to be pulsed in a food processor until they form fine crumbs. This process makes them easy to mold around the cheese balls, creating a uniform and delicious coating that holds well.
- Pretzel Sticks (Optional): For an added touch of charm and practicality, pretzel sticks serve as edible skewers, making these mini cheese balls incredibly easy to pick up and enjoy. Breaking them in half creates the perfect length for these bite-sized treats. They also offer a salty, crunchy counterpoint, essentially acting as a built-in cracker.
Simplified Steps: How to Easily Make These Delectable Cheese Balls
Crafting these delicious mini pizza cheese balls is surprisingly simple, broken down into just four straightforward steps. You’ll be amazed at how quickly you can create such an impressive appetizer. Follow these guidelines for a seamless cooking experience:
- Prepare the Cream Cheese Mixture: Begin by combining the softened cream cheese, finely shredded Monterey Jack cheese, diced pepperoni, dried Italian seasoning, and Worcestershire sauce in a medium-sized bowl. Using a handheld mixer, beat these ingredients together until they are thoroughly combined and smooth. The mixture should be uniform in color and texture, with the pepperoni and seasonings evenly distributed. Once mixed, cover the bowl and transfer it to the refrigerator for approximately 15 minutes. This brief chilling period helps the mixture firm up slightly, making it much easier to handle and shape in the next step.
- Form the Mini Balls: After the mixture has chilled, take it out of the refrigerator. Using a small spoon, a mini ice cream scoop, or your hands, form the cheese mixture into 16 small, uniform balls, each roughly 1/2-inch in diameter. Aim for consistency in size to ensure even chilling and a professional presentation. As you form each ball, place it on a clean baking sheet lined with parchment paper or wax paper. Once all the balls are formed, return the baking sheet to the refrigerator. Allow them to chill for about 1 to 2 hours, or until they are completely firm. This prolonged chilling time is crucial; it prevents the cheese balls from losing their shape when coated and ensures they hold up well during serving.
- Create the Flavorful Outer Coating: While your cheese balls are chilling, prepare their irresistible coating. Place the smokehouse flavored almonds into a food processor. Pulse the almonds a few times until they are finely ground into crumbs. Be careful not to over-process them into a paste; you want a crumbly texture. Transfer the almond crumbs to a shallow bowl. Add the very finely chopped fresh parsley to the bowl with the almond crumbs. Mix these two ingredients together thoroughly until they are well combined. The vibrant green parsley will contrast beautifully with the darker almond crumbs and add a fresh, herbaceous note to the coating.
- Generously Coat the Mini Balls: Once the cheese balls are firm from chilling and your coating mixture is ready, it’s time to assemble. Take each chilled cheese ball and roll it gently but firmly in the almond-parsley mixture. Press lightly as you roll to ensure the crumbs adhere well to the surface of the cheese. The goal is to achieve a complete and even coating on all sides of each ball. The firmness of the chilled cheese will help the coating stick effectively. Once coated, place the finished mini cheese balls back on the baking sheet.

Flexible Serving: Making it a Giant Cheese Ball (or Other Delicious Variations)
While our mini cheese balls are designed for convenience and individual enjoyment, we understand that sometimes a grand, traditional cheese ball is what the occasion calls for. If you still prefer the classic centerpiece, it’s incredibly easy to adapt this recipe. Simply mold the entire cream cheese mixture into one single, large ball instead of forming smaller ones. Proceed to coat the giant cheese ball with the almond crumbs, ensuring an even and attractive layer. Cover it tightly with plastic wrap and chill it until it’s firm and ready to serve. Instead of individual pretzel sticks, present your magnificent cheese ball with an array of whole pretzels, a variety of crackers, pita chips, or even vegetable sticks arranged artfully around it. This offers a more communal and classic approach to serving.
Beyond the size, don’t hesitate to explore other variations to suit your taste or theme. Want more heat? Add a pinch of red pepper flakes or a dash of hot sauce to the cheese mixture. Craving different textures? Experiment with a coating of crushed walnuts, pecans, or even sesame seeds. For a more sophisticated twist, consider incorporating finely chopped sun-dried tomatoes or a touch of truffle oil into the mixture. The possibilities are endless, allowing you to customize this recipe to perfection every time.
Serving Your Cheese Balls: The Perfect Accompaniments
The beauty of a creamy cheese ball lies in its incredible compatibility with a wide variety of dippers. There’s truly no “wrong” way to serve them, as cream cheese pairs delightfully with almost anything crunchy. For a classic experience, we’re particularly fond of the buttery richness of Ritz crackers or the wholesome crunch of Wheat Thins. Their subtle flavors allow the pepperoni pizza profile of the cheese balls to shine through.
However, don’t limit your options! Consider offering an assortment of:
- Crisp Veggie Sticks: Carrot sticks, celery sticks, cucumber slices, or bell pepper strips provide a refreshing and healthy crunch.
- Crostini: Lightly toasted baguette slices add a sophisticated touch and sturdy base.
- Pretzel Crackers: If you’re not planning on inserting pretzel sticks directly into the cheese balls, pretzel crackers offer that beloved salty crunch on the side.
- Pita Chips or Bagel Chips: For a heartier dipping option.
- Apple or Pear Slices: The sweetness and crispness of fruit can offer an unexpected but delightful contrast.
The key is to offer a variety of textures and flavors that guests can choose from, making your appetizer spread inviting and interactive.

Smart Storage & Make-Ahead Tips for Your Cheese Balls
One of the fantastic advantages of these mini pizza cheese balls is their make-ahead potential, making party planning significantly less stressful. You can prepare the cheese mixture and form the balls up to 5 days in advance. Simply ensure they are tightly covered with plastic wrap to prevent them from drying out or absorbing refrigerator odors, and keep them well-chilled in the refrigerator.
However, there’s a crucial tip regarding the outer coating: it’s best to wait until closer to serving time—ideally within an hour or two—before rolling the cheese balls in the almond-parsley mixture. If you coat them too far in advance, the nuts can absorb moisture from the cheese, potentially becoming soft and losing their desirable crunch. Nobody wants a soggy coating!
Once fully assembled, if you’re not serving them immediately, loosely cover the finished cheese balls with plastic wrap and return them to the refrigerator. For the best flavor and texture, allow them to sit at room temperature for about 15 minutes before serving. This brief period helps the cheese soften slightly, enhancing its creaminess and allowing the flavors to truly bloom. A final, important note: only insert the pretzel sticks right before serving. If added too soon, the pretzels can become soft and mushy from the moisture in the cheese, compromising their crispness. Enjoy these delightful bites at their freshest!
More Crowd-Pleasing Party Appetizers to Explore:
If you loved these mini pizza cheese balls, you’re in for a treat! Discover more fantastic recipes to round out your appetizer spread and impress your guests:
- Grape Jelly Meatballs
- Mini Tortellini Kabobs
- Cucumber Sandwiches
- Jalapeno Poppers
- Bacon Wrapped Chicken Bites
- Cheesy Corn Dip
We hope you thoroughly enjoy this delicious and easy recipe! Your feedback means the world to us, so please consider leaving a review below. Don’t forget to connect with us and stay updated on all our latest recipes by following Belly Full on TikTok, Facebook, Instagram, Pinterest, and YouTube!
Recipe: Mini Pizza Cheese Balls
These bite-sized wonders combine the beloved flavors of pepperoni pizza with the creamy indulgence of a classic cheese ball. Perfect for parties, these individual servings are easy to make, fun to eat, and guaranteed to be a hit!

Prep Time: 20 minutes
Chill Time: 2 hours
Total Time: 2 hours 20 minutes
Servings: 16 mini cheese balls
Ingredients
- 8 ounces cream cheese, softened to room temperature
- 4 ounces (1 cup) finely shredded Monterey Jack cheese, room temperature
- 6 slices pepperoni, finely diced
- 1 teaspoon dried Italian seasoning
- 1/2 teaspoon Worcestershire sauce
- 1/3 cup smokehouse flavored almonds
- 1/3 cup fresh parsley, very finely chopped
- 8 pretzel sticks, broken in half, optional
Instructions
- Place the softened cream cheese, Monterey Jack cheese, finely diced pepperoni, dried Italian seasoning, and Worcestershire sauce in a medium bowl. Beat with a handheld mixer until all ingredients are thoroughly combined and the mixture is smooth. Cover the bowl and chill in the refrigerator for about 15 minutes, or until the mixture is firm enough to easily handle.
- Remove the chilled mixture from the fridge. Form it into 16 small balls, each approximately 1/2-inch round. Place these mini cheese balls on a baking sheet lined with parchment paper. Return the baking sheet to the refrigerator and chill for 1-2 hours, or until the balls are completely firm. This step is crucial for them to hold their shape during coating.
- While the cheese balls are chilling, prepare the coating. Place the smokehouse flavored almonds in a food processor. Pulse a few times until the almonds are finely crushed into crumbs. Transfer the almond crumbs to a shallow bowl, then add the very finely chopped fresh parsley. Mix well to combine the almonds and parsley evenly.
- Once the cheese balls are firm, remove them from the refrigerator. Roll each cheese ball individually in the almond-parsley mixture, pressing lightly to ensure the coating adheres firmly to the cheese. Ensure each ball is fully and evenly coated.
- Just before serving, take the pretzel sticks (which should be broken in half) and insert one into each mini cheese ball, with the broken side facing down. Arrange them on a platter and serve immediately. If not serving right away, cover loosely with plastic wrap and refrigerate. Allow to sit at room temperature for 15 minutes before serving for optimal flavor and texture. Remember to insert the pretzel sticks only just before serving to prevent them from becoming soggy. Enjoy!
Notes
Should you prefer to make a single, larger cheese ball instead of mini ones, simply mold the entire cream cheese mixture into one ball and coat it with the almond crumbs. Chill until ready to serve. For a giant cheese ball, offer whole pretzels or a variety of crackers on the side instead of inserting pretzel sticks into portions.
Nutrition Information (per mini cheese ball)
Calories: 97kcal |
Carbohydrates: 1g |
Protein: 3g |
Fat: 9g |
Saturated Fat: 4g |
Polyunsaturated Fat: 1g |
Monounsaturated Fat: 3g |
Trans Fat: 1g |
Cholesterol: 23mg |
Sodium: 99mg |
Potassium: 58mg |
Fiber: 1g |
Sugar: 1g |
Vitamin A: 352IU |
Vitamin C: 2mg |
Calcium: 79mg |
Iron: 1mg
Nutritional information provided is an automatic calculation and may vary based on the exact products used and any modifications to the recipe. If precise nutritional values are critical, we recommend calculating them independently.