
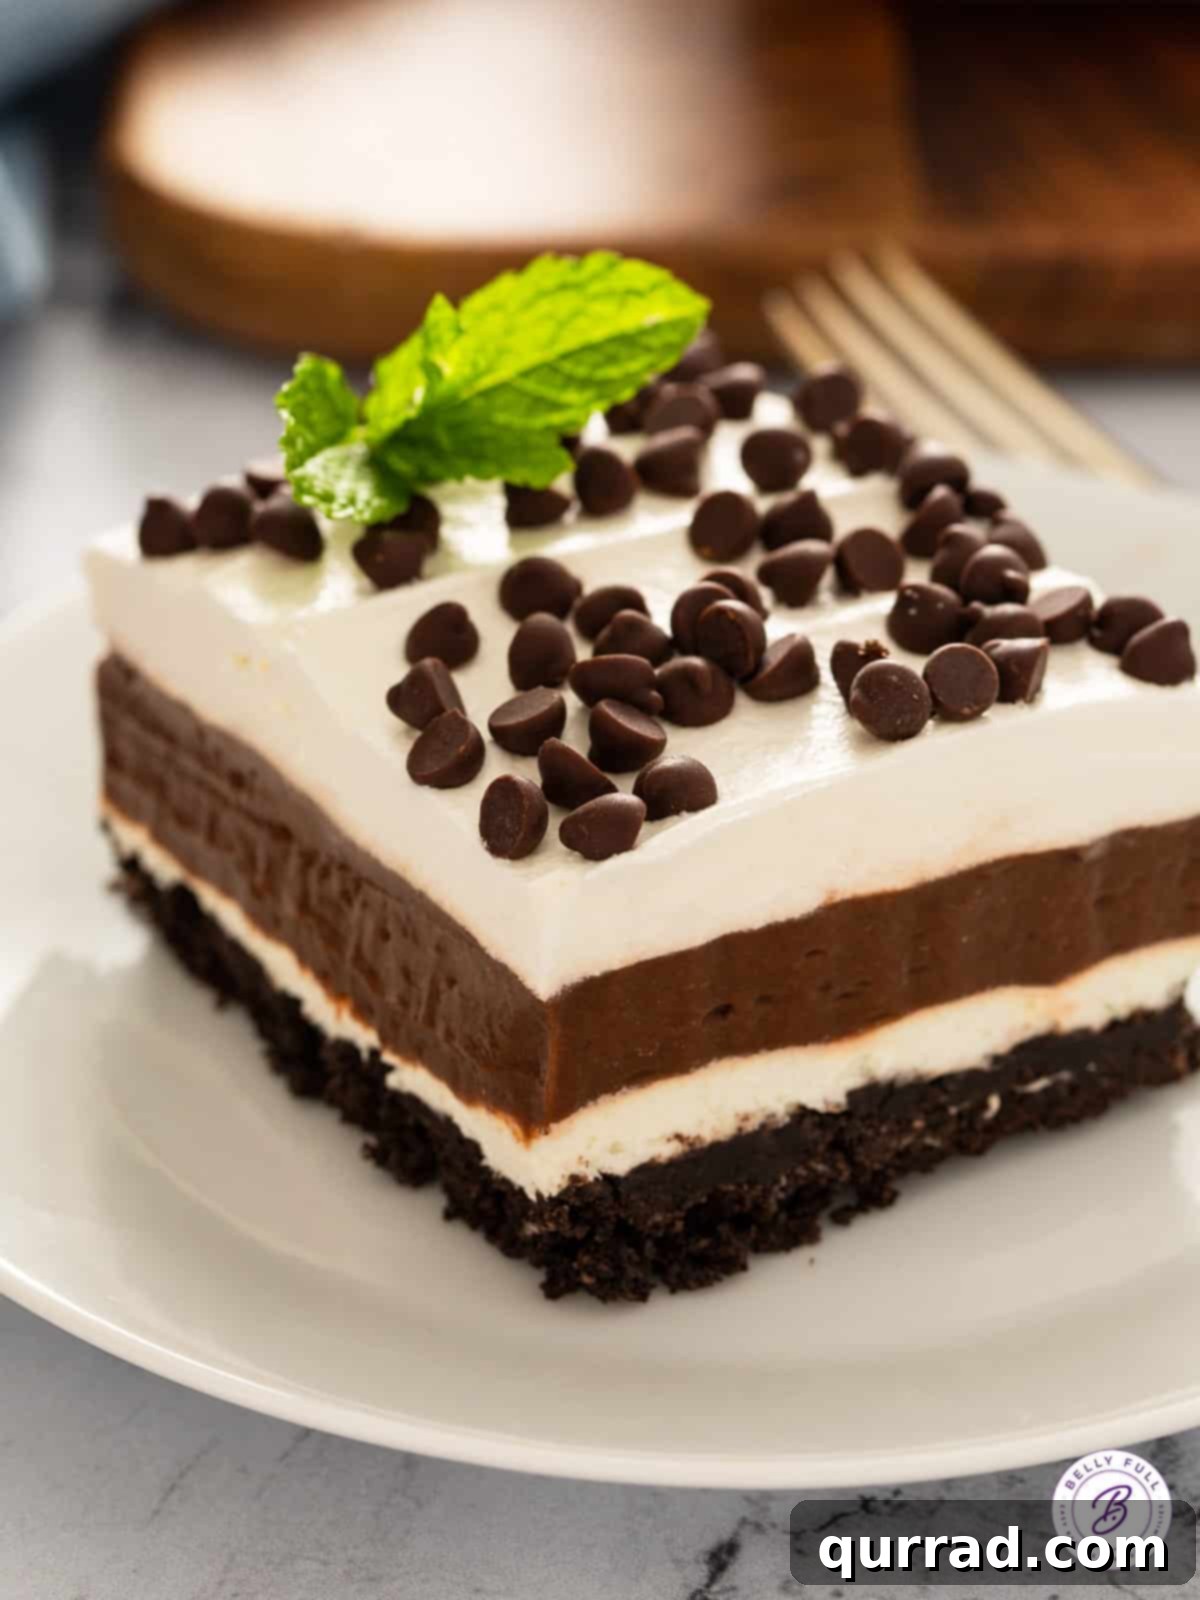
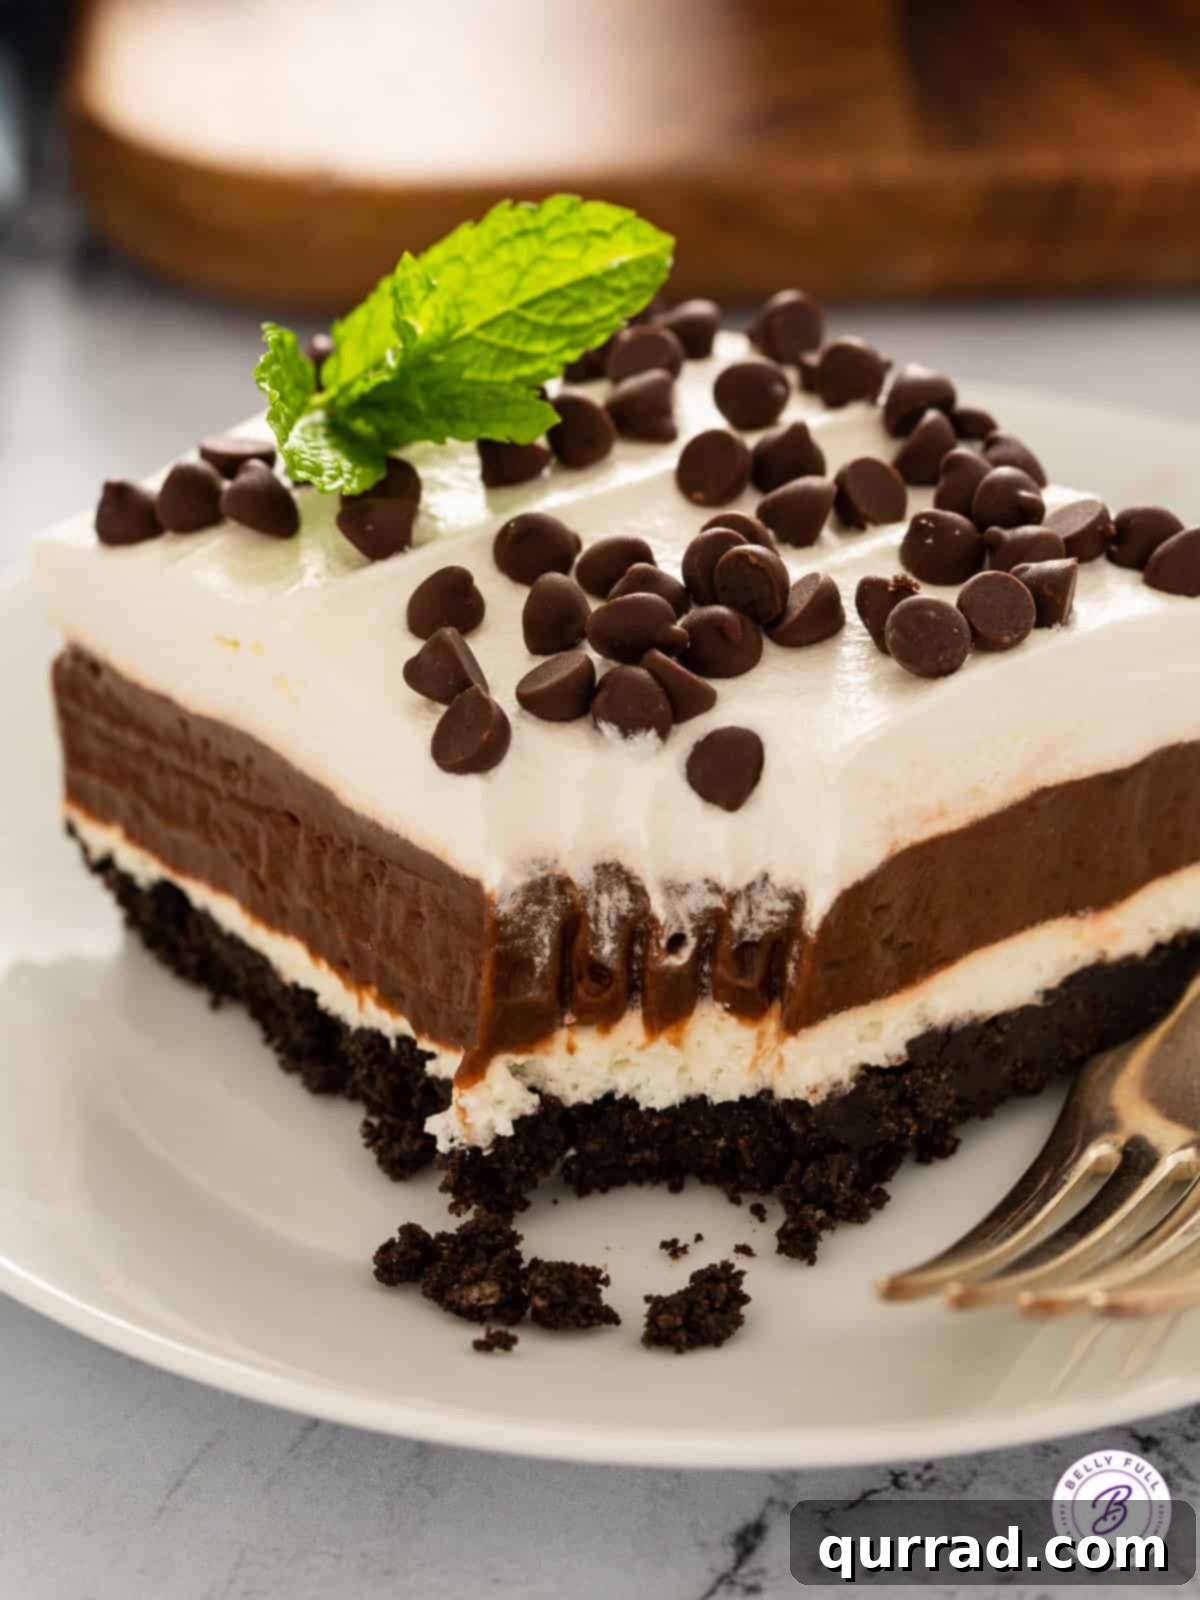
Delight in the ultimate no-bake indulgence with this incredibly easy Chocolate Lasagna recipe, affectionately known by many as Oreo Lush. This beloved dessert is a symphony of textures and flavors, featuring a crunchy Oreo cookie crust, a rich and creamy cheesecake-like filling, a smooth layer of decadent chocolate pudding, and a light, airy whipped topping finish. It’s a truly irresistible classic comfort dessert that promises to be a hit with both kids and adults, perfect for any occasion from a summer brunch to a cozy winter evening gathering, all year round!
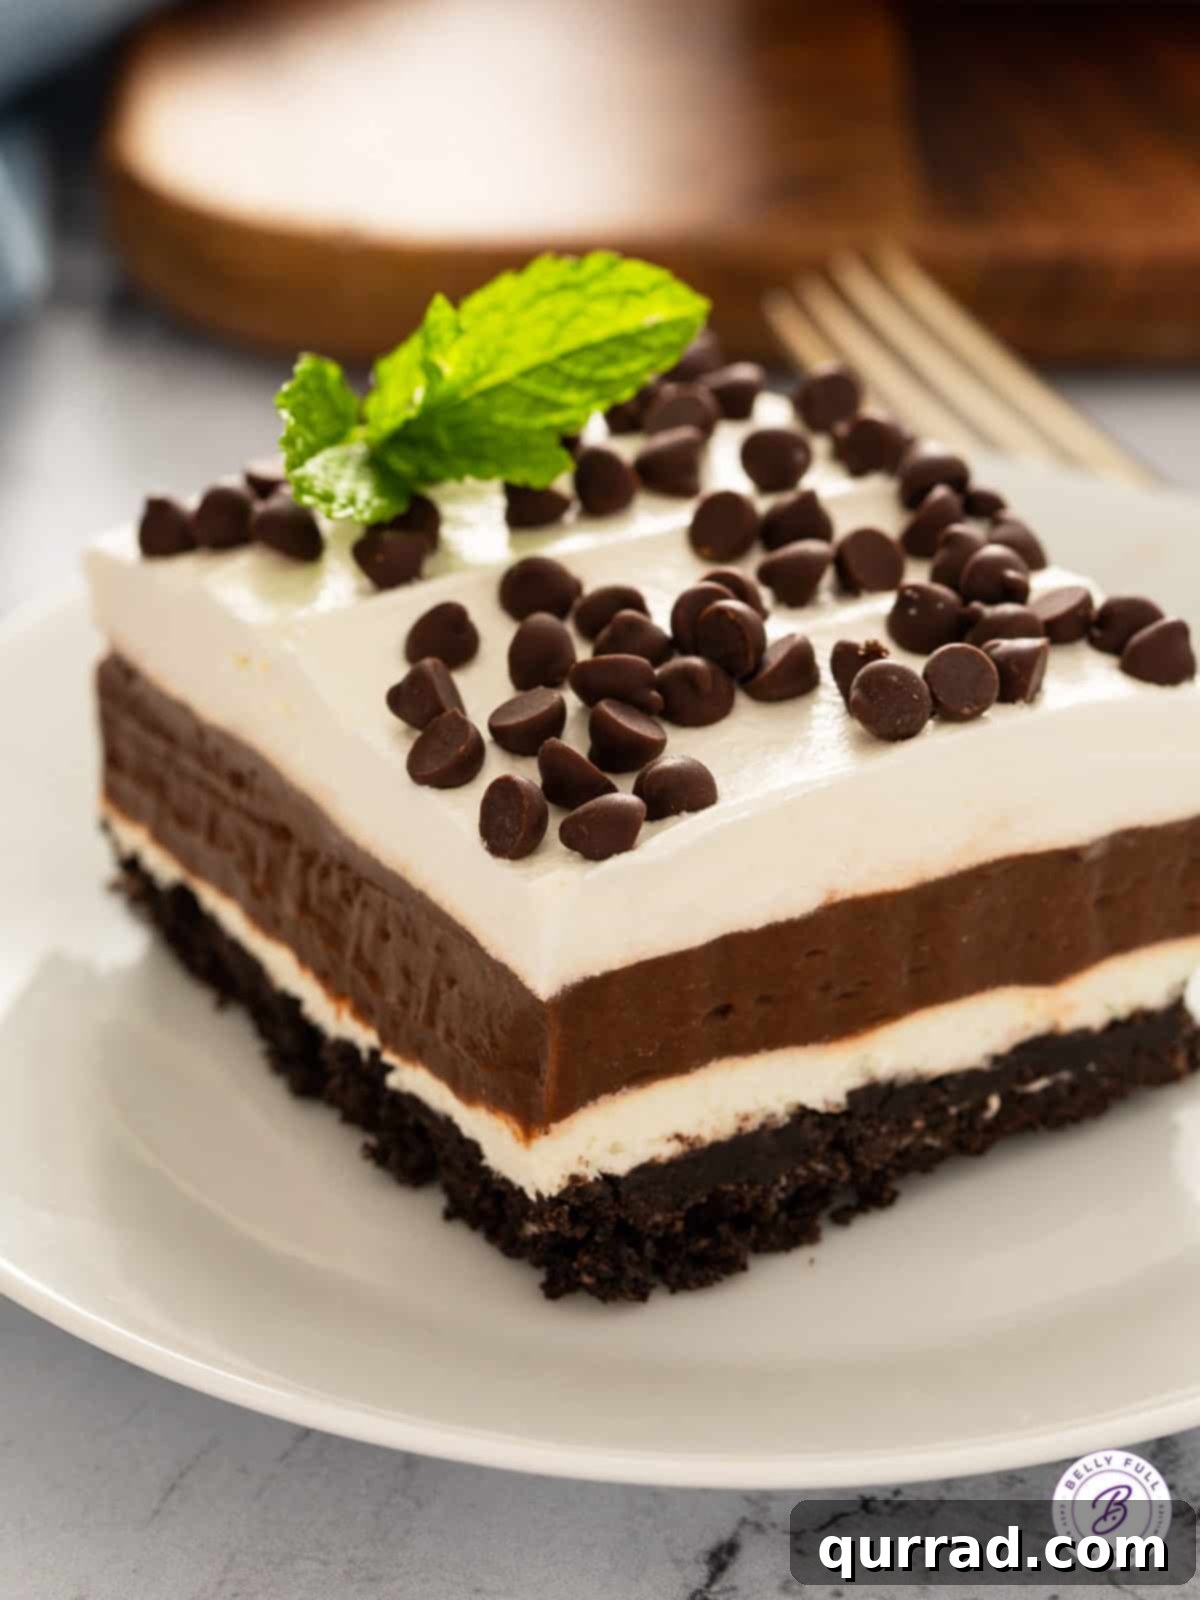
Easy No-Bake Chocolate Lasagna – The Ultimate Oreo Lush Experience
Few treats capture hearts quite like a dessert built on the humble yet iconic Oreo cookie. As a fervent fan of these classic chocolate sandwich cookies, it’s no surprise that my love for them translates directly into my dessert creations. This Chocolate Lasagna recipe, crowned with an irresistible Oreo cookie crust, stands as my absolute favorite “Lush” dessert. That’s a bold statement, considering my deep affection for equally delightful creations like Banana Cream Pie Lush and Coconut Cream Pie Lush.
For years, this no-bake chocolate lasagna has graced countless gatherings, always emerging as the most coveted and quickly devoured treat. If you’ve yet to experience the joy of making or tasting this extraordinary dessert, consider this your gentle nudge. Prepare to embark on a culinary journey where dreams are, quite literally, made of chocolate and cream!
What Exactly is Chocolate Lasagna?
Rest assured, despite its playful name, this delightful creation bears no resemblance to its savory Italian namesake. Chocolate Lasagna is simply a charming moniker for a spectacular layered chocolate dessert. Imagine a classic 13×9 inch casserole dish filled with successive layers of pure amazingness – much like its pasta counterpart, but entirely sweet and utterly decadent. This dessert is designed to be a showstopper, impressive in presentation yet surprisingly simple to assemble.
While some establishments, like Olive Garden, offer their own versions often featuring layers of cake, our interpretation of Chocolate Lasagna leans into a lighter, fluffier, and undeniably more luscious profile. It cleverly utilizes readily available store-bought ingredients, including the star Oreo cookies, velvety chocolate pudding, and a cloud-like whipped topping. The result is a dessert that, in my humble opinion, surpasses its more complex relatives with its ease, vibrant flavor, and melt-in-your-mouth texture.
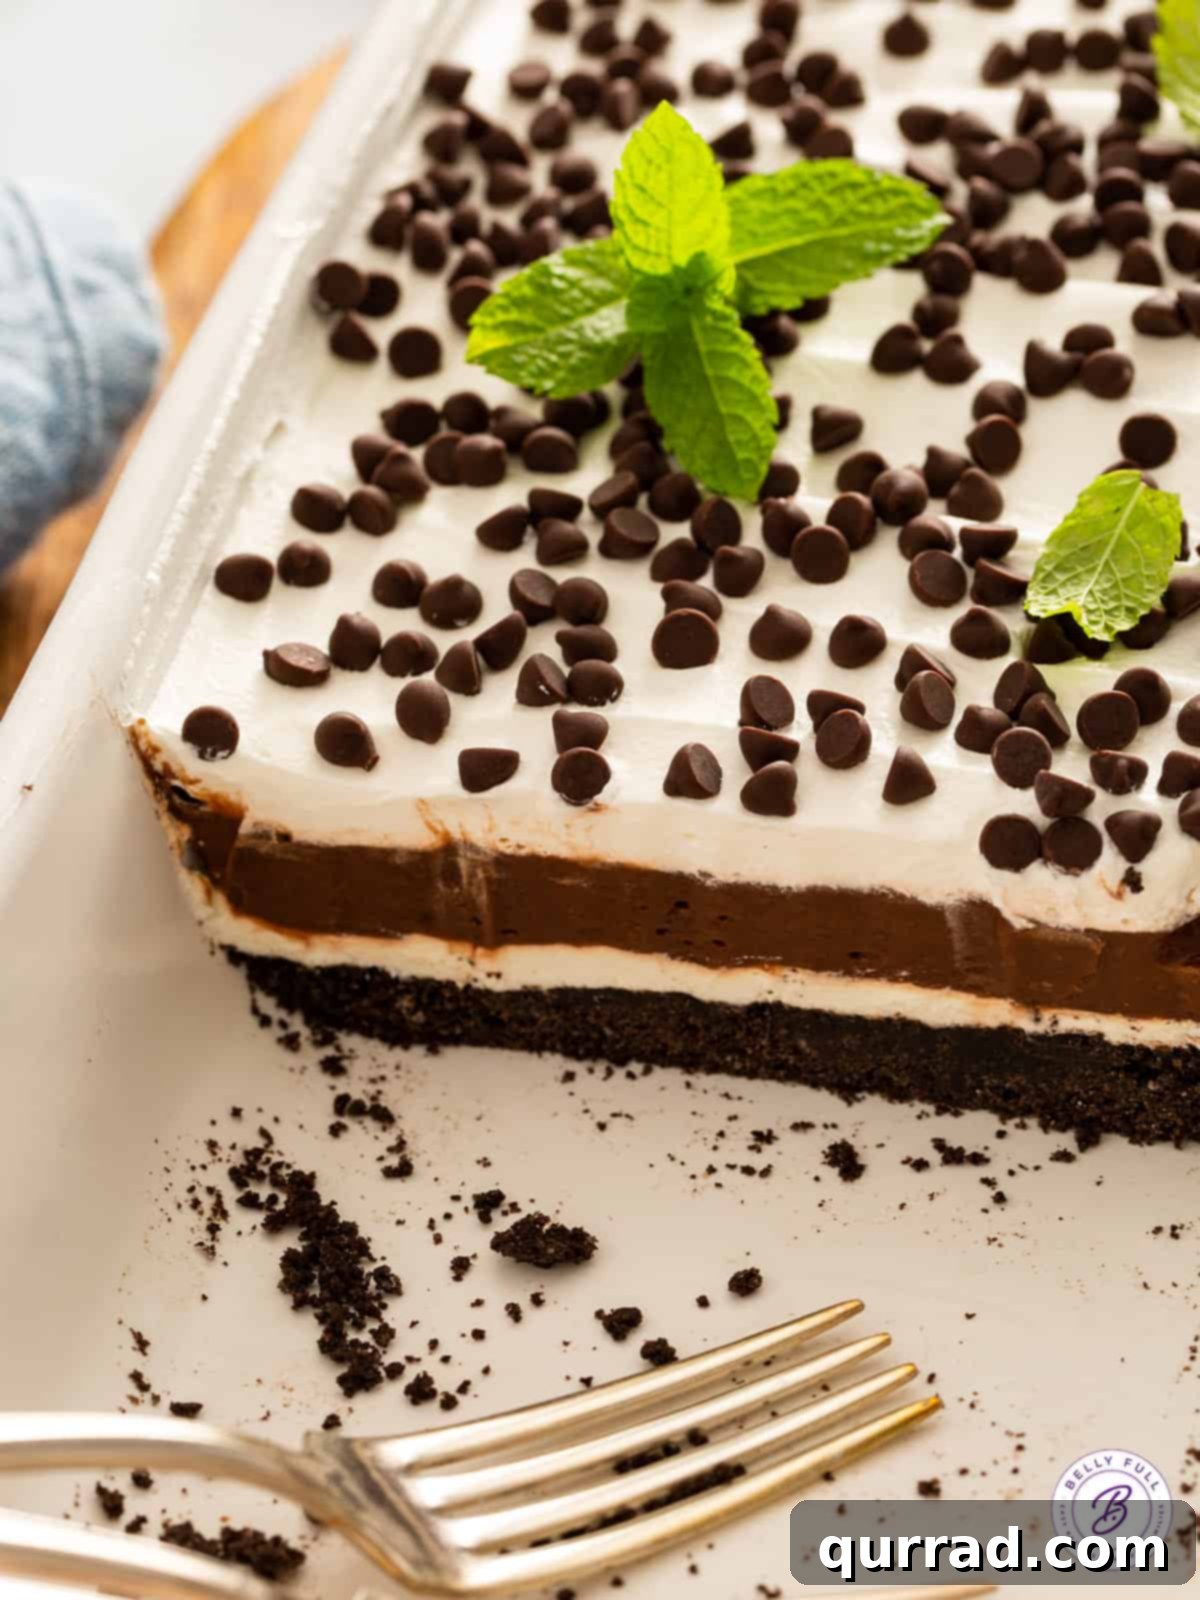
The Four Fabulous Layers: Ingredients Unveiled
The magic of this Oreo Lush lies in its distinct yet harmonious layers, each contributing a unique element to the overall masterpiece. Let’s delve into the components that create this sensational dessert:
- Crust Layer: The Foundation of Flavor – This crucial base is crafted from finely crushed Oreo cookie crumbs combined with rich melted butter. It creates a perfectly crunchy, chocolatey foundation that holds the entire dessert together and provides an irresistible contrast to the creamy layers above.
- Cream Layer: The Heart of Cheesecake Bliss – A luscious blend of softened cream cheese, granulated sugar, a splash of cold milk, and a portion of light whipped topping forms this dreamy layer. It’s wonderfully creamy and smooth, reminiscent of a classic cheesecake, offering a delightful tang that balances the sweetness.
- Chocolate Pudding Layer: Decadent and Smooth – For the ultimate chocolate fix, this layer is prepared with instant chocolate pudding and cold milk. Whisked until thick and velvety, it delivers a rich, intense chocolate flavor that is truly irresistible. Be warned: resisting the urge to sneak spoonfuls directly into your mouth will be a challenge!
- Whipped Topping Layer: A Cloud-Like Finish – The grand finale is a generous spread of light and airy whipped topping, creating a beautiful, fluffy crown for your lasagna. This is then sprinkled with a shower of mini chocolate chips, adding a final touch of chocolatey crunch and visual appeal. It’s a heavenly capstone to this delightful treat.
Crafting Your Chocolate Lasagna: A Simple Step-by-Step Guide
Creating this stunning no-bake chocolate dessert is surprisingly straightforward. Follow these steps for a perfectly layered and delicious result:
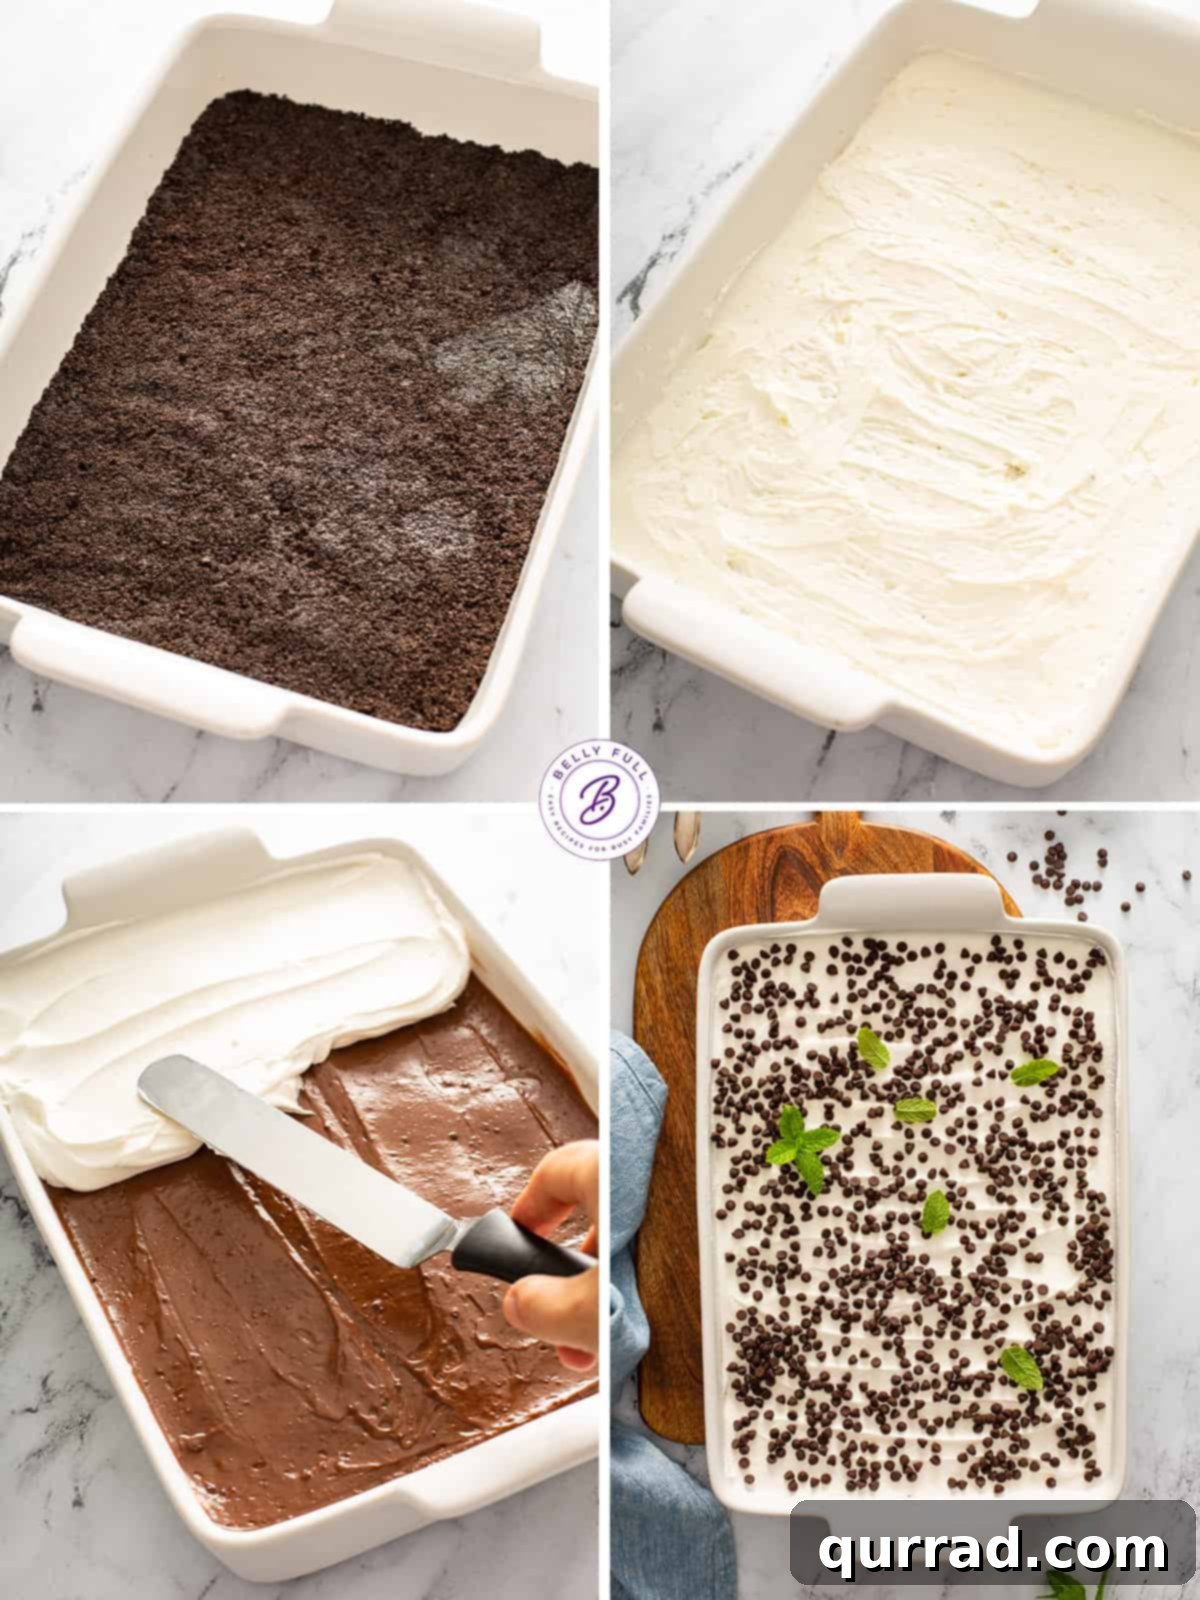
- Prepare Your Pan: Begin by coating a standard 9×13-inch baking dish generously with nonstick cooking spray. This critical step ensures your delicious crust won’t stick, making for easy serving. Set the prepared pan aside.
- Assemble the Oreo Crust: Take your 36 regular Oreo cookies (from a 14.3-ounce package) and blend them in a food processor until they are finely ground into uniform crumbs. Add 6 tablespoons of melted unsalted butter to the crumbs and pulse again until the mixture is well combined and resembles wet sand. Press this mixture firmly and evenly into the bottom of your prepared dish. Use the back of a spoon or a flat-bottomed glass to create a compact, smooth crust. Transfer the dish to the refrigerator to chill for at least 15 minutes, allowing the crust to firm up.
- Create the Creamy Cheesecake Layer: In a medium-sized mixing bowl, use an electric mixer to beat 8 ounces of softened cream cheese until it is light and fluffy, with no lumps. Gradually add 1/4 cup of granulated sugar and 2 tablespoons of cold milk, continuing to beat until the mixture is smooth and well combined. Gently fold in 1 cup of thawed Cool Whip until just incorporated – be careful not to overmix. Carefully and lightly spread this creamy mixture over the chilled Oreo crust, ensuring an even layer. Return the dish to the refrigerator for another 15 minutes to allow this layer to set slightly.
- Prepare the Decadent Chocolate Pudding: In a separate large bowl, combine the two small boxes (7.8 ounces total) of chocolate instant pudding mix with 3 & 1/4 cups of cold whole milk. Whisk vigorously and continuously for about 2 minutes, until the mixture becomes very thick and smooth. Let it sit for an additional 1-2 minutes to ensure it reaches its optimal thickened consistency. Once thickened, carefully spread the chocolate pudding layer evenly over the set cream cheese layer. Place the dish back into the refrigerator for at least 15 minutes to allow the pudding to firm up properly.
- Add the Whipped Topping and Garnish: Once the chocolate pudding layer has adequately set, gently spread the remaining Cool Whip (approximately 11 ounces) evenly over the top. Finish your Chocolate Lasagna by generously sprinkling 1 cup of mini chocolate chips over the whipped topping. For extra flair, you could also sprinkle with additional Oreo crumbs or chocolate shavings.
- Final Chill Time: This is a crucial step for achieving perfect slices. Place the entire dessert back into the refrigerator for a minimum of 3-4 hours before serving. Ideally, an overnight chill will yield the best results, allowing all the layers to fully set and meld together beautifully.
Tips for Achieving Chocolate Lasagna Perfection
While this no-bake dessert is inherently simple, a few expert tips can elevate your Chocolate Lasagna from great to absolutely unforgettable:
- Don’t Skip the Nonstick Spray: This might seem like a minor detail, but ensuring your pan is thoroughly coated with nonstick spray is paramount. Without it, the rich, buttery Oreo crust can stubbornly adhere to the bottom, making it challenging to serve neat slices. A well-greased pan means every slice lifts out beautifully.
- Ensure Your Pudding is Super Thick: When preparing the instant chocolate pudding, whisk it vigorously and for the recommended time (usually about 2 minutes), then let it rest. It’s essential that the pudding reaches a very thick, almost gel-like consistency before spreading it over the cream cheese layer. If the pudding isn’t thick enough, it won’t set properly, resulting in a runny layer that compromises the structural integrity and texture of your lasagna.
- Patience with Chilling is a Virtue: I understand the temptation to dive into this deliciousness immediately, but don’t skip the chilling steps! Each period of refrigeration is critical for allowing the individual layers to set firm and meld together. Skipping these steps will result in a dessert that is soft, messy, and difficult to slice, turning what should be a distinct layered treat into a mush. Plan ahead and give each layer its due chilling time.
- Achieving Picture-Perfect Slices: For those Instagram-worthy, clean-cut slices, here’s a professional trick: before cutting, place the entire pan in the freezer for about 20-30 minutes. This quick chill helps firm up all layers, making them easier to cut cleanly. Additionally, wipe your knife clean with a damp paper towel in between each slice. This prevents sticky residue from transferring between cuts, ensuring every piece looks pristine.
- Room Temperature Cream Cheese: For the smoothest, fluffiest cream cheese layer, ensure your cream cheese is at room temperature. This allows it to beat easily without lumps, creating a wonderfully consistent texture.
- Cold Milk for Pudding: Always use very cold milk for your instant pudding. Cold milk helps the pudding set faster and achieve a thicker consistency, which is crucial for this layered dessert.
Creative Variations & Customizations for Your Lush
One of the many joys of this Oreo Lush is its adaptability. Feel free to get creative and personalize your chocolate lasagna with these exciting variations:
- Mint Chocolate Lasagna: A Festive Twist – For a refreshing and holiday-friendly dessert, swap out the regular Oreos for Mint Oreos in your crust. Complete this festive variation by finishing the top layer with finely chopped Andes chocolates. It’s a delightful treat, especially popular during the Christmas season.
- Lemon Lasagna: A Zesty Summer Dream – If you’re a fan of citrus, this variation is for you! Replace the classic regular Oreos with Golden Oreos for the crust and, crucially, use instant lemon pudding instead of chocolate pudding for the middle layer. Lemon lovers will rejoice at this bright, tangy, and sweet combination. Other fruit puddings like banana or strawberry can also work beautifully.
- The Final Touch on Top: Endless Possibilities – While mini chocolate chips are a fantastic standard, don’t limit your creativity! Experiment with other delightful toppings like ground-up Oreos for extra crunch and texture, colorful chocolate sprinkles for a fun aesthetic, finely shaved chocolate, cocoa powder dusting, or even fresh berries for a burst of freshness.
- Reduced Sugar Options: Guilt-Free Indulgence – For those mindful of sugar intake, this dessert can be easily adapted. Utilize sugar-free instant pudding mixes and sugar-free whipped topping to create a lighter version that doesn’t compromise on flavor.
- Homemade Whipped Cream: A Gourmet Alternative – If you prefer to steer clear of store-bought whipped topping, feel free to substitute it with real homemade whipped cream. Beat heavy cream with a touch of sugar and vanilla until stiff peaks form. Note that homemade whipped cream has a slightly different consistency and doesn’t hold up as well to freezing as commercial whipped topping.
- Convert to Individual Parfaits: Elegant Servings – For a sophisticated presentation, transform this casserole into charming individual servings. Divide all the ingredients into approximately 15, 8-ounce glasses or small clear bowls, layering them just as you would in the pan. This creates beautiful Oreo Parfaits, perfect for parties where everyone gets their own perfectly portioned, super pretty dessert.
Proper Storage and Make-Ahead Magic
One of the many benefits of this No-Bake Chocolate Lasagna is its excellent make-ahead potential and ease of storage. Here’s how to keep your delicious dessert fresh:
- Storing Leftovers: Any leftover Chocolate Lasagna should be tightly wrapped in plastic wrap or transferred to an airtight container and stored in the refrigerator. It will maintain its deliciousness and texture for up to 3 days, though you might notice the consistency loosening slightly over time.
- Make Ahead for Convenience: This dessert is an absolute dream for entertaining! You can prepare your Chocolate Lasagna entirely the night before it’s needed. Simply assemble all the layers, cover the dish tightly with plastic wrap, and refrigerate overnight. This allows ample time for all the flavors to meld and the layers to set perfectly, making serving a breeze the next day.
- To Freeze for Later Enjoyment: Yes, you can freeze Chocolate Lasagna! To do so, first wrap the entire dish securely in plastic wrap, then add several layers of aluminum foil to prevent freezer burn. When you’re ready to enjoy it, thaw the frozen lasagna overnight in the refrigerator. Please note: while whipped topping (like Cool Whip) freezes and thaws well, real homemade whipped cream does not fare as well in the freezer; it tends to become watery and lose its texture upon thawing. Stick with whipped topping if you plan to freeze this dessert.
More Delicious Lush Recipes to Explore:
If you’ve fallen in love with the ease and deliciousness of this Oreo Lush, you’ll be thrilled to discover other amazing no-bake layered desserts in the “Lush” family. Each offers a unique flavor profile while maintaining the simple, satisfying structure you adore:
- Banana Cream Lush: A tropical delight with creamy banana goodness.
- Coconut Cream Lush: Perfect for coconut lovers, offering a sweet and exotic escape.
- Banana Split Lush: All the flavors of your favorite sundae in a convenient layered dessert.
- Pineapple Lush: A bright and refreshing option with a tangy twist.
I sincerely hope you adore this wonderfully easy and utterly delicious recipe. Your feedback means the world, so please be sure to give it a review below! And for more mouthwatering recipes and culinary inspiration, don’t forget to follow Belly Full on TikTok, Facebook, Instagram, Pinterest, and YouTube!
Chocolate Lasagna {Oreo Lush}
45 minutes
3 hours
3 hours 45 minutes
24
Pin
Ingredients
- 36 regular Oreo cookies (from a 14.3 ounce package)
- 6 tablespoons unsalted butter, melted
- 8 ounces cream cheese, softened
- 1/4 cup granulated sugar
- 2 tablespoons cold milk
- 12 ounces Cool Whip, thawed, divided
- 7.8 ounces (2 small boxes) chocolate instant pudding
- 3 & 1/4 cups cold whole milk
- 1 cup mini chocolate chips
Instructions
-
Coat a 9×13-inch dish generously with nonstick cooking spray and set aside.
-
Blend the Oreo cookies in a food processor until finely ground. Add in the melted butter and blend until well combined. Press the mixture evenly and firmly into the bottom of the prepared pan. Transfer to the refrigerator for 15 minutes to chill.
-
In a medium bowl with an electric mixer, beat softened cream cheese until fluffy. Add in the sugar and 2 tablespoons of milk; beat until smooth and combined. Gently fold in 1 cup of thawed Cool Whip. Spread this creamy mixture lightly and evenly over the chilled Oreo crust. Place back in the fridge for another 15 minutes to set.
-
In a separate large bowl, combine the instant pudding mix and cold milk. Whisk together vigorously until the mixture is very thick, about 2 minutes. Let it sit for an additional 1-2 minutes to thicken further. Then, carefully spread this rich chocolate pudding over the top of the cream cheese layer. Place the dish back in the fridge for another 15 minutes to allow the pudding to set properly.
-
Once the pudding has set, spread the remaining Cool Whip (approximately 11 ounces) evenly on top. Finish by sprinkling generously with mini chocolate chips.
-
Place the assembled dessert in the fridge for at least 3-4 hours (or preferably overnight) before serving, allowing all layers to firm up and flavors to meld beautifully.
Video
Notes
The pudding should be thick. Beat the instant pudding until it is super thick and has set properly; otherwise, the layer won’t hold its shape.
Each step requires chilling. Patience is key! Don’t skip these crucial chilling steps between layers. It’s critical so that each slice isn’t mushy and the layers remain distinct.
In order to get pretty clean slices, it helps immensely to place the pan in the freezer for 20-30 minutes prior to cutting, and also wipe off your knife with a paper towel in-between each cut for a neat finish.
Nutrition
Carbohydrates: 33g |
Protein: 4g |
Fat: 13g |
Saturated Fat: 7g |
Cholesterol: 25mg |
Sodium: 270mg |
Potassium: 132mg |
Fiber: 1g |
Sugar: 24g |
Vitamin A: 310IU |
Vitamin C: 1mg |
Calcium: 78mg |
Iron: 2mg
Nutritional information given is an automatic calculation and can vary based on the exact products you use and any changes you make to the recipe. If these numbers are very important to you, I would recommend calculating them yourself.