
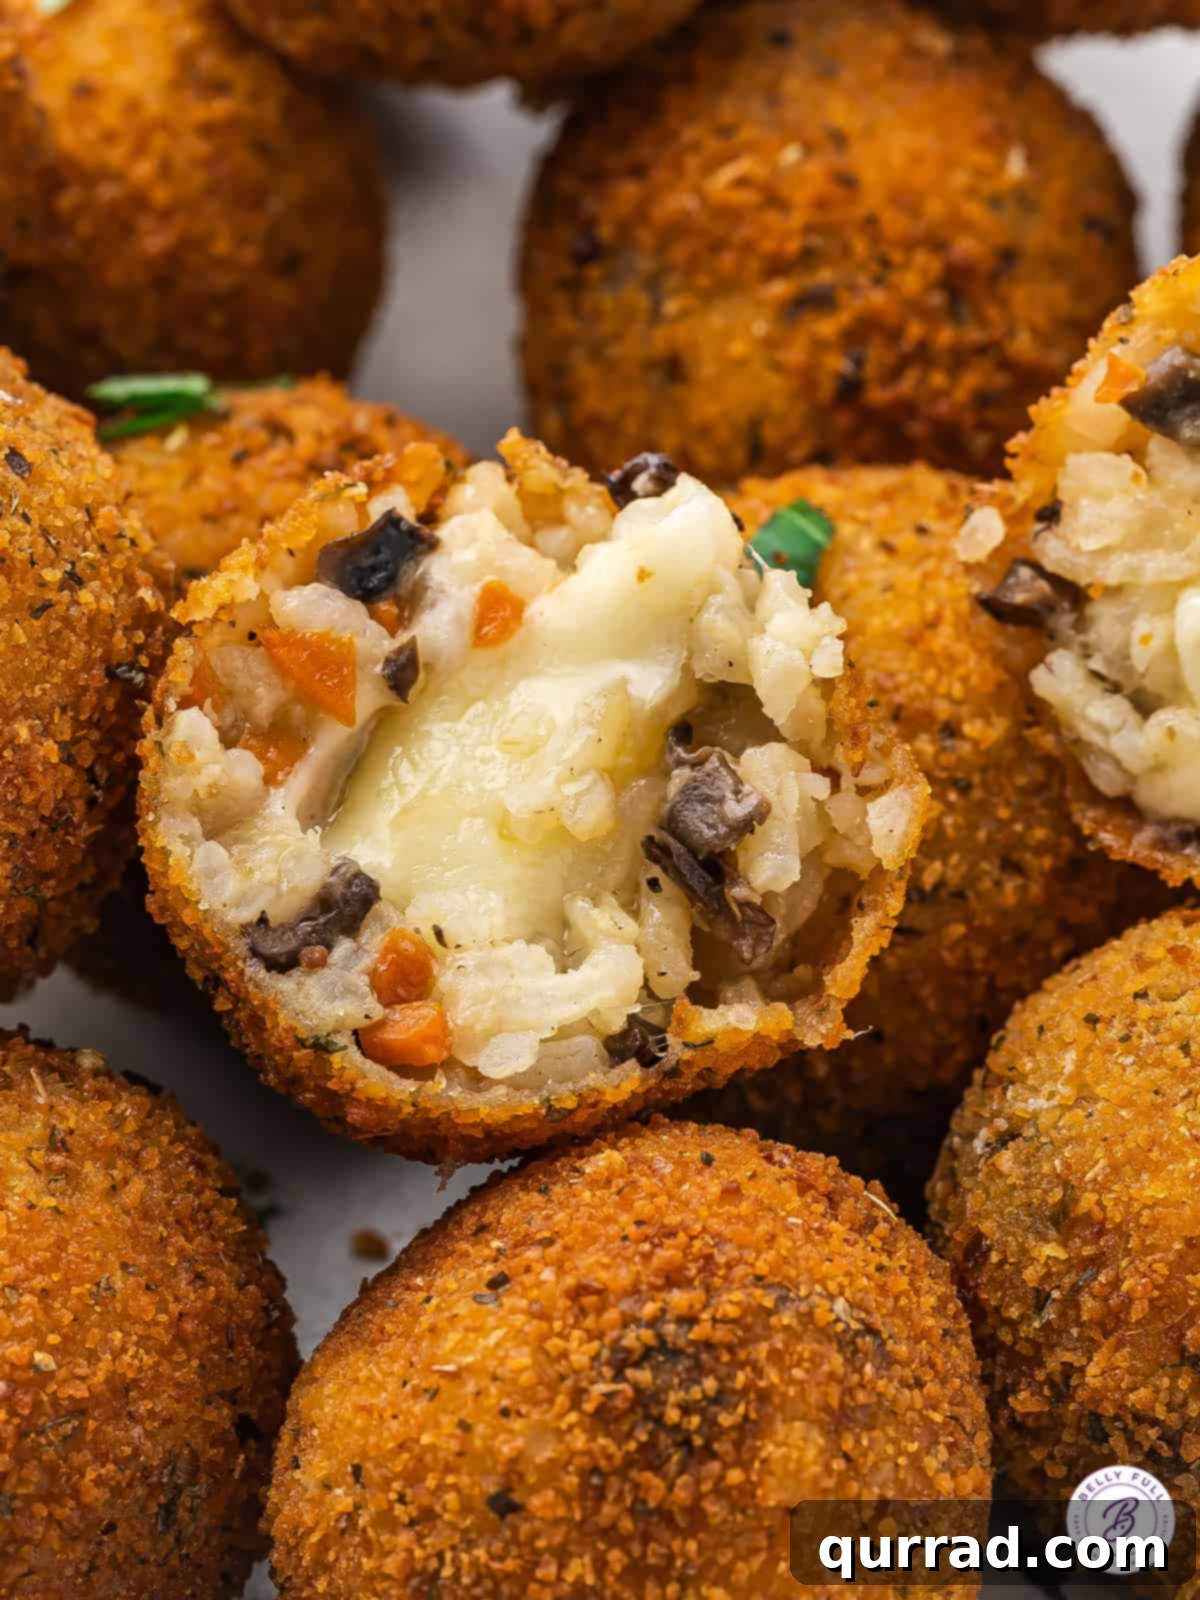
Indulge in the ultimate Italian comfort food with this exquisite Arancini recipe. Imagine perfectly cooked, creamy risotto, generously infused with cheese, then lovingly breaded and fried to a golden crisp. These delectable Italian rice balls are a celebration of flavor and texture, offering a restaurant-quality appetizer experience right in your home. Serve them warm with a vibrant marinara sauce for dipping, and prepare to impress!

A Stellar 5-Star Review
“I absolutely adored this recipe! It was a huge hit when I made it for my grandchildren. So much peace and love in every bite!” – Marcus
Mastering the Art of Homemade Arancini: Your Easy Recipe Guide
Have you ever had the pleasure of tasting Arancini? These iconic fried rice balls, originating from the beautiful island of Sicily, are much more than just an appetizer; they are a culinary journey. Named “little oranges” for their characteristic round shape and golden-orange hue after frying, Arancini boast a captivating contrast: a crunchy, seasoned breaded exterior yielding to a rich, creamy, and wonderfully cheesy risotto interior.
While often found gracing the menus of upscale Italian establishments, creating these delightful treats at home is surprisingly straightforward with our comprehensive guide. This Italian rice ball recipe is designed to be accessible for home cooks of all skill levels, making it perfect for entertaining, a special family dinner, or simply indulging in a taste of authentic Italy.
What Exactly Are Arancini? A Taste of Sicilian Tradition
Arancini are a staple of Sicilian cuisine, deeply rooted in the island’s culinary history. These delightful orbs of rice are typically made from leftover risotto, transformed into a new delicacy. While simple in concept, their execution is an art form, balancing rich flavors with contrasting textures. Common fillings vary by region, but often include ragù (meat sauce), mozzarella, peas, or, as in our recipe, a luxurious Gruyère cheese. The beauty of Arancini lies in their versatility and the sheer joy they bring to any table.
Why You’ll Fall in Love with This Arancini Recipe
There are countless reasons why this Arancini recipe will become a cherished favorite:
- Unbeatable Flavor Profile: The harmonious blend of savory risotto, rich cheese, and fragrant aromatics creates a depth of flavor that is truly irresistible.
- Perfect Texture Contrast: That satisfying crunch of the breaded crust giving way to the molten cheese and tender, creamy rice is what makes Arancini so special.
- Impressive Appetizer: These golden spheres look sophisticated and taste incredible, making them a fantastic choice for any gathering, from casual get-togethers to elegant dinner parties.
- Comfort Food at its Finest: Arancini offer a comforting, hearty bite that satisfies the soul, reminiscent of home-cooked Italian meals.
- Customizable: While our recipe features Gruyère, Arancini are highly adaptable. You can experiment with different cheeses and even add other ingredients to the risotto for your unique twist.
Essential Tips for Arancini Perfection
Crafting the perfect Arancini requires a few key techniques and a touch of patience. Follow these expert tips to ensure your fried Italian rice balls turn out flawlessly crispy, creamy, and utterly delicious every time:
- The Risotto Foundation is Crucial: The heart of any great Arancini is a well-made risotto. Do not rush the cooking process. Allow the Arborio rice to slowly absorb the liquid, stirring frequently. This patient approach, typically taking about 20-25 minutes, is vital for developing that signature creamy, al dente texture that holds the Arancini together and provides its luxurious mouthfeel. A dry or undercooked risotto will result in crumbly or hard rice balls.
- Chill Your Cheese for Optimal Melting: When adding the cheese cubes to the center of your Arancini, it’s crucial that they are well-chilled. Chilling helps the cheese maintain its form slightly longer when it hits the hot oil, preventing it from melting out too quickly and creating a messy situation. This ensures a beautiful, gooey cheese pull inside each rice ball.
- Achieve the Right Oil Temperature: This is arguably the most important tip for perfectly crispy (not greasy) Arancini. The oil must be adequately hot, ideally around 350°F (175°C), before you introduce the rice balls. If the oil isn’t hot enough, the breading will absorb excess oil, leading to a greasy, heavy Arancini. Conversely, if it’s too hot, the exterior will brown too quickly, leaving the interior cold. Use a kitchen thermometer to monitor the temperature and adjust the heat as needed throughout the frying process.
- Cool the Risotto Completely: After cooking, spread your risotto thinly on a baking sheet and allow it to cool completely in the refrigerator. This step is non-negotiable! Cold risotto is firm and much easier to handle, making the shaping of the rice balls a breeze. Trying to shape warm risotto will result in a sticky, unmanageable mess.
- Perfect Your Bread Crumb Coating: The triple-dredging method (flour, egg, breadcrumbs) is essential for a robust, crispy crust. Ensure each Arancini is fully coated at each stage, paying extra attention to patting on the breadcrumbs firmly. This thick coating acts as a protective barrier, preventing the rice from absorbing too much oil and ensuring maximum crispness.
- Fry in Batches: Avoid overcrowding your pan when frying. Frying too many Arancini at once will drastically lower the oil temperature, leading to greasy rice balls. Fry in small batches, typically 4-6 at a time, to maintain a consistent oil temperature and achieve uniform golden-brown results.
Classic Arancini (Fried Italian Rice Balls)
30
45
1
15
32
rice balls

Pin
Don’t miss the detailed step-by-step images following the recipe card!
Ingredients
-
2
tbsp
olive oil,
divided -
½
cup
shallots,
finely minced -
2
cloves
garlic,
minced -
½
cup
cremini mushrooms,
finely minced -
¼
cup
carrots,
finely minced -
1½
cups
dry Arborio rice -
½
cup
dry white wine -
3
cups
vegetable broth -
½
cup
grated Parmesan cheese -
salt and pepper,
to taste -
3
tbsp
unsalted butter -
1
cup
Gruyère cheese,
cut into small 1/2-inch cubes, chilled -
½
cup
all-purpose flour -
3
eggs,
beaten -
1
cup
Italian style breadcrumbs -
vegetable oil,
for frying -
fresh chopped parsley,
for garnish -
marinara sauce,
for dipping
Instructions
-
Heat 1 tablespoon of olive oil in a large nonstick skillet over medium heat until shimmering. Add the finely minced shallots and sauté for a few minutes until they become tender and translucent. Stir in the minced garlic and cook for another minute until fragrant. Incorporate the finely minced cremini mushrooms and carrots, cooking until they release their moisture and soften. Transfer this flavorful vegetable mixture to a separate bowl and set it aside to cool; it will be added to the cooked rice later.
-
Return the same pan to medium heat and add the remaining 1 tablespoon of olive oil along with the Arborio rice. Toast the rice for 1-2 minutes, stirring constantly, until the edges become slightly translucent. Pour in the dry white wine and cook, stirring, until the wine is completely absorbed by the rice. Begin adding the vegetable broth, one cup at a time, stirring continuously. Allow each addition of liquid to be fully absorbed by the rice before adding the next cup. This crucial step, which develops the risotto’s creamy texture, will take approximately 20-25 minutes. Patience is key here.
-
Once the risotto is beautifully creamy and cooked al dente (meaning it still has a slight bite to it), remove the pan from the heat. Stir in the grated Parmesan cheese, the previously cooked vegetable mixture, salt, pepper to taste, and the unsalted butter until everything is well combined and the butter has melted.
-
Spread the warm risotto mixture evenly onto a large, rimmed baking sheet. This allows it to cool down quickly and thoroughly, which is essential for shaping. Let it cool completely at room temperature, then ideally transfer it to the refrigerator for at least 1-2 hours (or even overnight) to ensure it is firm enough to handle.
-
Once the risotto is firm and completely cooled, take a small portion (about 2 tablespoons) of the mixture. Flatten it slightly in your palm, place a small 1/2-inch cube of chilled Gruyère cheese in the center, and then carefully enclose the cheese with the rice mixture, forming a compact, 2-inch round ball. Ensure there are no cracks for the cheese to escape during frying. Repeat this process with the remaining risotto and cheese cubes.
-
Prepare your breading station by setting up three shallow bowls. In the first bowl, place the all-purpose flour. In the second, pour the beaten eggs. In the third, add the Italian-style breadcrumbs. Dredge each Arancini ball first in the flour, ensuring it’s lightly but fully coated, then dip it into the beaten eggs, allowing any excess egg to drip off. Finally, roll the ball thoroughly in the Italian-style breadcrumbs, pressing gently to ensure a thick and even coating. This triple-dredging technique creates a robust, crispy crust. Repeat for all the rice balls.
-
In a medium-sized, heavy-bottomed pan or Dutch oven, heat about 1 inch of vegetable oil over medium heat until it reaches a temperature of 350°F (175°C). Use a kitchen thermometer to verify the temperature. Carefully lower the Arancini into the hot oil in batches (frying about 6 at a time to avoid overcrowding and dropping the oil temperature). Fry them for approximately 3 minutes per batch, turning occasionally, until they are beautifully golden brown and crispy on all sides. Try your best to maintain a consistent oil temperature throughout the frying process.
-
Once fried to perfection, use a slotted spoon or spider to carefully remove the Arancini from the hot oil. Transfer them immediately to a plate lined with paper towels to drain any excess oil.
-
Allow the Arancini to cool for about 5 minutes before serving; this helps the interior cheese set slightly and prevents burns. Serve them warm, generously sprinkled with fresh chopped parsley for a burst of color and freshness, alongside a warm bowl of your favorite marinara sauce for dipping. Enjoy your homemade taste of Italy!
Recipe Video Guide
Watch this helpful video to see each step of making Arancini come to life. Visual guidance can make all the difference in perfecting your Italian rice balls!
Click here to watch the Arancini recipe video!
Chef’s Notes & Variations
- Cheese Alternatives: While Gruyère offers a wonderfully nutty and creamy melt, feel free to experiment with other cheeses. Fresh mozzarella is a classic choice, but ensure you squeeze out any excess moisture before cubing it to prevent it from making the Arancini soggy or bursting during frying. Provolone or a blend of Italian cheeses can also be delicious.
- Wine Substitution: The dry white wine in this recipe not only adds a layer of complex flavor but also enhances the aroma of the risotto. The alcohol content evaporates completely during cooking, leaving only a nuanced taste. However, if you prefer to omit alcohol, you can easily replace the white wine with an equal amount of vegetable broth without significantly compromising the final result.
- Flavor Enhancements: For an extra layer of flavor in your risotto, consider adding finely chopped fresh herbs like thyme or rosemary along with the vegetables. A pinch of saffron steeped in a little warm broth can also add a beautiful color and exotic aroma to your Arancini.
- Make-Ahead Risotto: The risotto base can be prepared a day in advance and stored in an airtight container in the refrigerator. This can significantly reduce prep time on the day you plan to fry the Arancini. Just make sure it’s completely chilled before shaping.
Nutrition Information
Serving:
1
rice ball
|
Calories:
103
kcal
|
Carbohydrates:
12
g
|
Protein:
4
g
|
Fat:
4
g
|
Saturated Fat:
2
g
|
Polyunsaturated Fat:
0.4
g
|
Monounsaturated Fat:
2
g
|
Trans Fat:
0.04
g
|
Cholesterol:
24
mg
|
Sodium:
177
mg
|
Potassium:
51
mg
|
Fiber:
1
g
|
Sugar:
1
g
|
Vitamin A:
322
IU
|
Vitamin C:
0.4
mg
|
Calcium:
67
mg
|
Iron:
1
mg
Nutritional information provided is an estimated automatic calculation and may vary based on the specific brands and products used, as well as any modifications made to the recipe. For precise dietary information, it is recommended to calculate these values independently.
Never Lose a Recipe!
Want to keep this delicious Arancini recipe handy? Simply bookmark this page or subscribe to our newsletter to receive new recipes directly in your inbox every week!
Click here to subscribe!
Did you make this? We’d love your feedback! Leave a rating below!
A Visual Journey: How to Make Arancini Step by Step
For those who learn best with visual aids, our step-by-step photos walk you through each crucial stage of making perfect Arancini. Follow along to ensure every rice ball is a masterpiece!
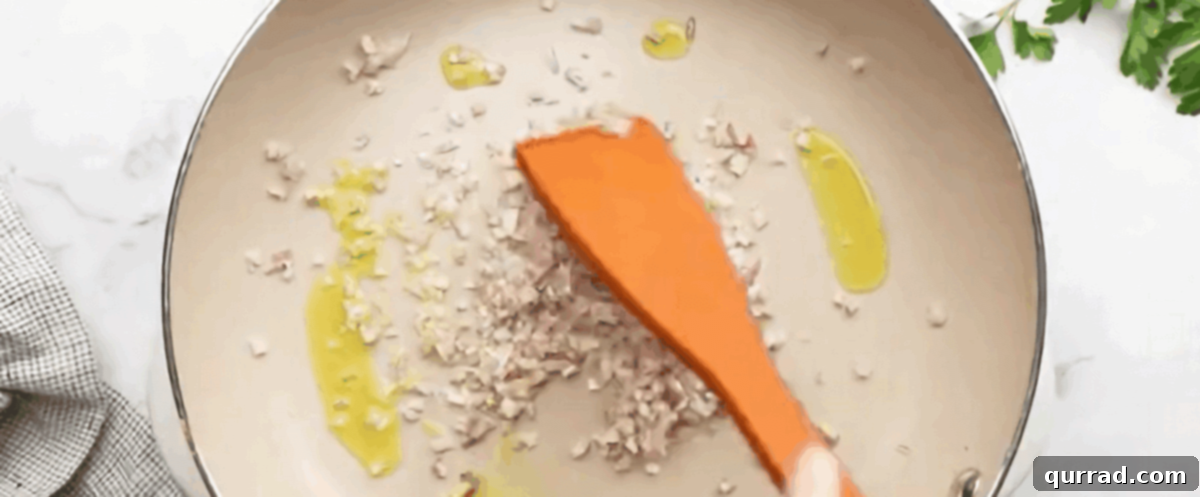
1. Prepare the Aromatic Base: Begin by heating 1 tablespoon of olive oil in a large nonstick skillet. Once shimmering, add ½ cup of finely minced shallots and sauté until they are soft and translucent. Stir in 2 cloves of minced garlic until fragrant, then add ½ cup of finely minced cremini mushrooms and ¼ cup of finely minced carrots. Cook these vegetables until they have released their moisture and become tender. Set this flavorful mixture aside in a separate bowl.
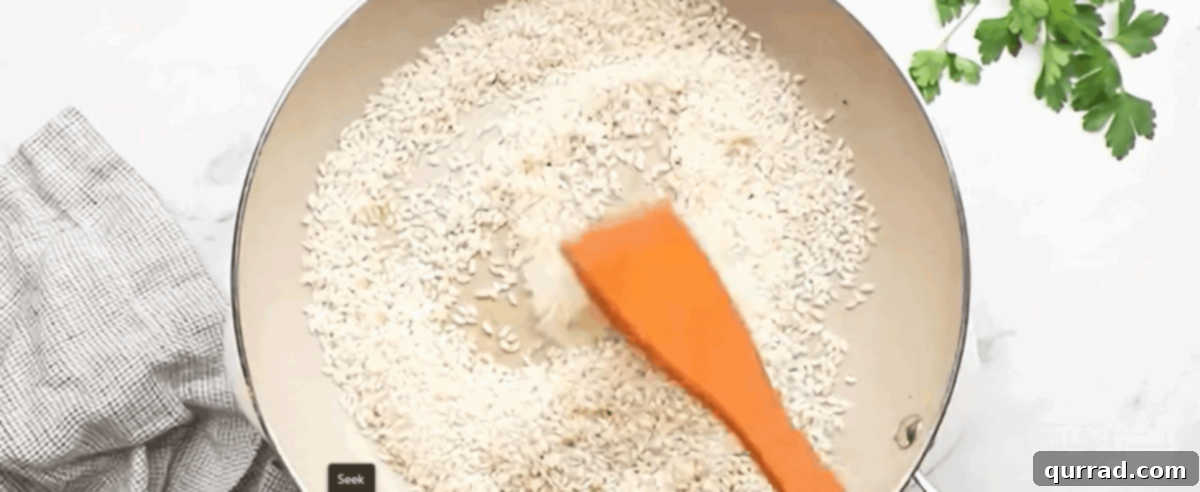
2. Craft the Creamy Risotto: Using the same pan, add the remaining 1 tablespoon of olive oil along with 1 ½ cups of Arborio rice. Toast the rice for 1-2 minutes until it becomes slightly opaque. Pour in ½ cup of dry white wine, stirring until it is fully absorbed. Then, begin adding 3 cups of vegetable broth, one cup at a time. Stir continuously, allowing the rice to completely absorb each addition of broth before adding the next. This slow and steady process, taking about 20-25 minutes, is vital for developing the risotto’s characteristic creamy texture.
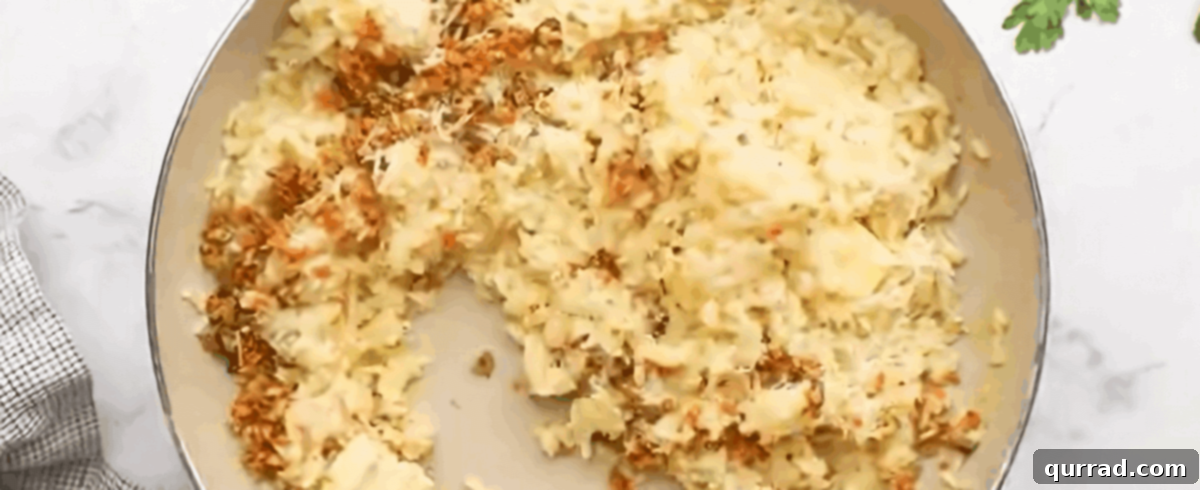
3. Infuse and Cool the Risotto: Once the risotto is perfectly creamy and al dente, remove it from the heat. Stir in ½ cup of grated Parmesan cheese, the sautéed vegetable mixture you prepared earlier, a generous pinch of salt and pepper to taste, and 3 tablespoons of unsalted butter until everything is thoroughly combined. Immediately spread the warm risotto mixture thinly onto a large rimmed baking sheet. This ensures quick and even cooling, which is essential for proper shaping. Allow it to cool completely, preferably in the refrigerator for at least an hour.
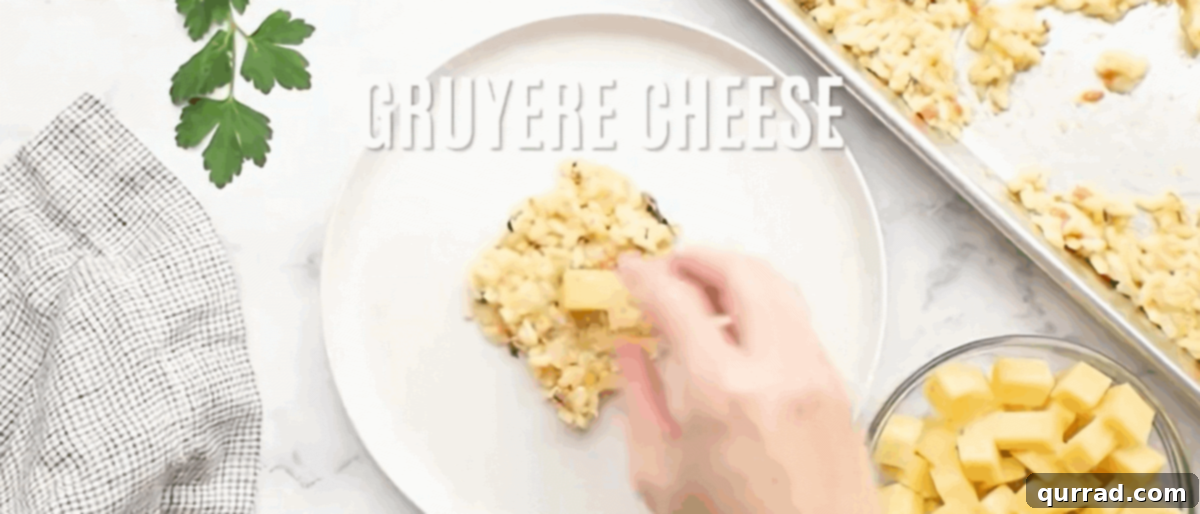
4. Shape the Arancini Balls: Once the risotto mixture is firm and completely cooled, take a portion (about 2 tablespoons) and gently flatten it in the palm of your hand. Place a small, chilled cube of Gruyère cheese in the center. Carefully mold the risotto around the cheese, sealing it completely to form a smooth, 2-inch round ball. Ensure there are no visible cracks to prevent the cheese from escaping during frying. Repeat this process until all the risotto mixture and cheese cubes are used.
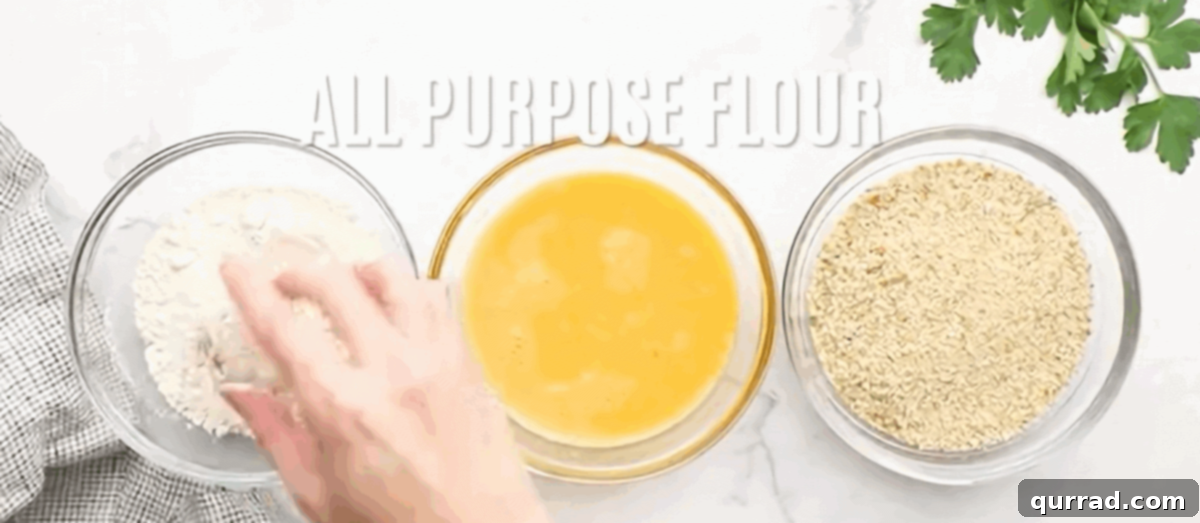
5. Create the Crispy Coating: Set up a dredging station with three shallow bowls. Fill the first with ½ cup of all-purpose flour, the second with 3 beaten eggs, and the third with 1 cup of Italian-style breadcrumbs. Take each shaped Arancini ball and first dredge it lightly in the flour, ensuring an even coat. Then, dip it into the beaten eggs, letting any excess drip off. Finally, roll it thoroughly in the Italian breadcrumbs, gently pressing the crumbs onto the surface to ensure a thick and complete coating. This triple layer will result in that irresistible golden crunch.
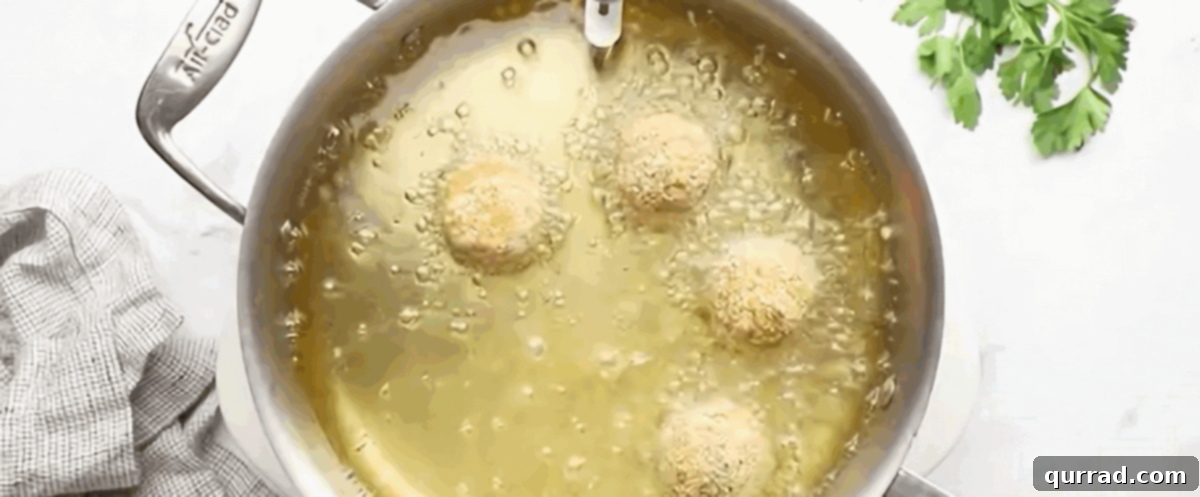
6. Fry to Golden Perfection: In a medium-sized, heavy-bottomed pot or Dutch oven, heat about 1 inch of vegetable oil to a temperature of 350°F (175°C). Use a kitchen thermometer to ensure accuracy. Carefully place the breaded Arancini into the hot oil in batches of about 6, making sure not to overcrowd the pan, which would lower the oil temperature. Fry for approximately 3 minutes per batch, turning them occasionally, until they are evenly golden brown and wonderfully crispy on all sides. It’s important to maintain a consistent oil temperature throughout the frying process for the best results.

7. Serve and Savor: Once fried, use a slotted spoon to transfer the Arancini to a plate lined with paper towels to drain any excess oil. Allow them to cool for about 5 minutes before serving to ensure the cheese is perfectly melted but not scalding hot. Garnish generously with fresh chopped parsley for a pop of color and serve immediately with warm marinara sauce for dipping. Get ready for an explosion of flavors!
Storing and Reheating Your Delicious Arancini
Arancini are best enjoyed fresh, but they can be stored and reheated while maintaining much of their deliciousness. This makes them an excellent make-ahead appetizer!
Refrigeration
Once your Italian fried rice balls have cooled completely, place them in an airtight container and store them in the refrigerator for up to 3 days. To prevent them from becoming soggy, you might place a paper towel at the bottom of the container.
Reheating
For the best reheating results that restore their crispy exterior, avoid the microwave. Instead, reheat Arancini in an air fryer at 350°F (175°C) for 8-10 minutes, or in a preheated oven at 375°F (190°C) for 15-20 minutes, or until they are heated through and crispy. This method ensures the outside is restored to its golden, crunchy glory.
Freezing Instructions
Arancini freeze beautifully! After the Arancini have cooled completely (do not freeze when warm), arrange them in a single layer on a baking sheet and place them in the freezer. Once they are solid (this usually takes a few hours), transfer the frozen rice balls to a freezer-safe container or a heavy-duty plastic freezer bag. They can be stored in the freezer for up to 3 months.
Reheating from Frozen
To reheat frozen Arancini, there’s no need to thaw them first. Simply place them directly in a preheated air fryer at 350°F (175°C) for 15-20 minutes, or in an oven at 375°F (190°C) for 25-30 minutes. Cook until they are heated through and the exterior is crispy. This method ensures a warm, cheesy center and a perfectly crisp shell, making them taste almost as good as fresh!
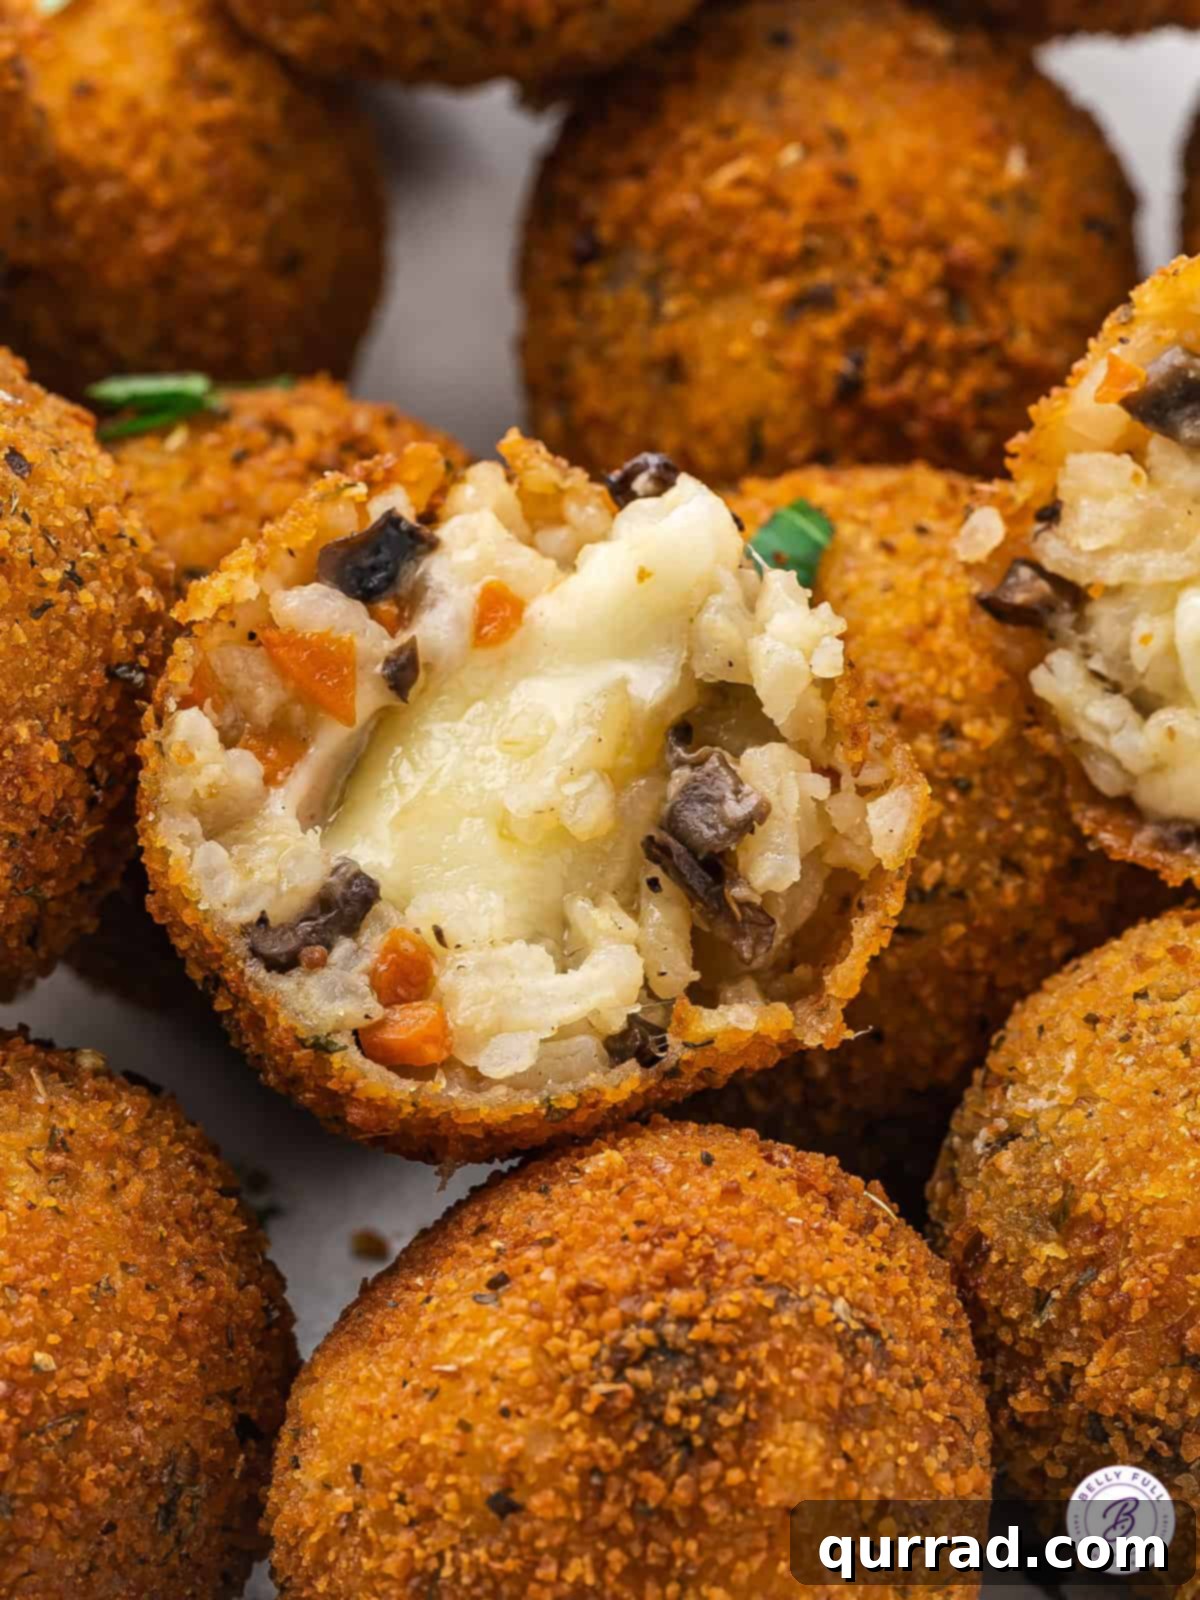
Ideal Pairings: What to Serve With Arancini
Arancini are incredibly versatile and make a fantastic appetizer, snack, or even a light meal. Here’s how to best enjoy these fried Italian rice balls:
- Classic Dipping Sauce: The most traditional and undeniably delicious pairing is a rich and vibrant homemade marinara sauce for dipping. Its tangy sweetness perfectly complements the savory, cheesy Arancini.
- Fresh Garnish: Always sprinkle your plated Arancini with fresh chopped parsley just before serving. Not only does it add a beautiful pop of color, but its herbaceous notes also brighten the dish.
- Beyond Marinara: While marinara is king, don’t hesitate to explore other dipping options. A creamy pesto aioli, a spicy Calabrian chili dip, or even a simple lemon-garlic mayonnaise can offer exciting new flavors.
- As an Italian Appetizer Spread: Create an authentic Italian appetizer spread by serving Arancini alongside other delicious small bites. Consider a flavorful olive tapenade, a rustic bread dipping oil with crusty bread, or even some delicate crab stuffed mushrooms or baked brie for a richer touch.
- Main Course Accompaniment: Arancini can also serve as a delightful starter to a full Italian meal. Pair them with classic pasta dishes like a light and elegant seared scallop piccata, a hearty and luscious spaghetti carbonara, or the rich and creamy penne alla vodka.
- Don’t Forget Dessert: To complete your Italian dining experience, follow up with a refreshing affogato – a scoop of vanilla gelato drowned in a shot of hot espresso. It’s the perfect sweet and bitter contrast after savory Arancini.
Frequently Asked Questions About Arancini
Here are some common questions about making and enjoying Arancini:
What kind of rice is best for Arancini?
Arborio rice is the gold standard for Arancini. Its high starch content is crucial for achieving the creamy texture of risotto, which then allows the rice balls to hold their shape perfectly when cooled and fried. Other short-grain rice varieties can work, but Arborio provides the best results.
Can I bake Arancini instead of frying them?
While traditional Arancini are fried, you can bake them for a lighter option. Preheat your oven to 400°F (200°C) and lightly spray the breaded rice balls with cooking oil. Bake for 20-25 minutes, flipping halfway through, until golden brown and crispy. Keep in mind that the texture won’t be as intensely crispy as deep-fried Arancini, but they will still be delicious.
What are some popular Arancini fillings?
Beyond our cheesy risotto, popular Sicilian Arancini fillings include ragù (a rich meat sauce often with peas), butter and ham, spinach and ricotta, or even pistachio. The possibilities are endless, allowing for great culinary creativity!
Can I make the risotto ahead of time?
Absolutely! Preparing the risotto a day in advance is highly recommended. Not only does it save time on the day you plan to fry, but chilling the risotto overnight makes it much firmer and easier to shape into perfect Arancini balls. Just store it in an airtight container in the refrigerator.
Why do my Arancini fall apart when frying?
Several factors can cause Arancini to fall apart: the risotto wasn’t cooled sufficiently before shaping, the rice balls weren’t formed tightly enough, or the breading wasn’t thick and even. Also, ensure your oil temperature is consistent; if it’s too low, the Arancini will soak up oil and become heavy, potentially breaking apart.
More Irresistible Appetizers to Explore
If you loved making and devouring these Arancini, you’ll surely enjoy these other easy and flavorful appetizer recipes:
- Flavorful Mixed Olive Tapenade: A quick and elegant spread for crostini or crackers.
- Mediterranean Bread Dipping Oil: Simple yet addictive, perfect for crusty bread.
- Decadent Crab Stuffed Mushrooms: Savory, cheesy, and utterly delicious.
- Crispy Golden Crab Cakes: A seafood classic that never disappoints.
- Elegant Baked Brie with Jam and Nuts: A warm, gooey, and impressive crowd-pleaser.
- Authentic Filipino Lumpia: Crispy spring rolls filled with savory meat and vegetables.